
Again continuing on the theme of summer and it being really nice I thought I’d make a fruit tart. Is a thing I remember seeing at gatherings at my nana’s garden when I was little. She always had a really really pretty fruit tart in the middle of the table when we ate our sort of picnic lunch.
It’s a relatively straight forward thing to make but requires all the elements to be done well to get the “show stopping” final result.
I normally take loads of photographs in my blog but because there are quite a few elements to the tart I’d be here forever. Instead I just photographed the final finished article. Anyways here’s how I thought the simplest way to go about it was:
Pastry Case
120g of plain flour
120g of unsalted butter
60g of caster sugar
Teaspoon of salt
Splash of cold water
Place the flour, butter salt and sugar in a food processor and blitz until you get a breadcrumb consistency. Now a little at a time add the water until the dough starts coming together. Just before it does stop mixing. Turn it out onto a floured work surface and bring together by hand into a ball, cover in cling film and chill in the fridge for half an hour.
Meanwhile line a tart tin with butter and greaseproof paper on the bottom. When the pastry is well chilled, roll it out to about a half centimetre thick and get it onto the lined tin. Press is into the edges and then chill again for 10 minutes to firm up.
Preheat the oven to 170 degrees C and when the tart case has firmed up, prick the bottom with a fork all over, cover with greaseproof paper and cover with baking beans to weigh the pastry down and bake for about 15 mins.
After 15 mins, remove the greaseproof paper and beans and return to the oven for another 5 mins for the base to cook. Once cooked, leave to stand in the tin for 10 mins then trim around the top to make the tart case level all the way around. Remove from the tin and leave to cook completely.
The Creme Patissiere
4 medium egg yolks
65g caster sugar
30g plain flour
350ml whole milk
1 teaspoon of vanilla extract
First thing to do here is to get the milk in a pan with the vanilla extract and bring up to a simmer. Once it’s got to this stage turn it off the heat.
Meanwhile whisk the egg yolks with the sugar until its a pale blonde colour. Then add in the flour and whisk until combined.
When the milk is up to temperature, pour half of it into the egg mixture and whisk continuously. Once combined, add it back to the pan continuing to whisk. Continue to whisk on the heat until the mix thickens to a runny custard consistency. It will thicken when cool.
Pour into a suitable container and place a cling film on the top so it doesn’t form a skin on top. Place in the fridge to cool.
Once both the pastry shell and the creme Patissiere are cool, pour the pastry cream into the shell.
Decorate the top of the tart with whatever fruit you like. I used strawberries, blueberries and kiwi fruit. Make it look pretty though. Contrasting colours work best like green and red and the blue of the blueberries just breaks it up a little.
When its decorated, water down a little apricot jan and brush over the top of the fruit. It’ll make it nice and glossy.
Enjoy!!!

So a friend of mine is obsessed with a popular Portuguese/Mozambique chicken chain restaurants sauce (which is widely available in shops I might add). So obviously she asked me how to make it.
Now the chain restaurants sauce is obviously a guarded secret, much like Another well known fast food outlets burger sauce. So I had to begin with a little research. I knew I wasn’t going to find the exact recipe for the sauce in question but I’d give it a good go at making one.
As is the way with me I make things as simple as possible. Simplest thing would be to go and buy a bottle but to be honest I like to know what’s in my food and If sauces you make yourself have complete control to adjust it too. Here’s what I managed to come up with:
Note: Again I saw this as a great opportunity for a fridge clear out. I used quite a few bits of veg that I had in there that needed using so just do the same.
4 tablespoons of olive oil
Juice of 2 limes
4 spring onions
3 cloves of garlic (crushed)
4 scotch bonnet chillies (this made the sauce really really really hot, just use normal red chillies if you don’t want it really spicy)
1 teaspoon of white wine vinegar
1 tablespoon of smoked paprika
1 teaspoon of onion powder
1 bay leaf
1 teaspoon of dried oregano
1/2 teaspoon of cumin seeds
1 teaspoon of sea salt
1/2 teaspoon of cracked black pepper
Basically it’s simply a case of throwing it in a blender and blitz until everything is very smooth. With the scotch bonnets I just threw them in whole with the stems on and everything. Piri piri sauce is meant to new fiery and this recipe certainly is that.

Well, as we’re in the middle of a mini heat wave (or the great British summer as I call it) thought I’d make some more raspberry ripple ice cream. I’ve made this before and it was dead easy. Why would I bother buying an ice cream machine and letting it churn away for a couple of hours when I can make it this way in 10 minutes, bang it in the freezer and forget about it. Easy peasy.
The cost of the ingredients too are minimal too. Will cost less than a fiver to knock up a large batch, cheaper than buying the premium branded ice creams that cost a fiver for a little tub. Here’s what your gonna need:
1/2 pint of double cream
4 eggs, separated
140g of caster sugar
1 teaspoon of vanilla extract
1 punnet of raspberries (about 150g)
First of all I’d make the raspberry syrup. Place the raspberries in a small saucepan with 40g of caster sugar and get the heat going on low to medium. The sugar will start to caramelise the raspberries so keep giving the pan a little swirl every now and again.

After a bit the raspberries will break down and you’ll be left with a purée.

Pass the mixture through a sieve and set aside to cool down a little.

Next job is to whisk up the egg whites to a soft peak stage then slowly add the rest of the caster sugar until it forms a really glossy and shiny stiff peak. I used my mixer but you can always use a hand whisk if you don’t have one.

While the egg whites are mixing, you can whisk up the cream. I used an electric whisk because I’d have been there forever doing it by hand. If you don’t have an electric whisk, unlucky. Time for a workout. You want the cream to be at a thickly whipped consistency, if you fold ribbons in it they will hold there shape.

When its whipped, fold in the vanilla extract and the egg yolks and then there combined, fold in the meringue mixture.

Now you can put the cream mixture into plastic tubs suitable for the freezer but I didn’t have any left so I used a loaf tin lined with cling film. Pour the cream mix into whatever you’ve got then tip in the raspberry purée and with the bottom end of a spoon swirl around. You don’t want to mix them together just create “strands” of raspberry purée throughout the cream. After that chuck it in the freezer and leave for a couple of hours to set up.

And that’s it.
If you get everything on the go at once you really can get it done in about 10 minutes.

In a former life I seem to have been a baker to be honest because its all I find myself doing recently. This is the next instalment of bread making: Focaccia.
Like most breads its relatively simple to make and tastes great. Looks pretty decent too. The last time I made this I had it with lasagne (seen as its Italian and all that). But it’s bread, it goes well with pretty much anything. Be good as like a little starter with oil and vinegar to dip in too, but I’m not gonna tell you how to eat it, just how to make it…..
You’ll need:
500g strong white flour
10g of salt
10g of yeast
100ml or thereabouts of a really good quality olive oil
340ml of water
Tablespoon of sea salt
Tablespoon of dried Oregano
Note: Since this is a oil enriched dough, it really is worth getting a really good quality olive oil. I used some Sicilian extra virgin stuff that was in the “premium” bit on the supermarket shelf. Worked amazing but to be honest get what’s affordable. It’s bread, don’t break the bank for it.
I always use my kitchen aid attached with a dough hook for bread but if you don’t have one its all good, just means you’ll have to knead the dough by hand.

So, first of all get the yeast into the water and set aside. In the mixers bowl put the flour, salt and 40ml of the olive oil in the bowl and set going on a low speed. Once the water and yeast mixture is a bit frothy, slowly add it into the mixture and keep it going on a low speed for around 5-7 mins. Its going to be a wetter dough than regular bread so if it sticks to the sides of the mixers bowl, pour around a little olive oil to bring it away.
While that’s mixing, oil up a square baking dish or tin (about a 2-3 litre capacity one). It needs to be square to help with the shape of the bread. Once the bread dough is at a soft stringy consistency, place it in the oiled dish, cover and leave to prove until doubled in size.

Once proved, coat a work surface with yet some more olive oil (told you it was an oil enriched dough), sprinkle with a little fine semolina flour and gently tip the dough out onto the work surface. Normally now you’d knock the air out of the dough and leave it to prove but you want to keep as much in this time as possible. Carefully split the dough in half and place onto two greasproof paper lined sheet pans and leave to prove yet again until doubled in size.
Now this step is easier said than done to be honest. It’s a really wet and ‘loose’ dough so I find it easier to get the lined trays close and try do it in one quick motion. It’s not gonna hold its shape but as long as it don’t split in half or anything just press it gently back into shape once its on the tray.

Anyways, once its proved again, get ya oven on to about 220 degrees C. Then, with your finger, press random spaced out holes into the dough right through to the bottom. Sprinkle with the sea salt and oregano on top with a drizzle more oil.

Bake for around 15 mins. Should be a nice golden brown on top and sound hollow when tapped on the bottom when done. Place on a wire rack, drizzle with yet more olive oil and leave to cool. Serve however you like but it’s a good one, you’ll enjoy it!!!


So with me having me new cookbook, this was one of the ‘hot recipes’ i had to have a go at straight away. It ticked all the boxes for me. If it was on a menu in a restaurant, I’d have ordered it.
I actually can’t stress how easy this dish is. It’s a classic restaurant dish that can be knocked up in 15 mins flat, from scratch, no messing about. Feels like It should be one of our Jamie’s.
As I’ve found with Guys book, the ingredients list is quite extensive but he does go on about ‘layers’ of flavour and does not disappoint. This recipe has different elements that just work together. The chicken rub is awesome!!!! Period. It can be used in an assortment of different recipes. But I’ll stick with this one before I get carried away.. Here we go:
(If you’ve read my blog before, once again I’ve converted his measurements from the book into ones I’m familiar with. If you want the original quantities hit me up and ill give em to ya no sweat.)
For the “blackening rub”
2 tablespoons of salt
1 tablespoon of granulated garlic
3 tablespoons of paprika
1 tablespoon of freshly cracked black pepper
2 teaspoons of ground white pepper
2 teaspoons of cumin
2 teaspoons of onion powder
1 teaspoon of cayenne pepper.
If you don’t have all the ingredients for this rub, do yourself a favour and get them. For me the quantities produced a lot of spice rub. Totally more than i needed for this recipe but I can honestly see myself using this for a lot of things. I’ve not tried this yet but I’m positive this will be amazing with steaks or in burgers. For this recipe however, I suggest using one chicken breast per person. Once the rub is made, coat the breasts generously (according to how many your serving) and set side.
The rest of the recipe (I made this for 2 but can be made for more)
2 cloves of minced garlic
A glass of white wine (my preferred choice is Pinot Grigio but whatever you like will be fine)
250ml of double cream
About 4-5 jarred sun dried tomatoes
Enough spaghetti or fettuccine to serve however many your serving
75gof Parmesan cheese
Seasoning to adjust
2 spring onions to garnish
To get started, you’ll need a griddle pan on high heat, frying pan in low-medium heat and then a deep sided pan with water in on a high heat.
(Using all the Hobs in this recipe is what makes it a classic restaurant dish. It’s quick cooking to keep up with demand but if your at home making it for tea then just chill… No need to rush anything.)
Leave all the pans to heat up. From what I understand of Guys recipe, everything should be done whilst the pasta is cooking’ so get that in first. Your looking at 8 mins, possibly sooner dependant on cooking instructions.
Meanwhile, In the frying pan, using a garlic crusher, mince the garlic into it with a tablespoon of olive oil. Because its a low heat the garlic won’t burn. Once cooked but before it browns tip in the wine. This will stop the garlic from cooking and prevent it from tasting bitter and burnt. This is why gentle looking is the key. Pour in the cream and reduce until the desired consistency.
Grab the chicken breasts with the rub on, and place on the griddle pan. I’d give it a couple of mins a side. If the breasts have a fat bit on one side, get some greaseproof paper and place the breast in it. Fold it over and whack it flat with a rolling pin. This will flatten the breast so it cooks evenly, plus it’ll tenderise the meat and pound more of the flavour from the rub into it. Bonus!!
Once the pasta is cooked, drain, and add to the garlic, wine and cream mixture and toss thoroughly. Top with the chicken and spring onions then serve. I served it with the baguette I made and gave the recipe for in a previous post. I sliced them and toasted them with garlic butter which I also made.
All done in under 15 mins. It’s not particularly a looker of a dish but its quick, fairly simple and delicious!!!!!

So I’ve bought a new cookbook. I’ve really taken to Guy Fieri recently so had to have a gander at his book. As soon as I got it I must have sat there for at least an hour with a pad of post it notes marking down which recipes I’m going to try.
I thought I’d start with something fairly easy (or what I thought). Soup. Can’t really go wrong with soup. This recipe looked great, had everything I like in it. The method however was somewhat different to what I’ve done before. Normally when I make soup ill pick a main flavour, boil it in stock with some fried onions and then blend it and serve. This is totally in its own league. All shall be revealed.
I’ve also had to do quite a lot of conversions too. Because the book is by an American author, everything is measured in volume as opposed to the metric system I normally use. I’ve done it for this recipe in metric measurements so if the quantities look a little strange this is why. Here goes..
15 medium sized tomatoes (the best you can find) (diced and de-seeded)
1 onion (diced)
2 carrots (diced)
2 sticks of celery (diced)
1 scotch bonnet chilli (de-seeded and diced)
3 cloves of garlic (chopped)
180g of butter
180g plain flour
1 tablespoon of ground cumin
500ml of double cream
S and P
Olive oil

First step is to get the the tomatoes in a bowl of boiling water. Set this aside for 5 minutes while you chop the rest of the veg. Once everything is chopped, empty the water out and peel the skin off the tomatoes. Then chop them into quarters and get rid of the seeds in the middle. Then give them a quick dice up. It’s a really time consuming process but it’ll be worth it in the end. Place all the chopped tomatoes, onion, carrot, celery, chilli, and garlic on a roasting tray and drizzle with olive oil.
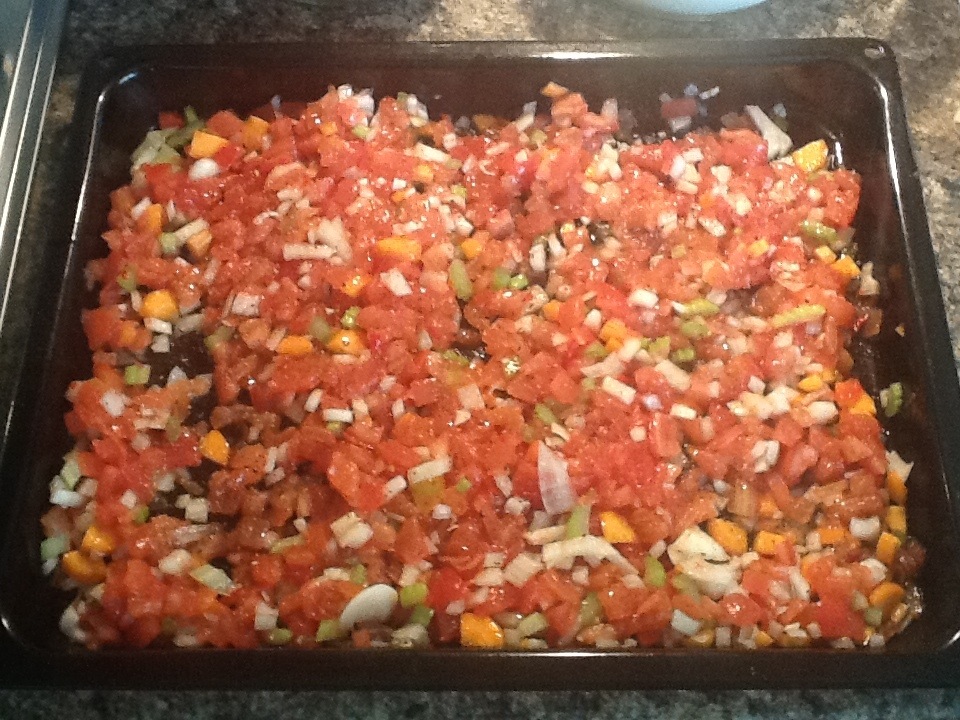
Season it lightly with S and P and then roast the lot at 220 degrees C until there just started to brown. Set aside once done.

In a heavy cast iron pan melt the butter on a medium-high heat.

Tip in the flour once melted and then keep whisking the mixture for around 5 mins. Your essentially making a roux and cooking out the flour.
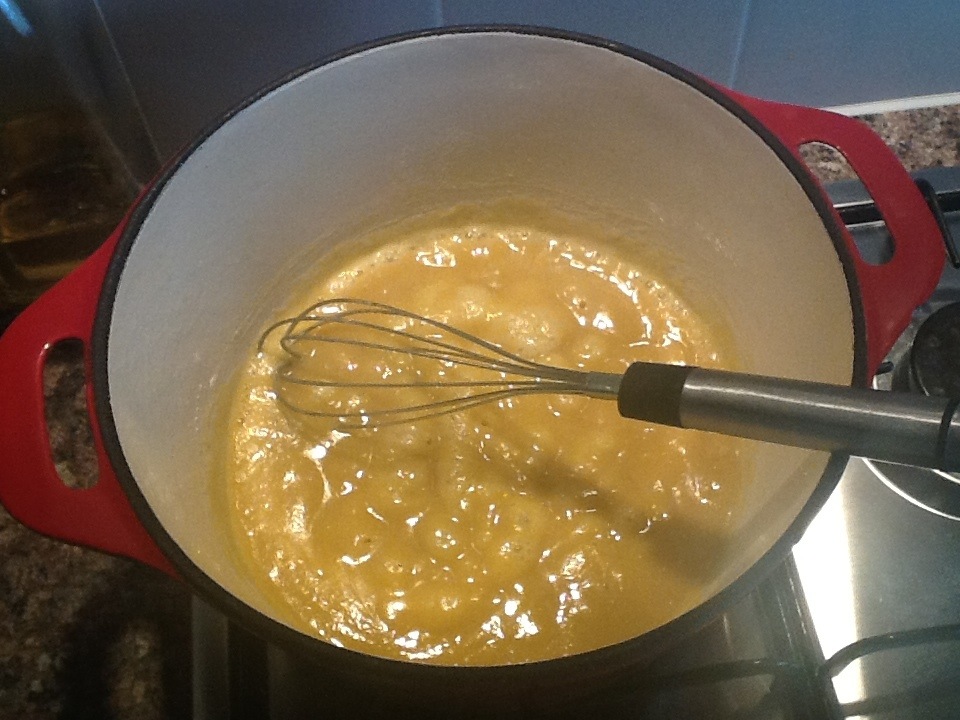
After 5 minutes or so, add in the roasted veg mix with the cumin. Lower the heat to low and cook for a further 20 mins stirring constantly.

Once cooked out for a bit transfer the mixture to a blender and purée till smooth, adding water if necessary to thin down to the desired consistency.

Add back to the pan and bring back up to temperature. Turn off the heat did then stir in the cream. Check for seasoning and adjust accordingly.
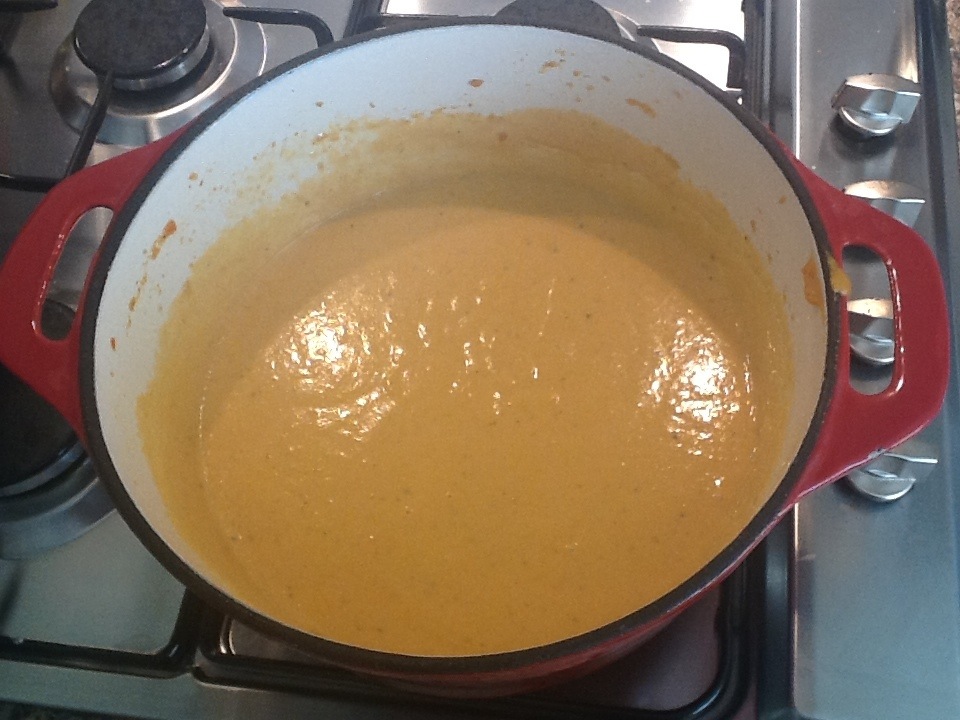
Serve immediately.

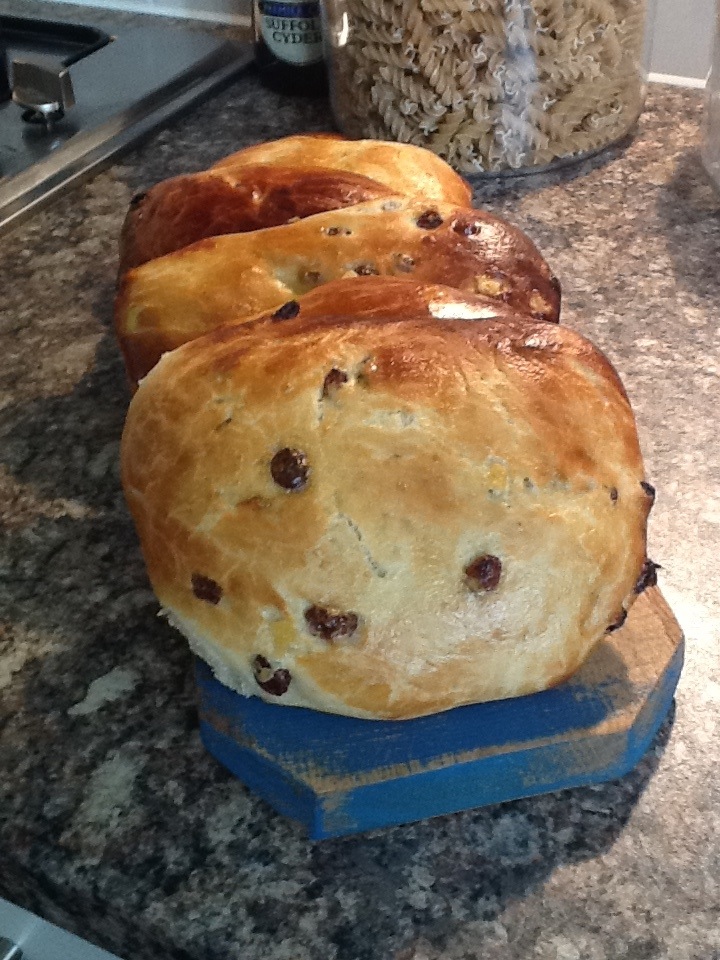
Continuing on my little baking mission I’ve decided to go on the currant teacakes run this time.
We’ve all had them in some shape or form before and I love having them for breakfast slightly toasted with lots of butter.
Again the basics of bread making apply so there not too difficult. Here’s what your gonna need:
500g strong white bread flour
10g salt
10g active yeast
60g caster sugar
1 teaspoon of cinnamon
300ml of water
50g of softened butter
100g sultanas
100g of mixed peel
1 beaten egg

Right, so the first port of call is the yeast and water. Get em in together and put to one side for a little bit. While that’s doing its magic, get the flour, salt sugar and cinnamon in a stand mixers bowl fitted with a dough hook attachment. When the water and yeast is slightly frothy, set the mixer on a low speed and slowly add the water. Keep mixing for a further 5-10 mins till there’s a soft elastic dough. Place in an oiled bowl and leave to prove for an hour or until doubled in size.


Once proved, tip the mixed peel and sultanas on top and incorporate into the dough. After a few mins turn out onto a work top coated in a little vegetable oil.

Work the dough a little further and then decide up into 8. I find that if you make like a cage with your hands, get one of the eights you’ve got and rotate the dough in the cage with your hand. This will round everything off nicely. Then flatten it down to about 1 cm thick and place on a sheet pan lined with baking paper. Repeat for the other 7 making sure there’s plenty of space between each one. (Im gonna go all out and say im really not the best at this as demonstrated by the irregular shapes they all look. Still taste nice though!!!) Brush each one with the egg and leave again to prove until doubled in size.

Preheat the oven to 200 degrees C and bake for 15-20 mins till golden brown. Try to wait till there cooled but I couldn’t. Half of em went within half hour of them coming out of the oven.

I’m actually making these to go with another recipe (Cajun chicken Alfredo). I wanted to make some proper garlic bread so thought I’d go all out and make baguettes.
There simple enough to make and only have 4 ingredients so theses no excuses not to have a go…
500g of strong white bread flour
10g salt
10g active yeast
370ml of water

Place the yeast in the water and set aside for 10 ish minutes. Meanwhile weigh out the flour and salt and get them in a stand mixer ready to add the yeast and water mixture.
Once the mixture has frothed up a little, set the mixer on a low speed and slowly pour it in till it all comes together and forms a dough. You might not need all of the water, however you might need a little more. Your looking for a slightly wet dough but not too sticky. Keep it going for a good 5-10 mins until it becomes smooth and elastic. Transfer out into a square dish or bowl that’s been coated in olive oil, cover, and leave to prove until doubled in size.


Once proved, coat your worktop in a little more oil and being as gentle as you can turn it out onto the surface. Usually with bread you’d “knock it back” getting all of the air back out of it but this time were not going to. Baguettes have a lot of aeration in the texture so all we need to do it cut it into 4 and lightly roll them out just using the weight of your arms. Place on a sheet pan lined with baking parchment and leave to prove again for a couple of hours.

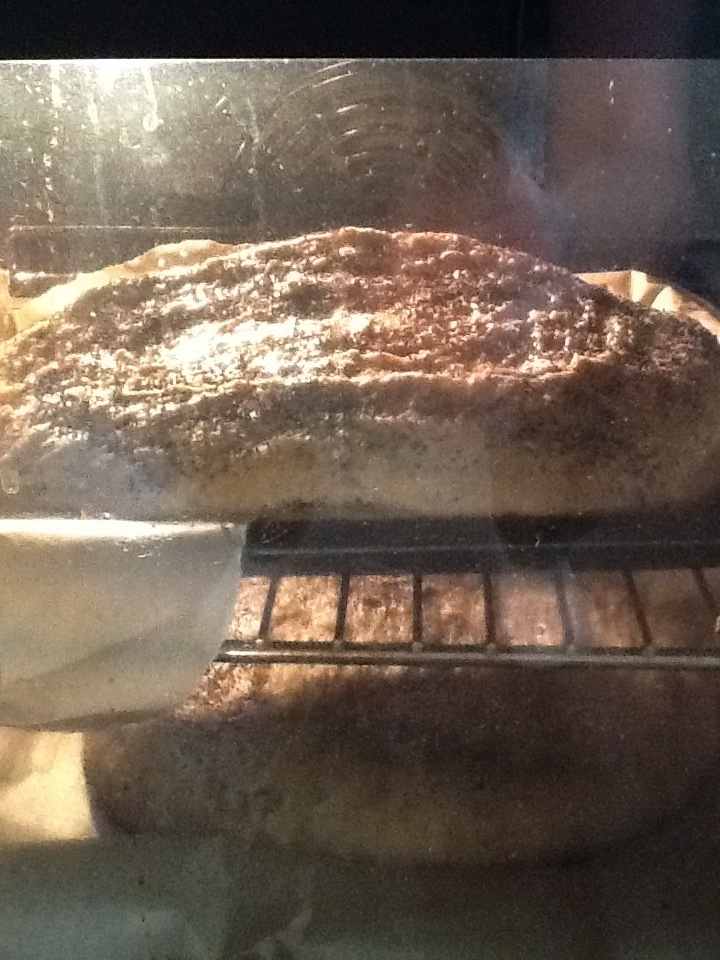
Preheat the oven to 220 degrees C with a tray in the bottom. Lightly dust the baguettes with a touch of flour and make 3 slashes on each one with a sharp knife.
 Place in the oven and before you close the door, tip a mug full of water into the tray. This will slightly steam the baguettes as they cook.
Bake for about 15-20 mins till there golden brown. Allow to cool on a wire rack.
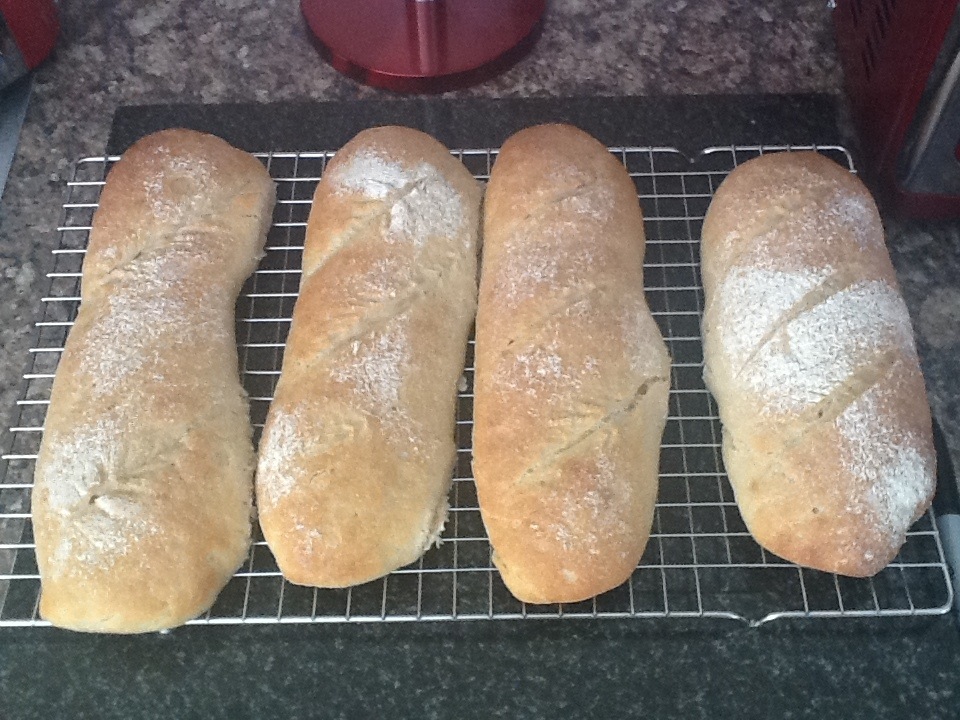
I’m going to cut mine and slather a load of homemade garlic butter on them to go with my Cajun chicken Alfredo but you can have them with anything you like.

I’ve eaten lots of carrot and coriander soup in the past and I had a real craving for it this afternoon so I thought I’d make some.
As is with most soups, its pretty simple to make and requires little ingredients too. Here’s how simple it is:
1kg bag of carrots (peeled and sliced)
1 onion (diced)
1 potato (cubed)
1 tablespoon of ground coriander
1 litre of chicken stock
Half a handful of fresh coriander
Teaspoon of natural yoghurt or single cream
Firstly, sweat off the onions for 5 mins until translucent and add in the potatoes and ground coriander then cook for a further couple of minutes.
Add in the carrots and chicken stock and simmer for 20 mins till the carrots are cooked.

Ladle into a liquidizer with the fresh coriander and blitz until smooth.
Return to the pan, season to taste and bring back to the boil. Add a little water if its too thick.
Serve with a swirl of natural yoghurt or cream and a drizzle of extra virgin olive oil then finish with a coriander leaf. Simple but very nice!! Enjoy.


As you’ve probably guessed from my blog posts I’m somewhat of a sucker for bread. I absolutely love it, so I’m always wanting to try new variations.
I recently got asked by a friend to make them a seeded wholemeal bread and seen as I never made it before though I’d give it a bash. As is the way I go about things I looked at a few different methods and other people’s ideas and then combined them to make my own. This is what I came up with:
Will make 2 Seeded whole meal loaves (half the recipe for 1 loaf)
800g of Seeded whole grain strong flour
200g of strong white bread flour
4 tablespoons of black treacle
150g pack of mixed seeds
40g poppy seeds
20g of salt
20g of fast action yeast
660ml of tepid water
Get the water in a jug and add in the yeast then set aside for 10 mins.
Place all the flour, salt and black treacle into a stand mixers bowl with a dough hook attachment fitted and mix a little till combined. Then slowly add the water and yeast mix (It should have frothed up slightly) until the dough its coming away from the sides of the bowl. It shouldn’t be a wet dough just nice and soft. This needs to be worked for about 7 mins for the glutens in the flour to develop.
Once the dough is a soft and smoother consistency, glug some olive oil on a work top and spread out. Place the dough on the coated surface and then tip the packet of seeds on top and work in. The reason for using olive oil on the surface is if you use more flour you run the risk of making the bread tough once baked. Using olive oil makes the dough easy to work the seeds in and reduces the need for excess flour. Once worked in, place in a oil coated bowl, cover and leave to prove for 2 hours or until doubled in size.

Once proved, knock the dough back, getting all the air out of the dough. Then shape the dough into oval shapes and place onto a sheet pan lined with some baking parchment.

Make a slash down the middle of the loaf and cover loosely with cling film and leave to prove again until doubled in size.

Again, once proved preheat the oven to 230 degrees C and carefully brush the loaves with water and sprinkle over the poppy seeds. Place in the oven and bake for around 20-25 mins until the loaf sounds hollow when tapped on the bottom.

Really nice with soup or toasted.
