
So it’s curry night in my household and I’m gonna share my method of curry making, and accompaniments. Generally, i’ll call the curry a chicken tikka “whatever” because it literally is a case of using whatever is in the cupboards. Sure the taste changes every time I make it, but when you combine different spices with a Birra this and that you’ll end up with something really really nice.
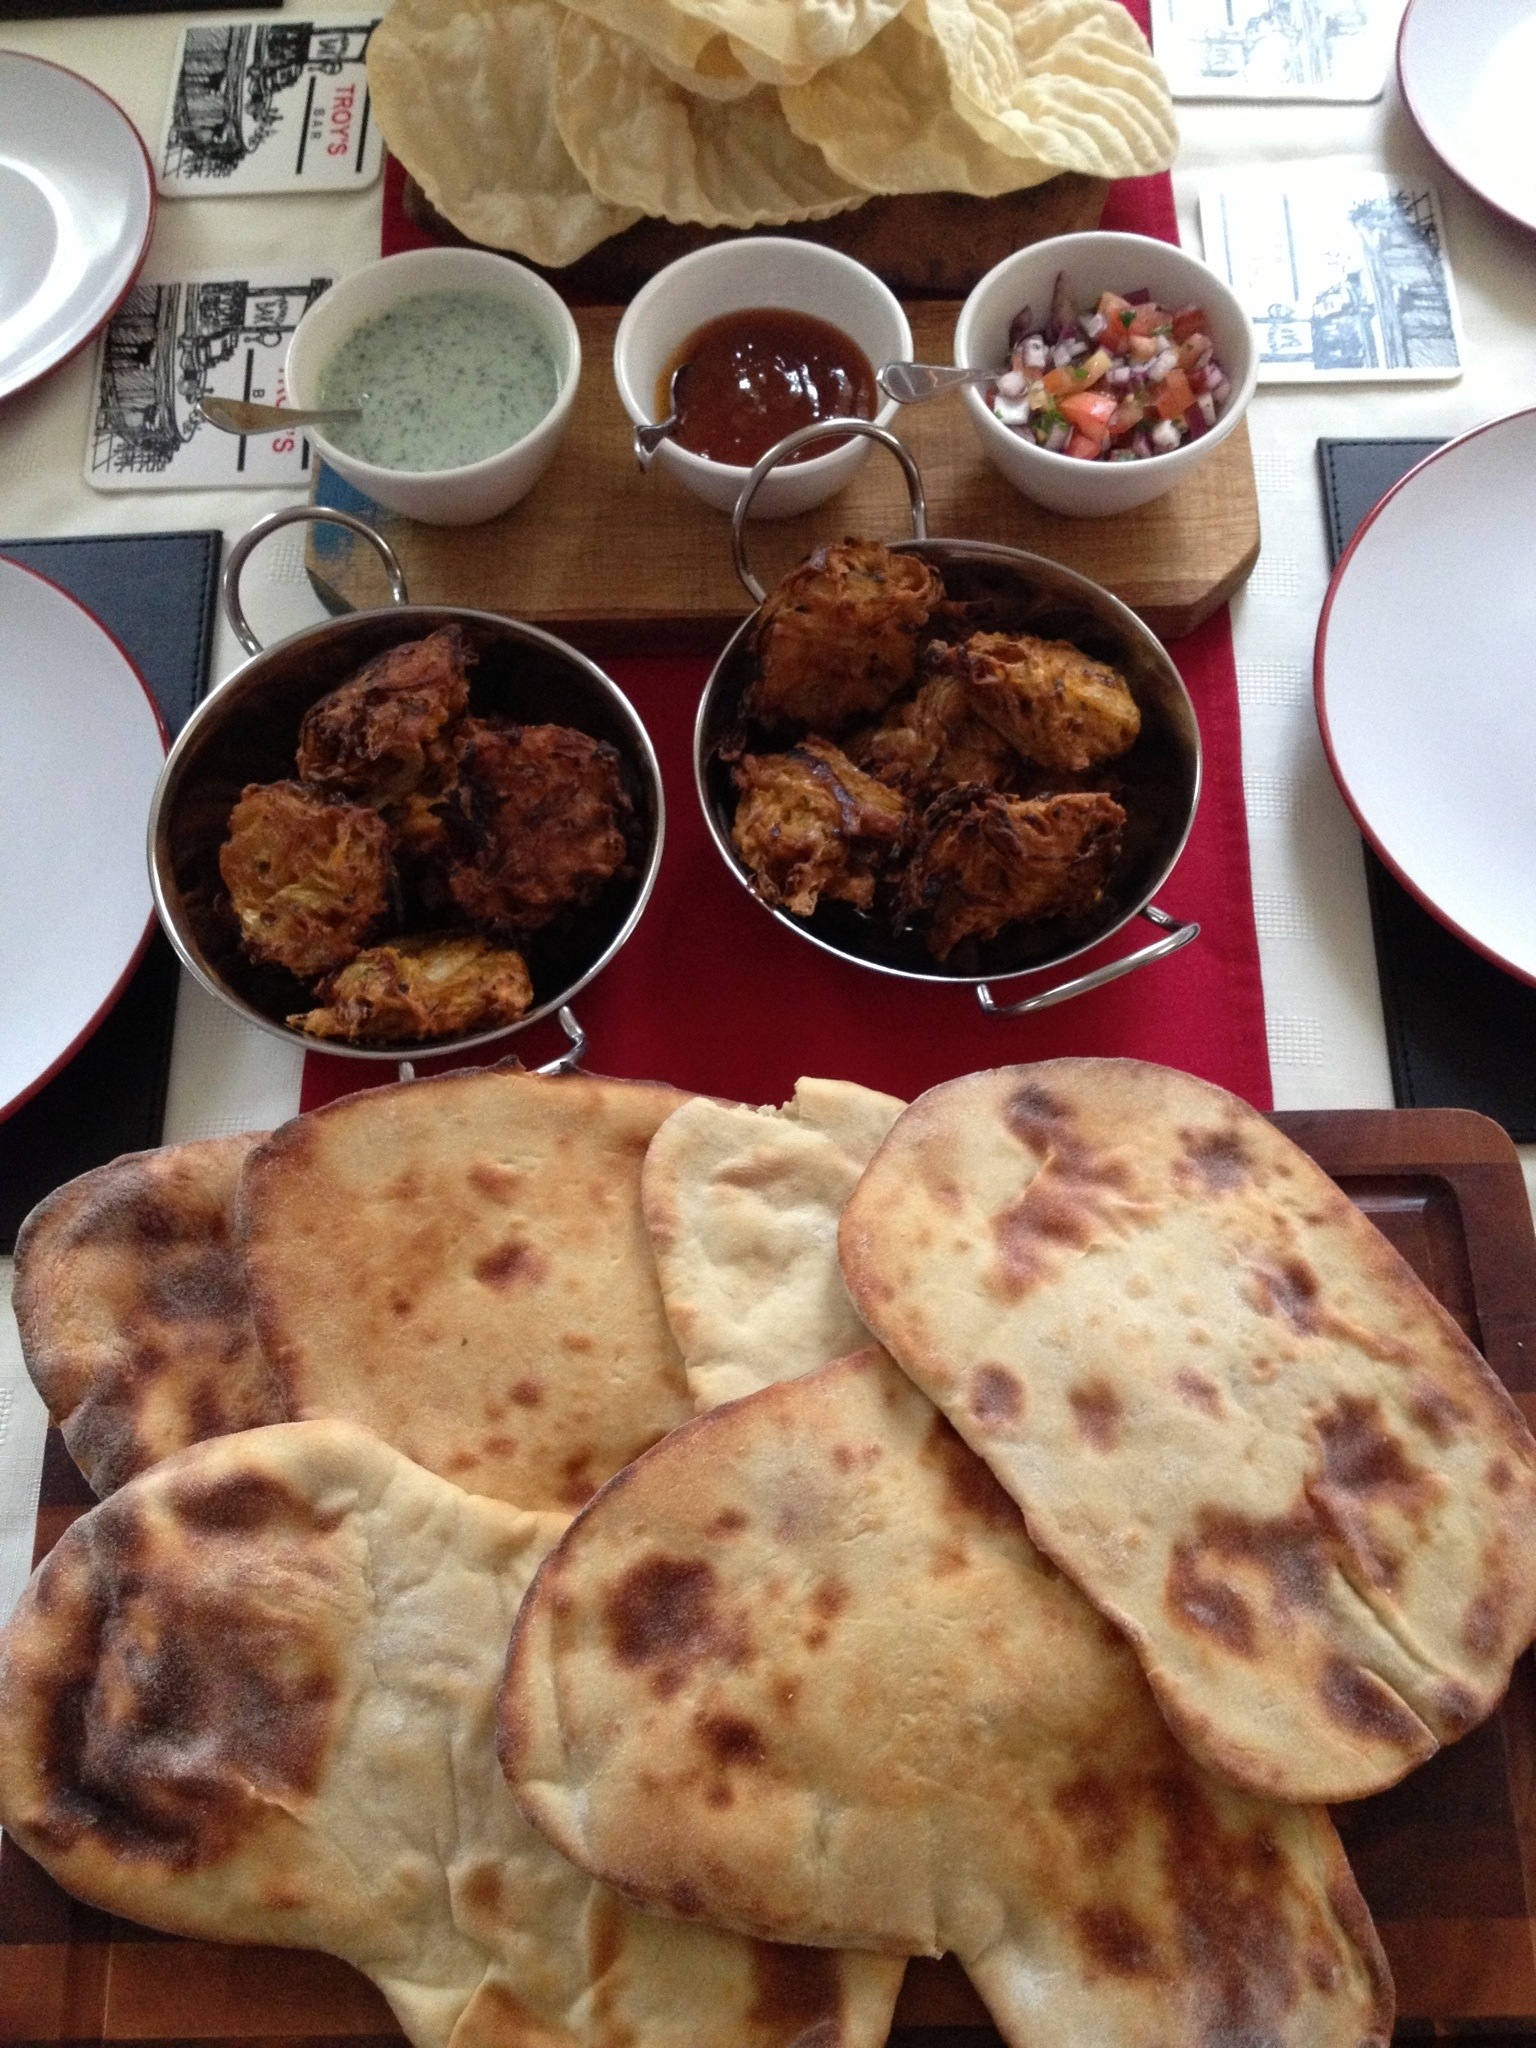
Accompaniments; got to have rice. But gonna jazz it up a little because let’s face it, plain rice can be boring. A couple of little subtle flavours chucked in and it’ll really go well with the curry (or great for other recipes too!!). Also gonna make Naan breads and onion bhajis. Staple sides with curries and then a couple of really really quick and easy dips just to finish it all off.
It does sound like a lot to do but managed correctly and it’ll be a breeze. I’ve broken this recipes up into the order I’ve done things which makes sense to me. You can always read it all and make your own way up but i think if you want use your time effectively this is the way to do it. Here’s how I went about it.
These first two steps should be done the day before.
Chicken tikka marinade.

350g of natural yoghurt
Clove of garlic (minced)
Thumb size piece of ginger (finely grated)
2 Tablespoon of garam masala
1 teaspoon of turmeric
1 teaspoon of chilli flakes
Half a bunch of coriander, roughly chopped
4 chicken breasts cut into bite size chunks
Simply chuck it all in a bowl and stir until well combined with a bit of salt and leave it in the fridge overnight.
First part of the onion bhajis
3 white onions (sliced)
Half bunch of coriander (roughly chopped)
1 clove of garlic (minced)
Juice of half a lemon
1 1/2 tablespoons of tikka paste
Again once the onions are sliced, throw it all in a bowl and mix until well combined. This can be done before or after the above marinade and also left overnight. Both of them should take about 10 mins to do and I think the whole thing about Indian cooking is Flavour, Flavour and Flavour. The longer you leave things to marinade the bigger the flavour.
On the day
Naan breads
150ml of warm milk
2 teaspoons of caster sugar
2 teaspoons of dried yeast
450g of plain flour
1 teaspoon of salt
2 teaspoons of baking powder
3 tablespoons of vegetable oil
150ml of natural yoghurt
1 egg (lightly beaten)
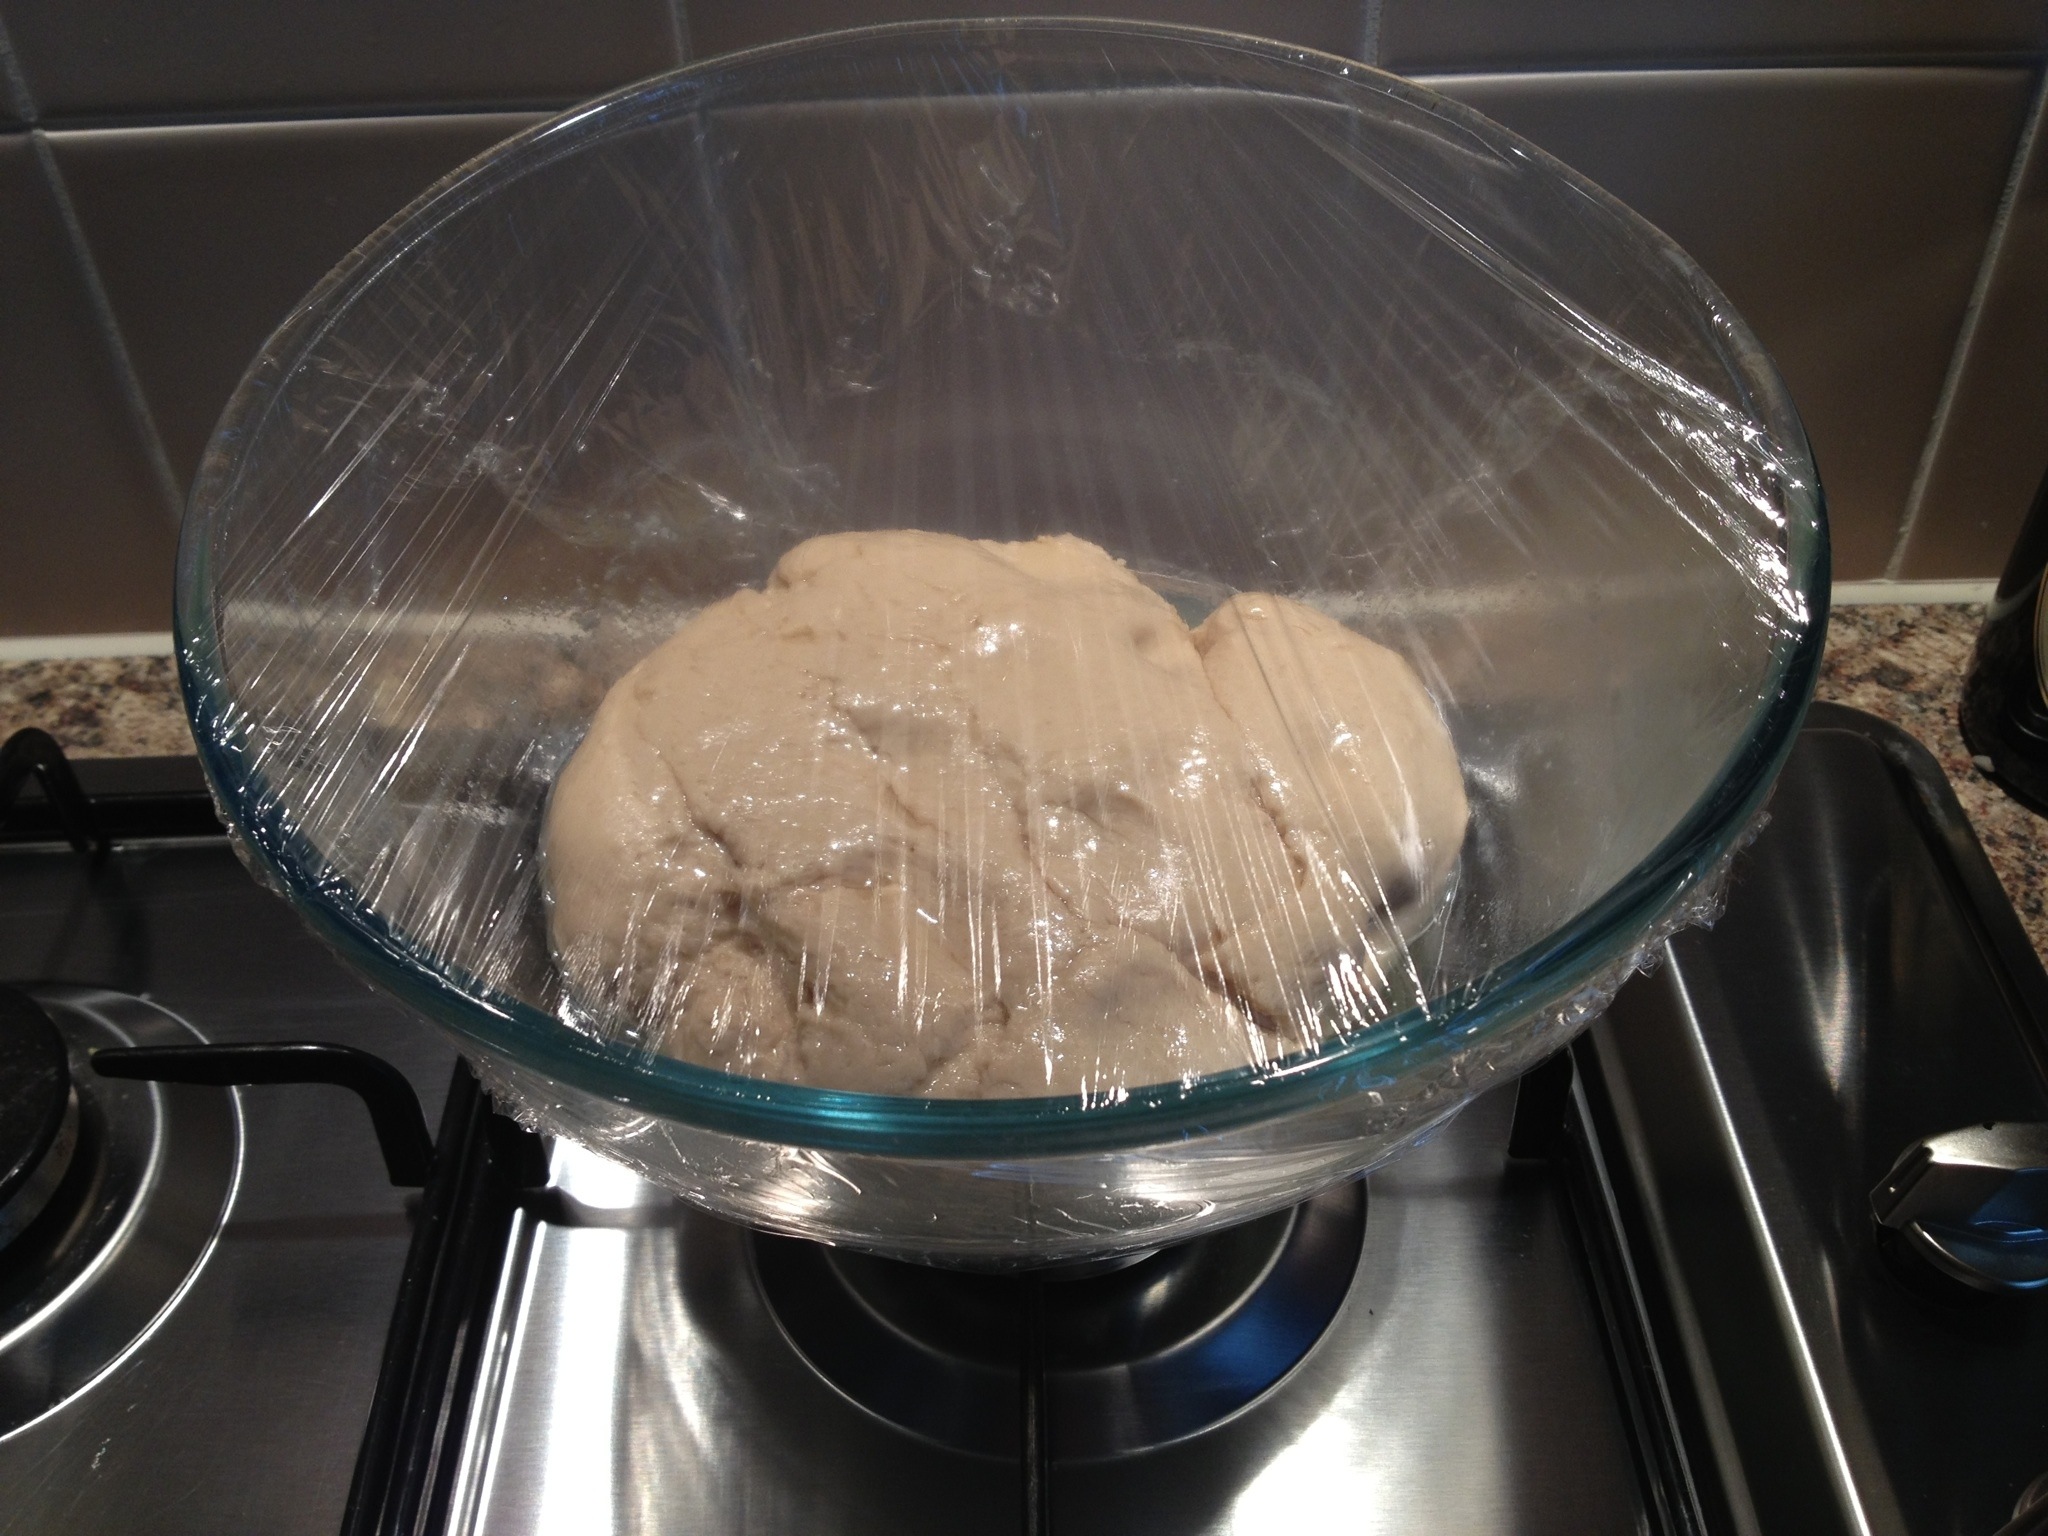
For the dough you want to mix the milk, sugar and yeast in one jug and let the yeast dissolve a little and then the rest in the other. I use a stand mixer to knead my dough but you can do it by hand if you don’t have one.
Set the mixer going with all the ingredients in it and slowly pour in the milk mix until the dough comes together. It’ll be slightly sticky to start with but as the dough works, the gluten in the flour with start to develop and you’ll get a smoother dough. Once done, place in an oiled bowl and leave covered to prove for a couple of hours.
Once doubled in size, pre heat your oven with a pizza stone in to the hottest the oven will go. Knock the dough back and portion into about 6 ish. Is up to you how many you want, but the more you want the smaller they’ll be, 6 I think is a good balance of size and yield.

You can roll them out to the classic “teardrop” shape if you like but I think they look ten times better if there just randomly rolled out. Make its look like you’ve actually made them. Once there rolled out place them In the oven on the pizza stone until cooked, turning them once. It won’t take long maybe 2-3 mins a side. Make sure they’re well floured or they’ll stick to the pizza stone.
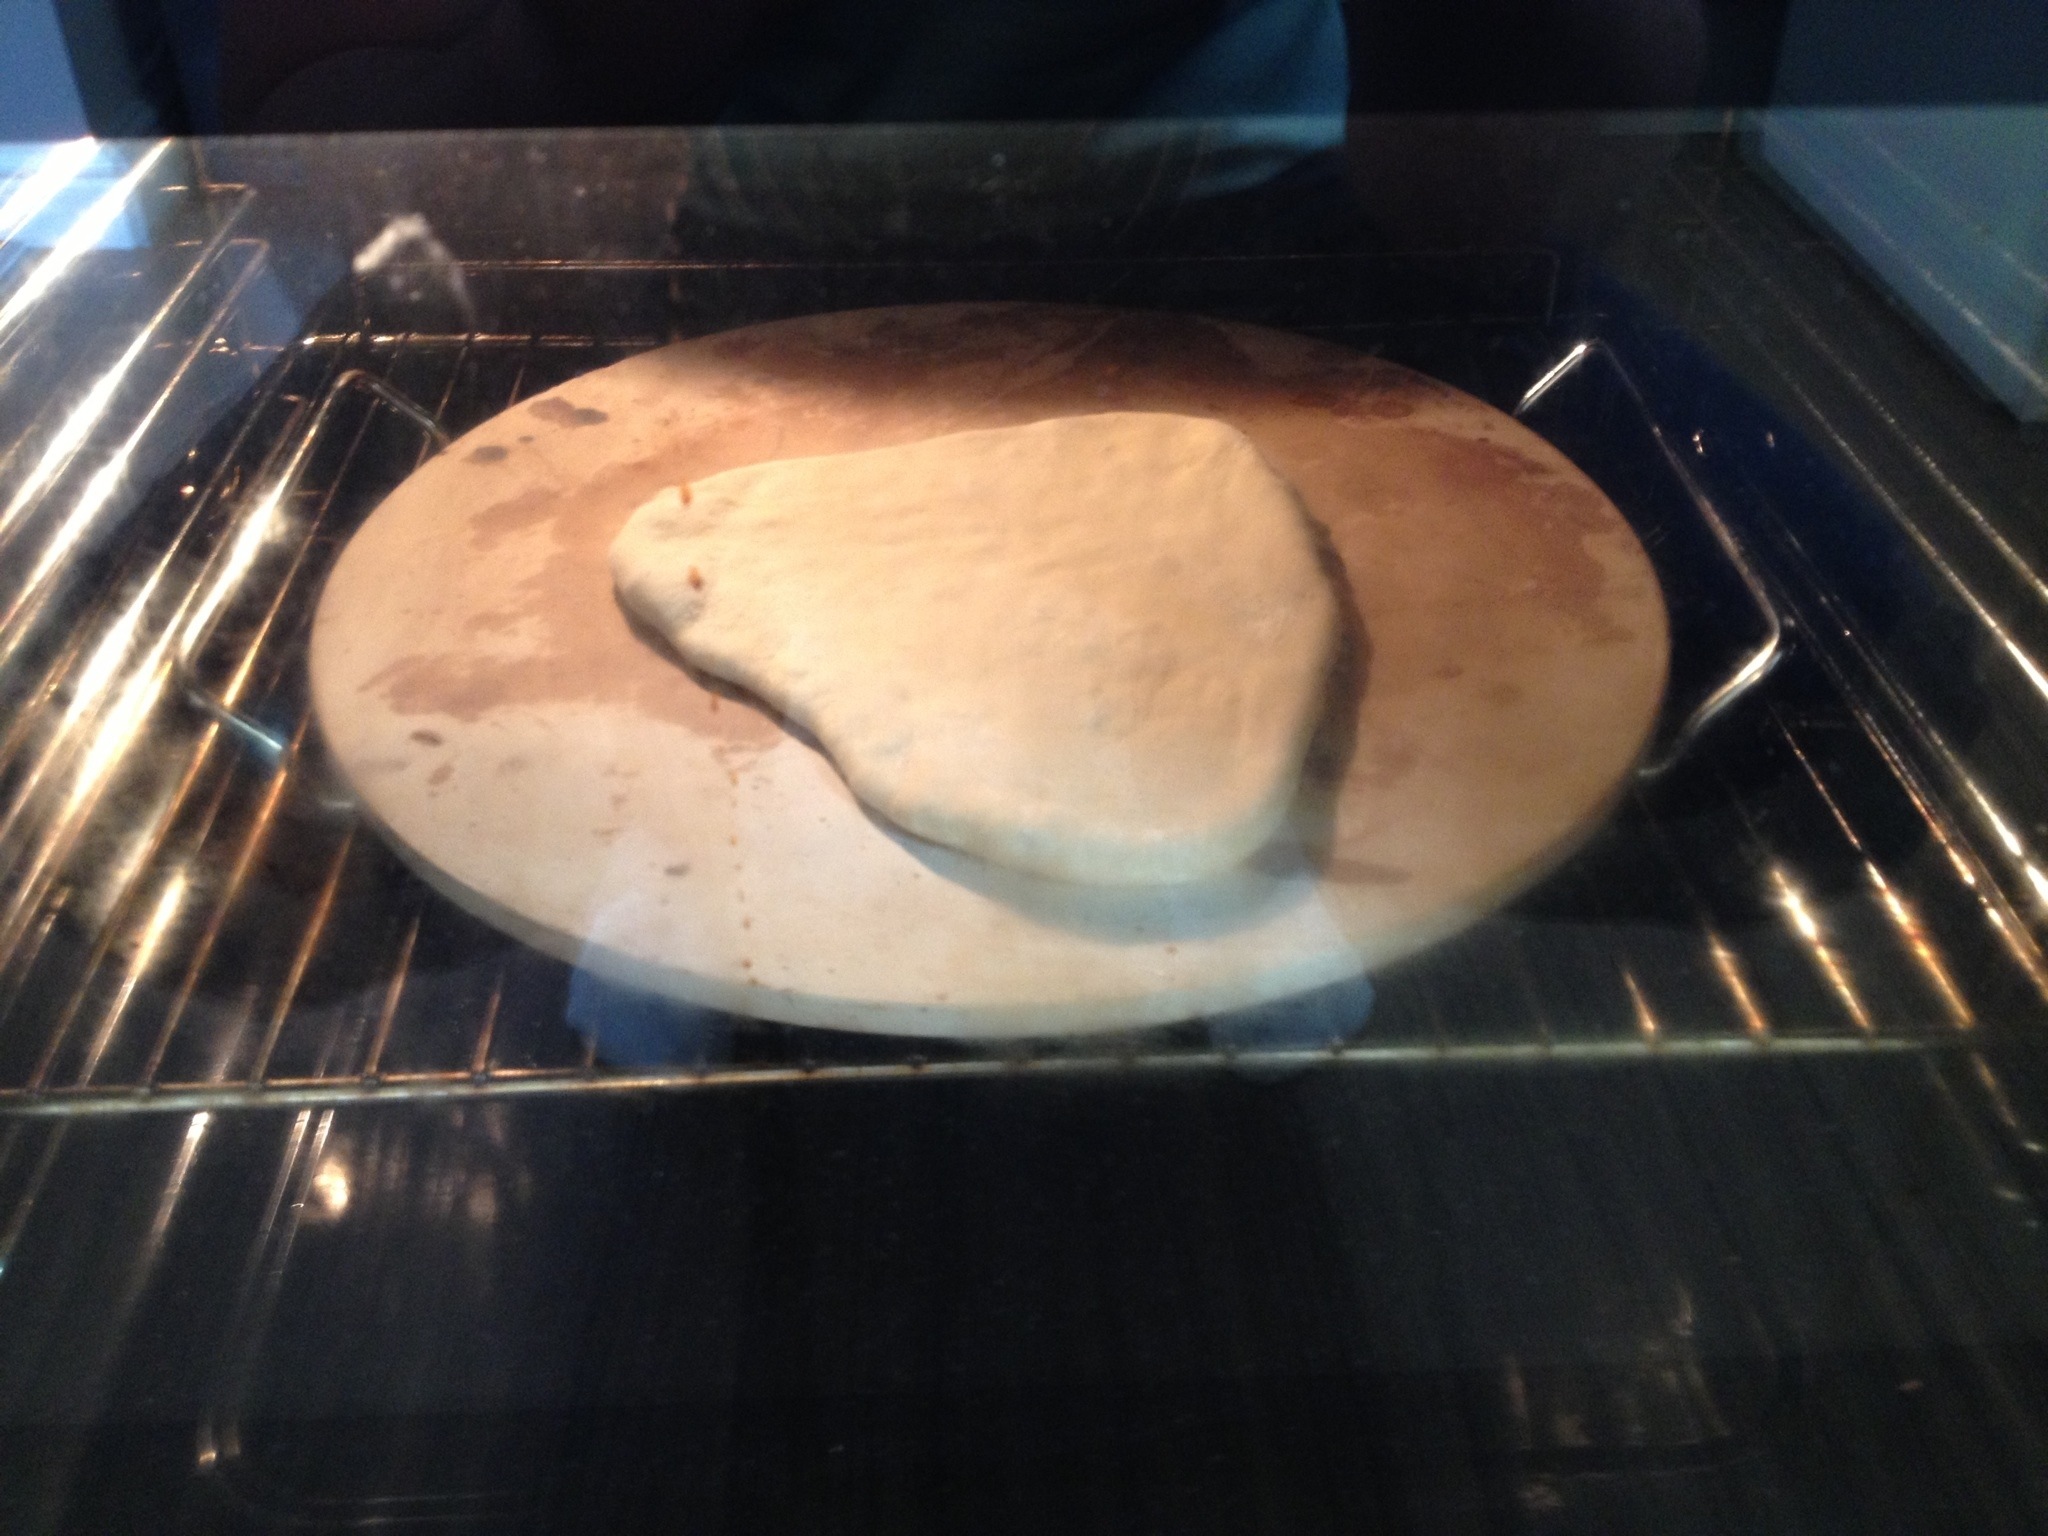
Once they’re all done wrap in tinfoil and leave in the oven until needed.

Back to the Onion Bhajis
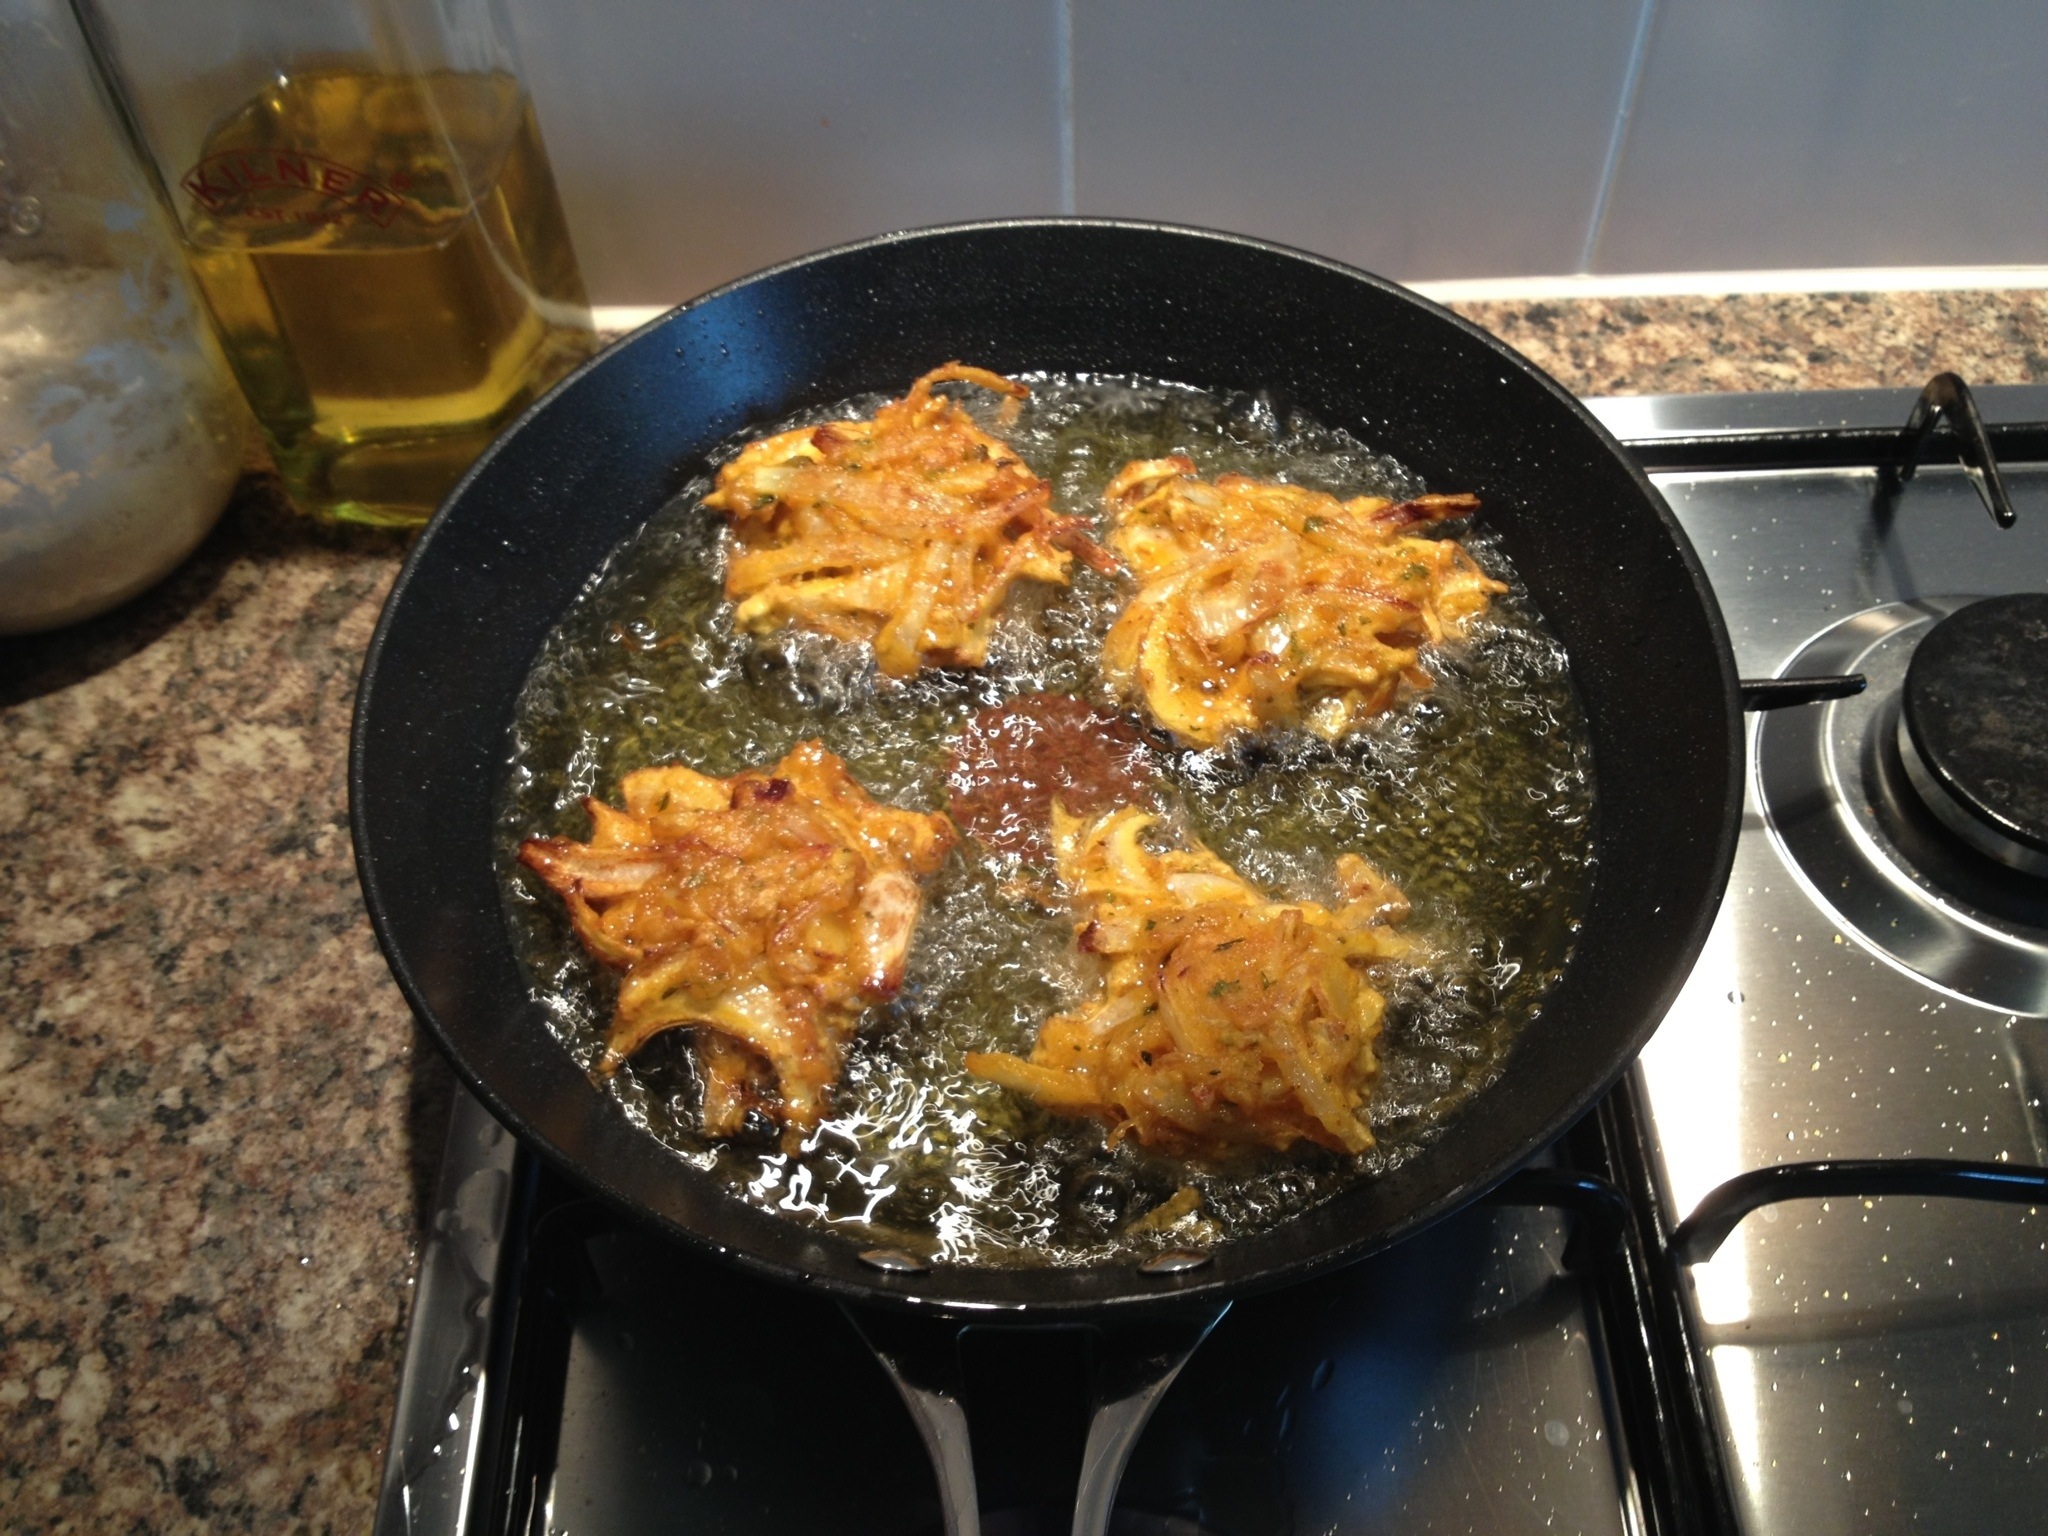
Get 200g of plain flour and slowly add to the mixture with a couple of splashes of water a bit at a time so you get a “paste” like consistency. Put a pan on the heat with an inch worth of oil and heat up. If you’ve got a deep fat fryer do them in there.
Grab a handful of the mixture and compact it tightly in your hand forming a flat circle shape and then place in the oil. I managed to get 4 in the pan in one go but do what you can in batches till there all cooked flipping them over after a couple of minutes to do the other side. Drain on some kitchen towel and refrigerate when done till ready to use.

 Back to the marinating chicken.
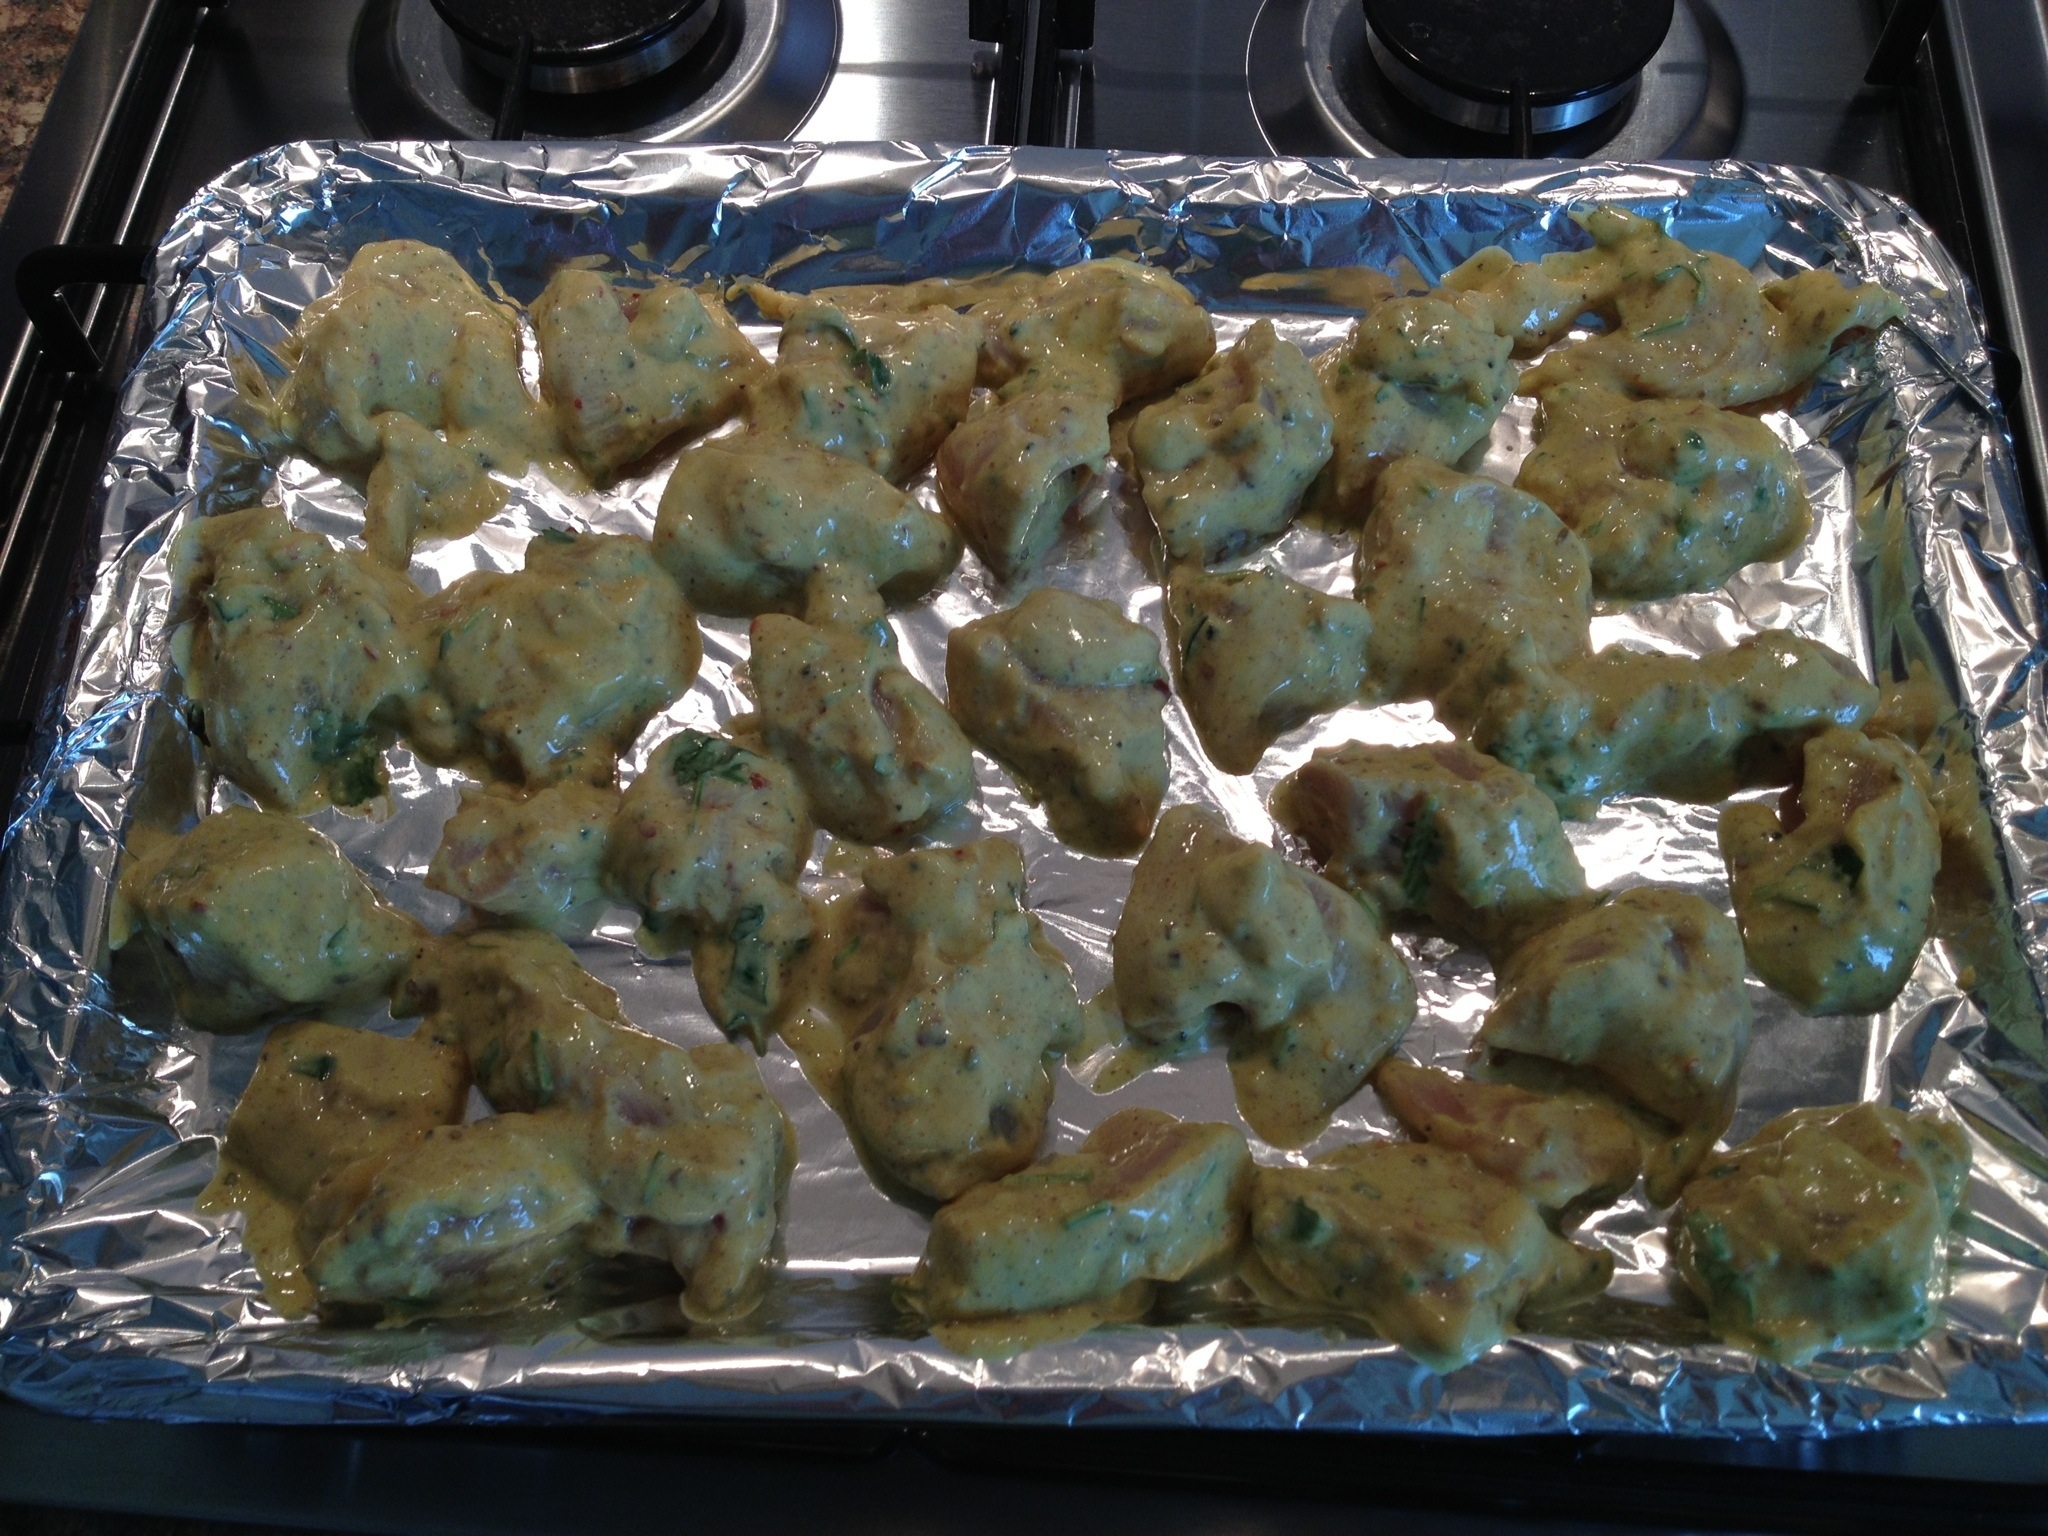
Turn a grill onto a medium-high heat ( or broiler I think??) and grill the chicken on a sheet pan until cooked through, turning the pieces over halfway through. Set aside to cool and refrigerate.

Note: You must discard the excess marinade. Do not use it for anything else.
The Curry Sauce
3 tablespoons of ghee ( or clarified butter)
1 cinnamon stick
8 cardamon pods
2 cloves of garlic (minced)
Thumb size piece of ginger (finely grated)
1 white onion (finely diced)
1 teaspoon of cumin seeds
1 teaspoon of ground coriander
1 teaspoon of cayenne pepper
1/2 teaspoon of turmeric
1 1/2 tablespoons of garam masala
3 tablespoons of tikka paste
1 can of chopped tomatoes
150ml of chicken stock
Juice of half a lemon
Splash of double cream
The first thing I did with all this was to get it all ready and organised. Get your onion chopped, spices weighed, stock and tomatoes ready. It’s saves a load of messing and rushing about while your making the sauce.

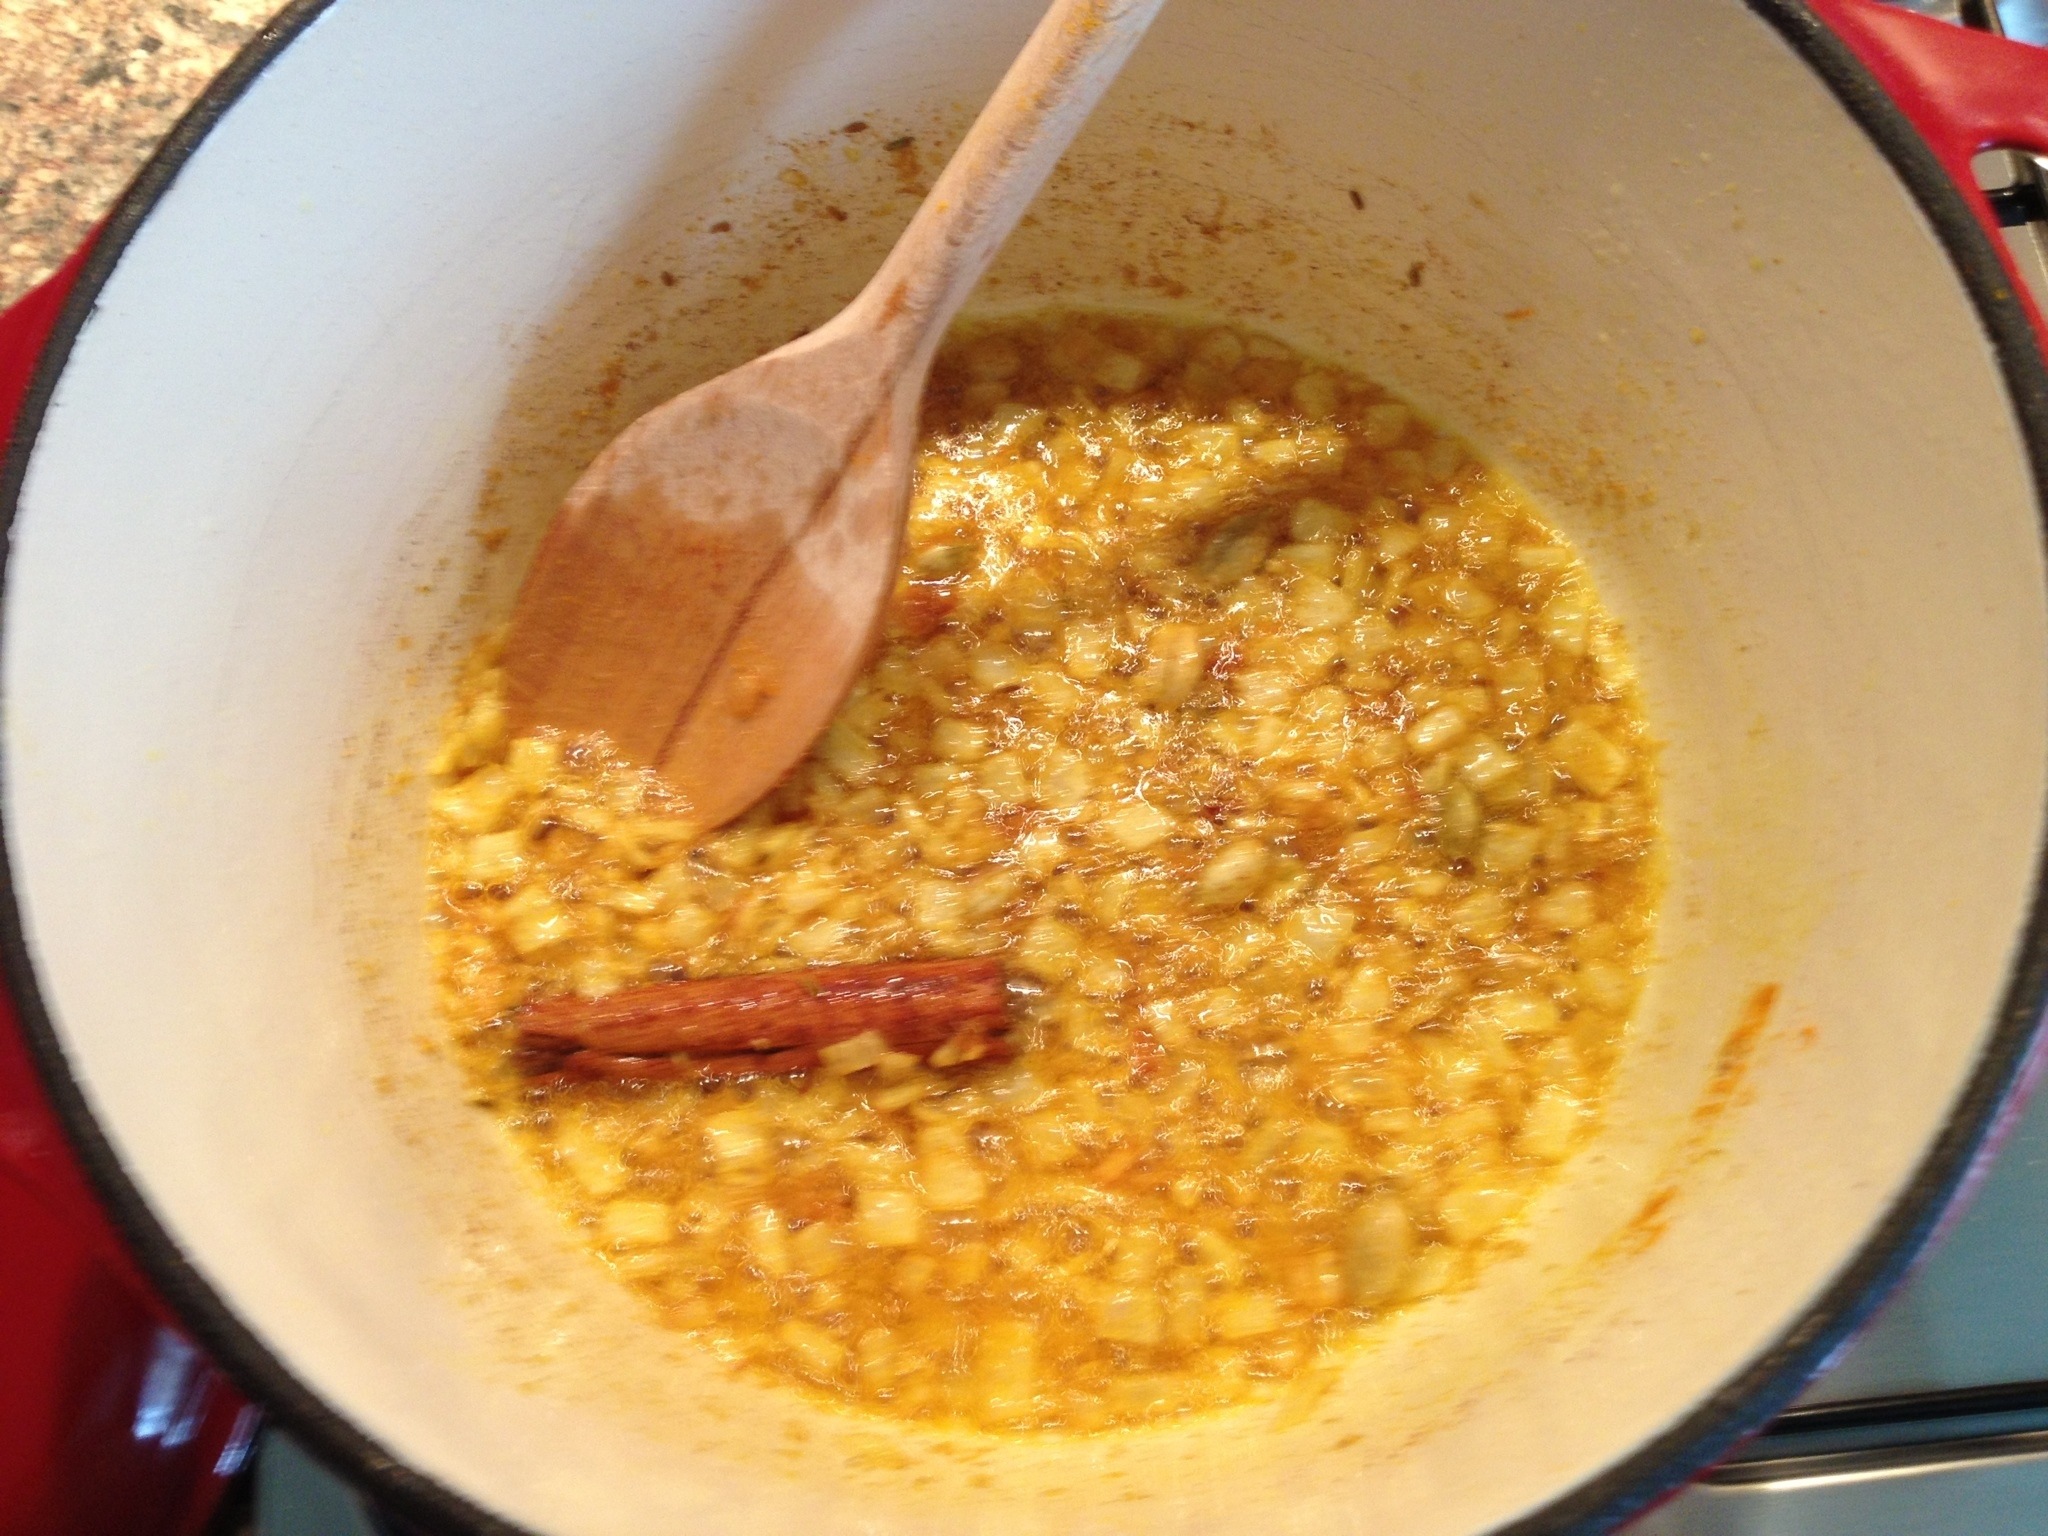
First job is to heat the Ghee in a heavy cast iron cooking pot (Dutch oven or whatever people call it, a big heavy pan to me….) then put in the cinnamon stick and cardamon pods and cook for a few mins. Add the onion and cook until just starting to brown then add the garlic and ginger and cook for a further minute.


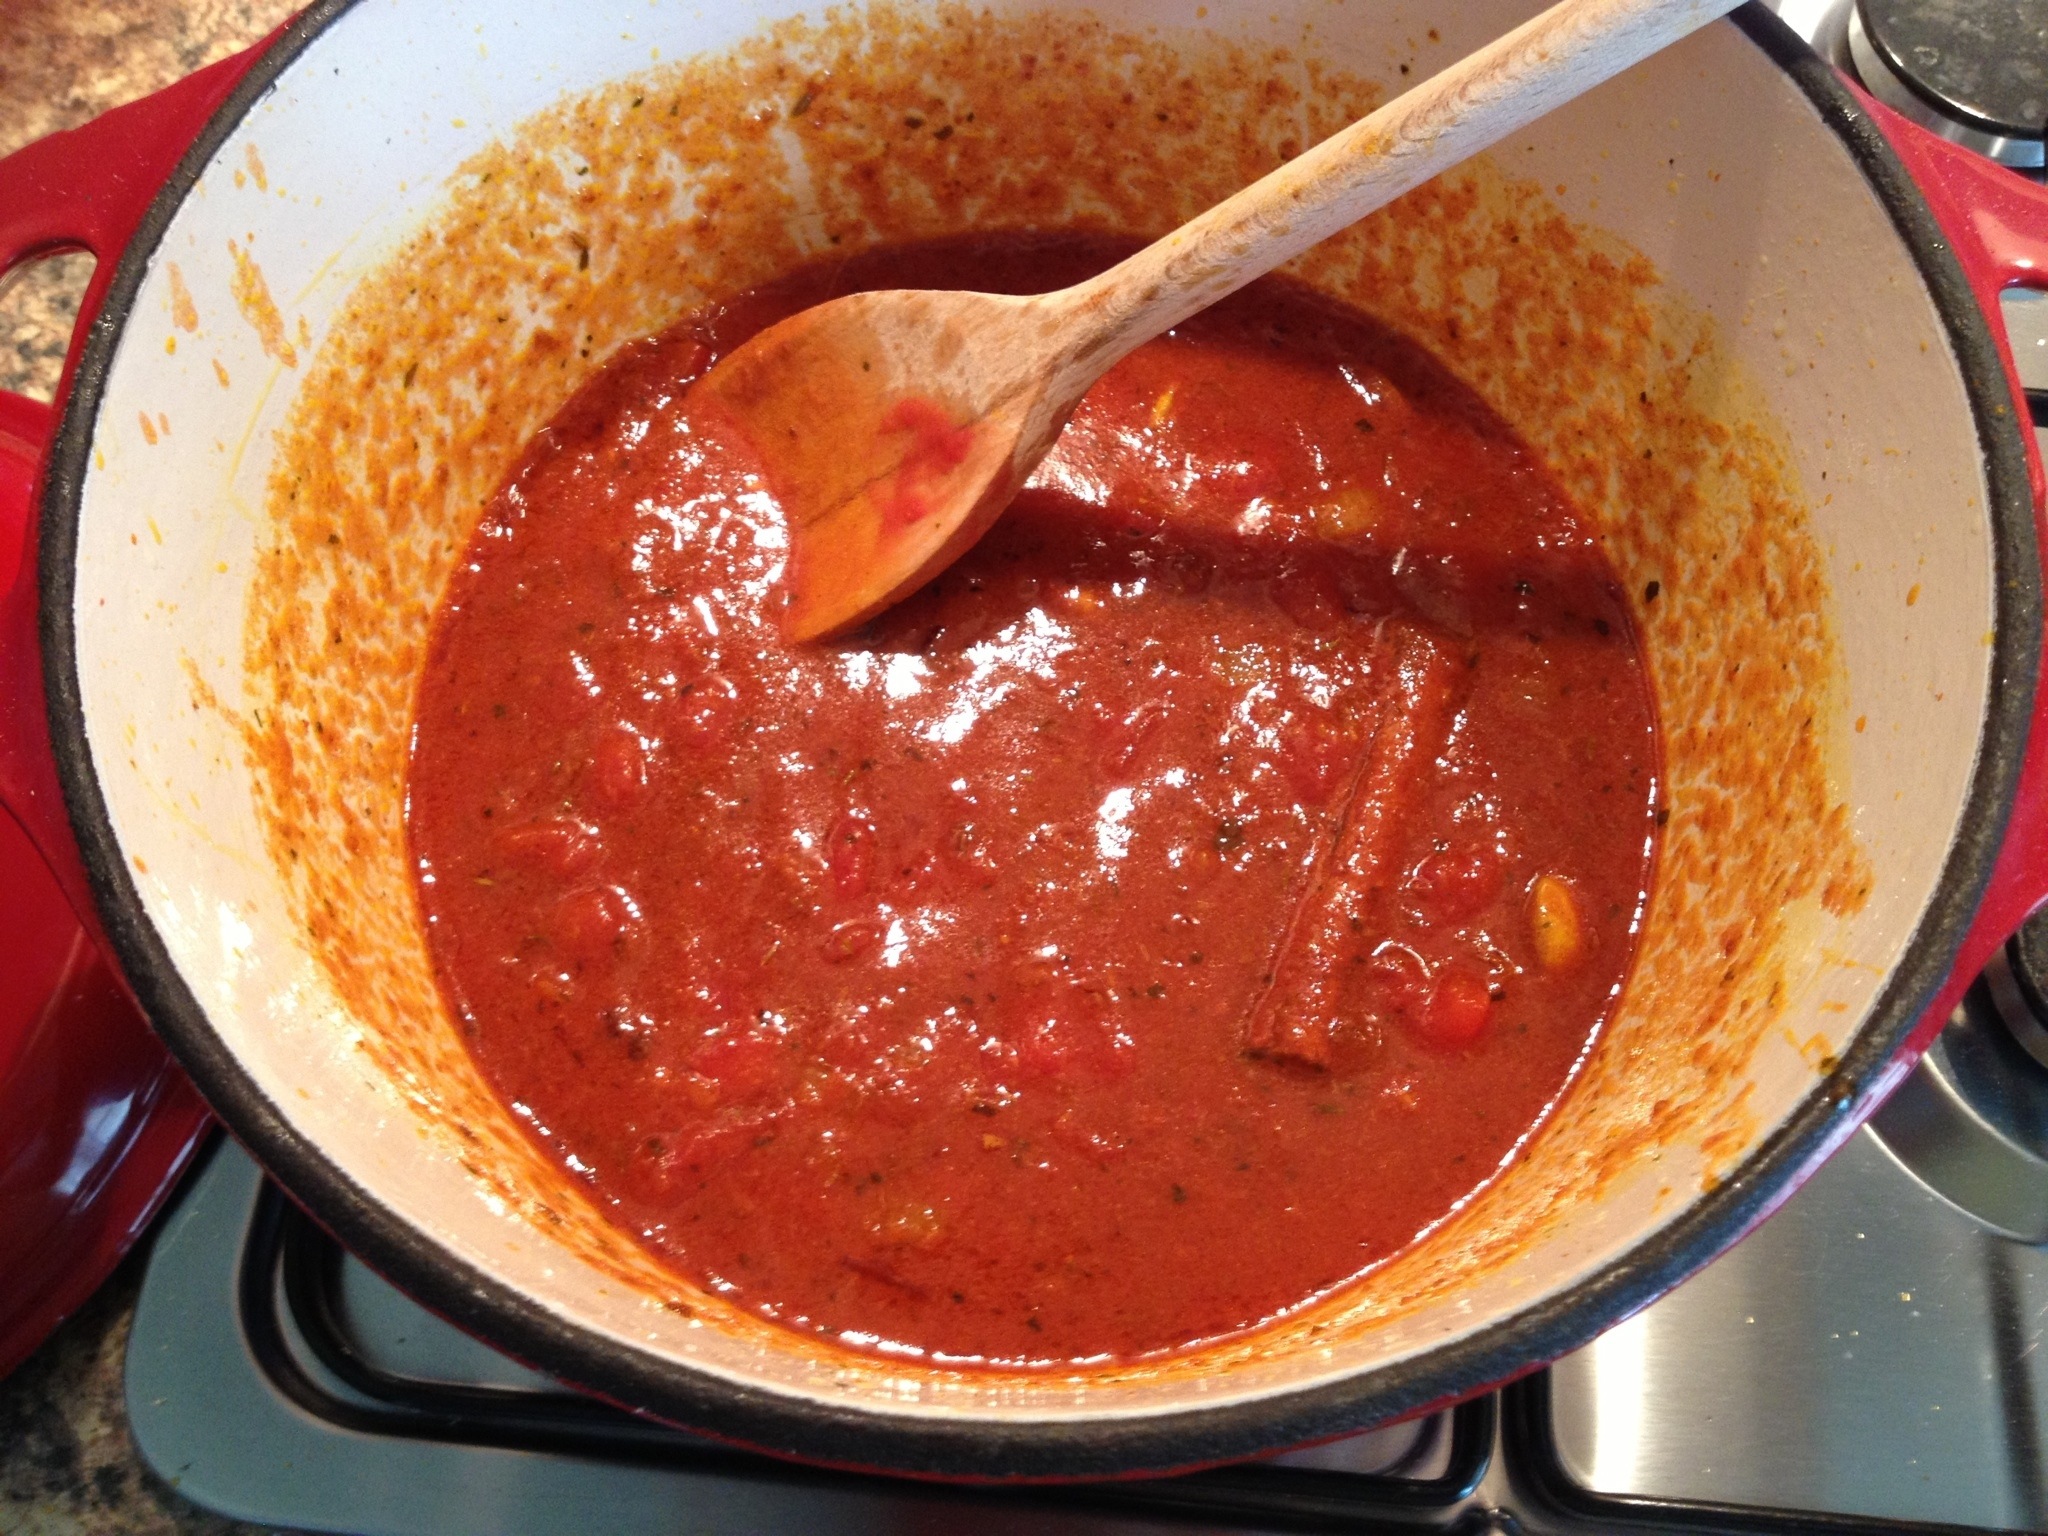
Next job is to cook out the spices. Place all but the garam masala in the pan and cook for a few minutes. Then add in the tikka paste and cook for 1 more minute before adding in the chopped tomatoes, chicken stock and garam masala and lemon juice.

Let it simmer for about 7-8 minutes until thickened slightly and then turn off the heat. At this point I’d have a little taste to make sure the seasoning is right and adjust accordingly. Put the lid on and leave till ready to eat.
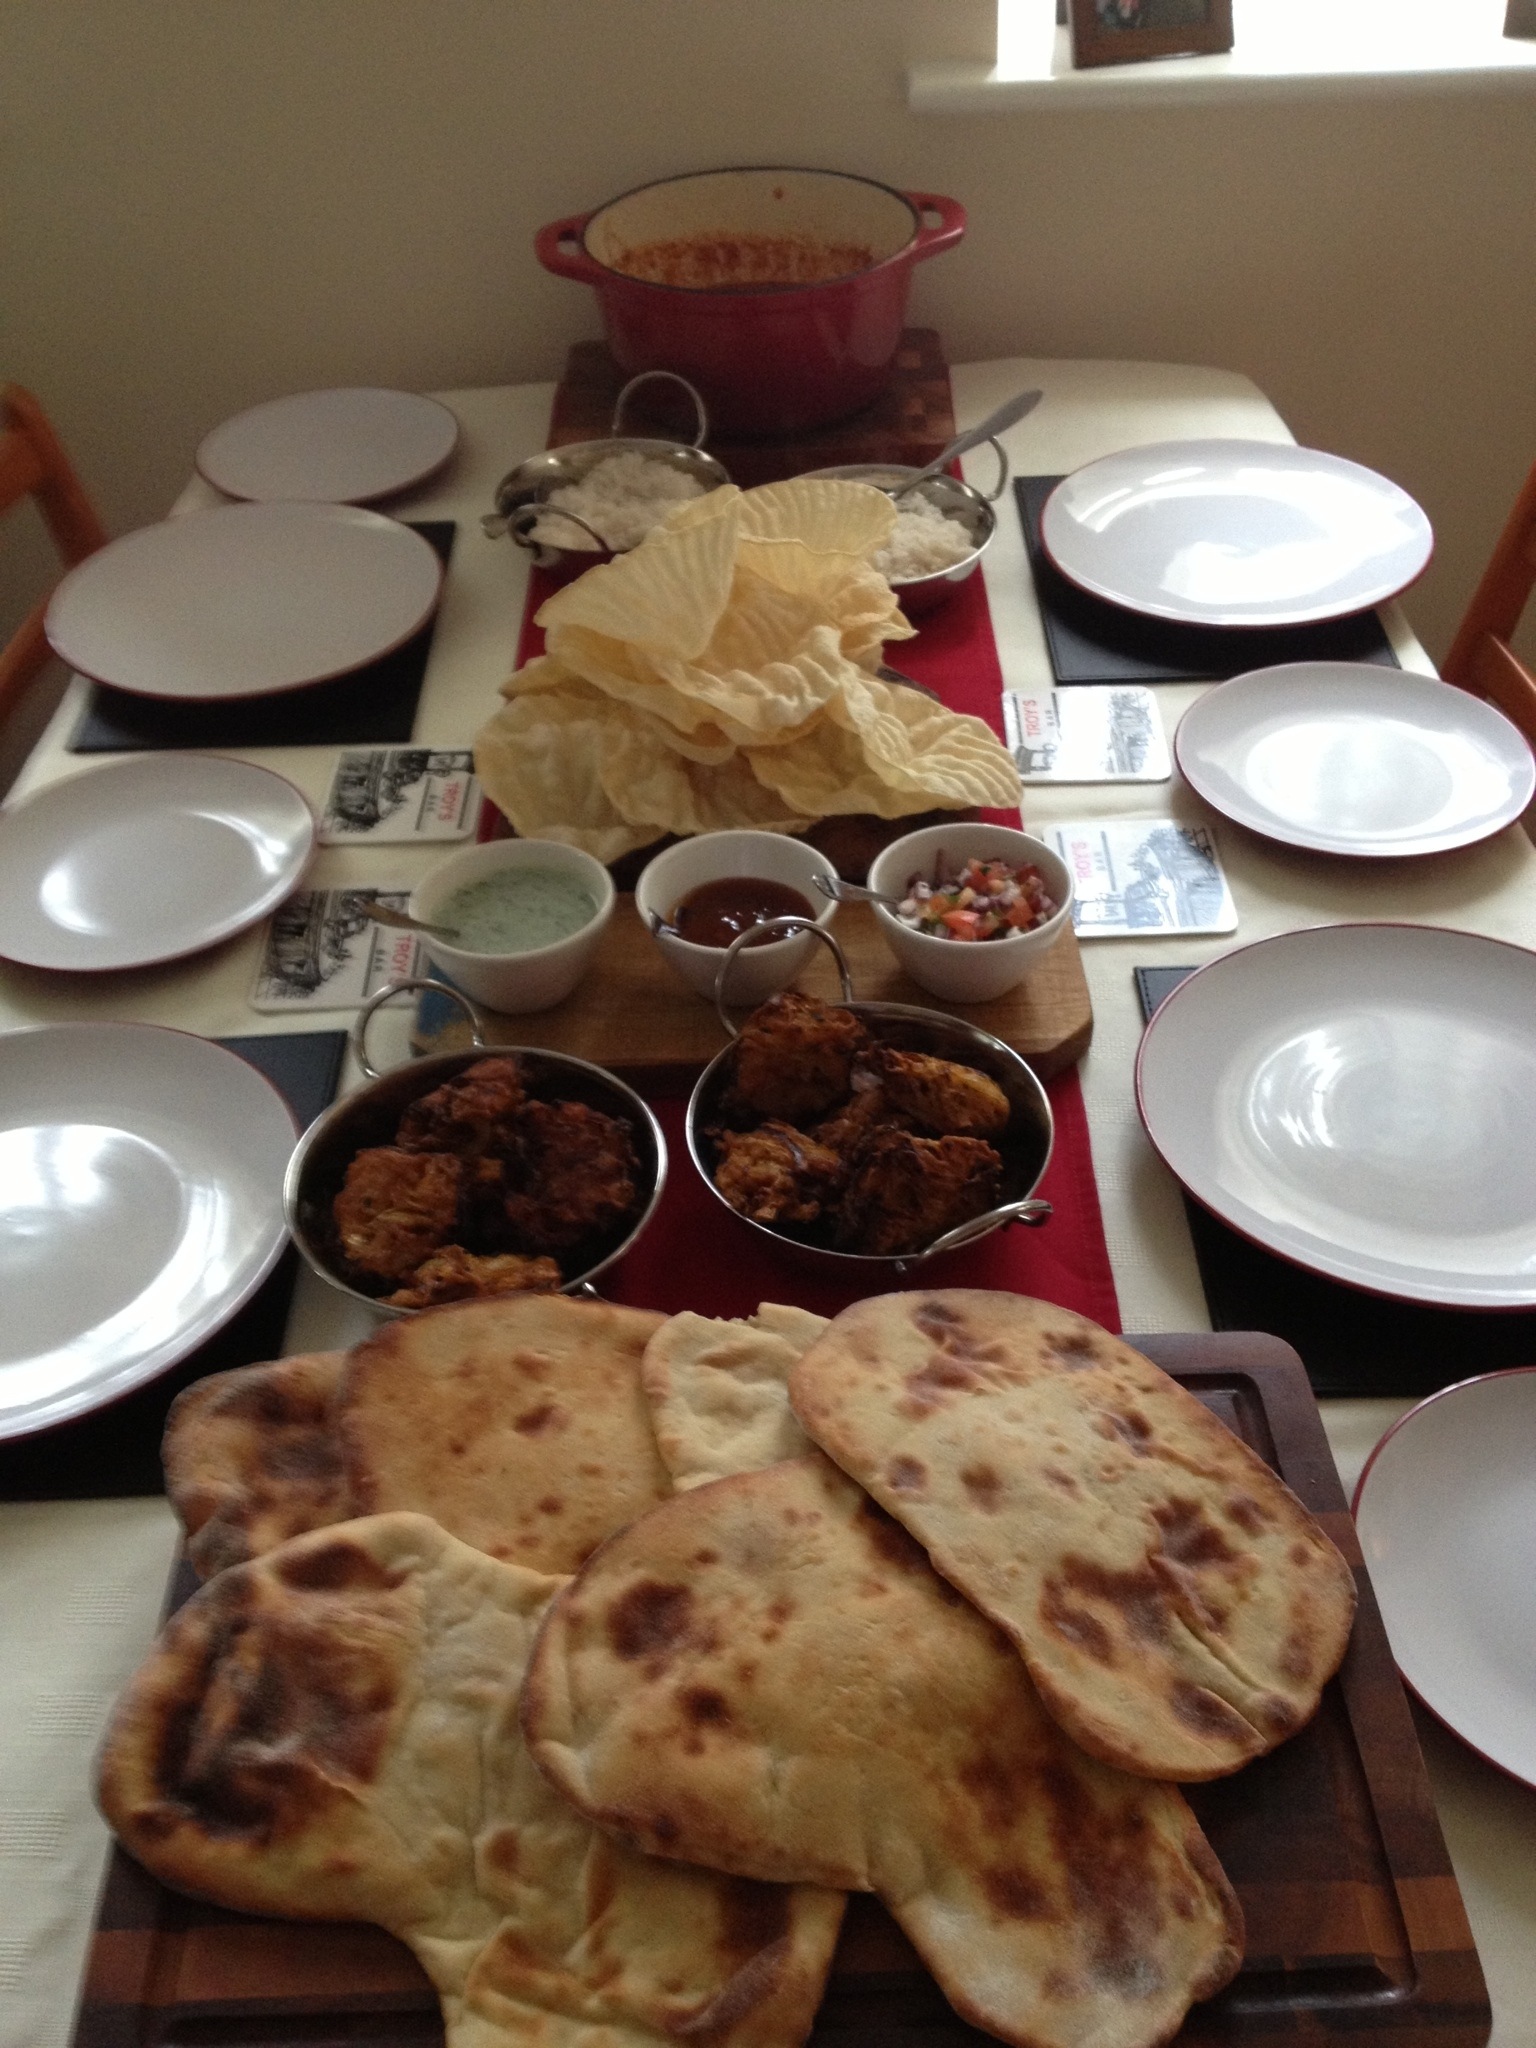
So well have a little recap at this point. Everything should be ready now for when you want to eat. The chicken tikka is cooked and ready to warm through in the curry sauce, also the naan breads and bhajis are in the oven ready to be warmed up. In the time it takes to cook the rice, everything can be warmed through ready to serve.
For the fragrant rice
1 builders mug of basmati rice
2 builders mug of boiling water
1 cinnamon stick
3 cardamon pods
2 bay leaves
Sprinkle of salt
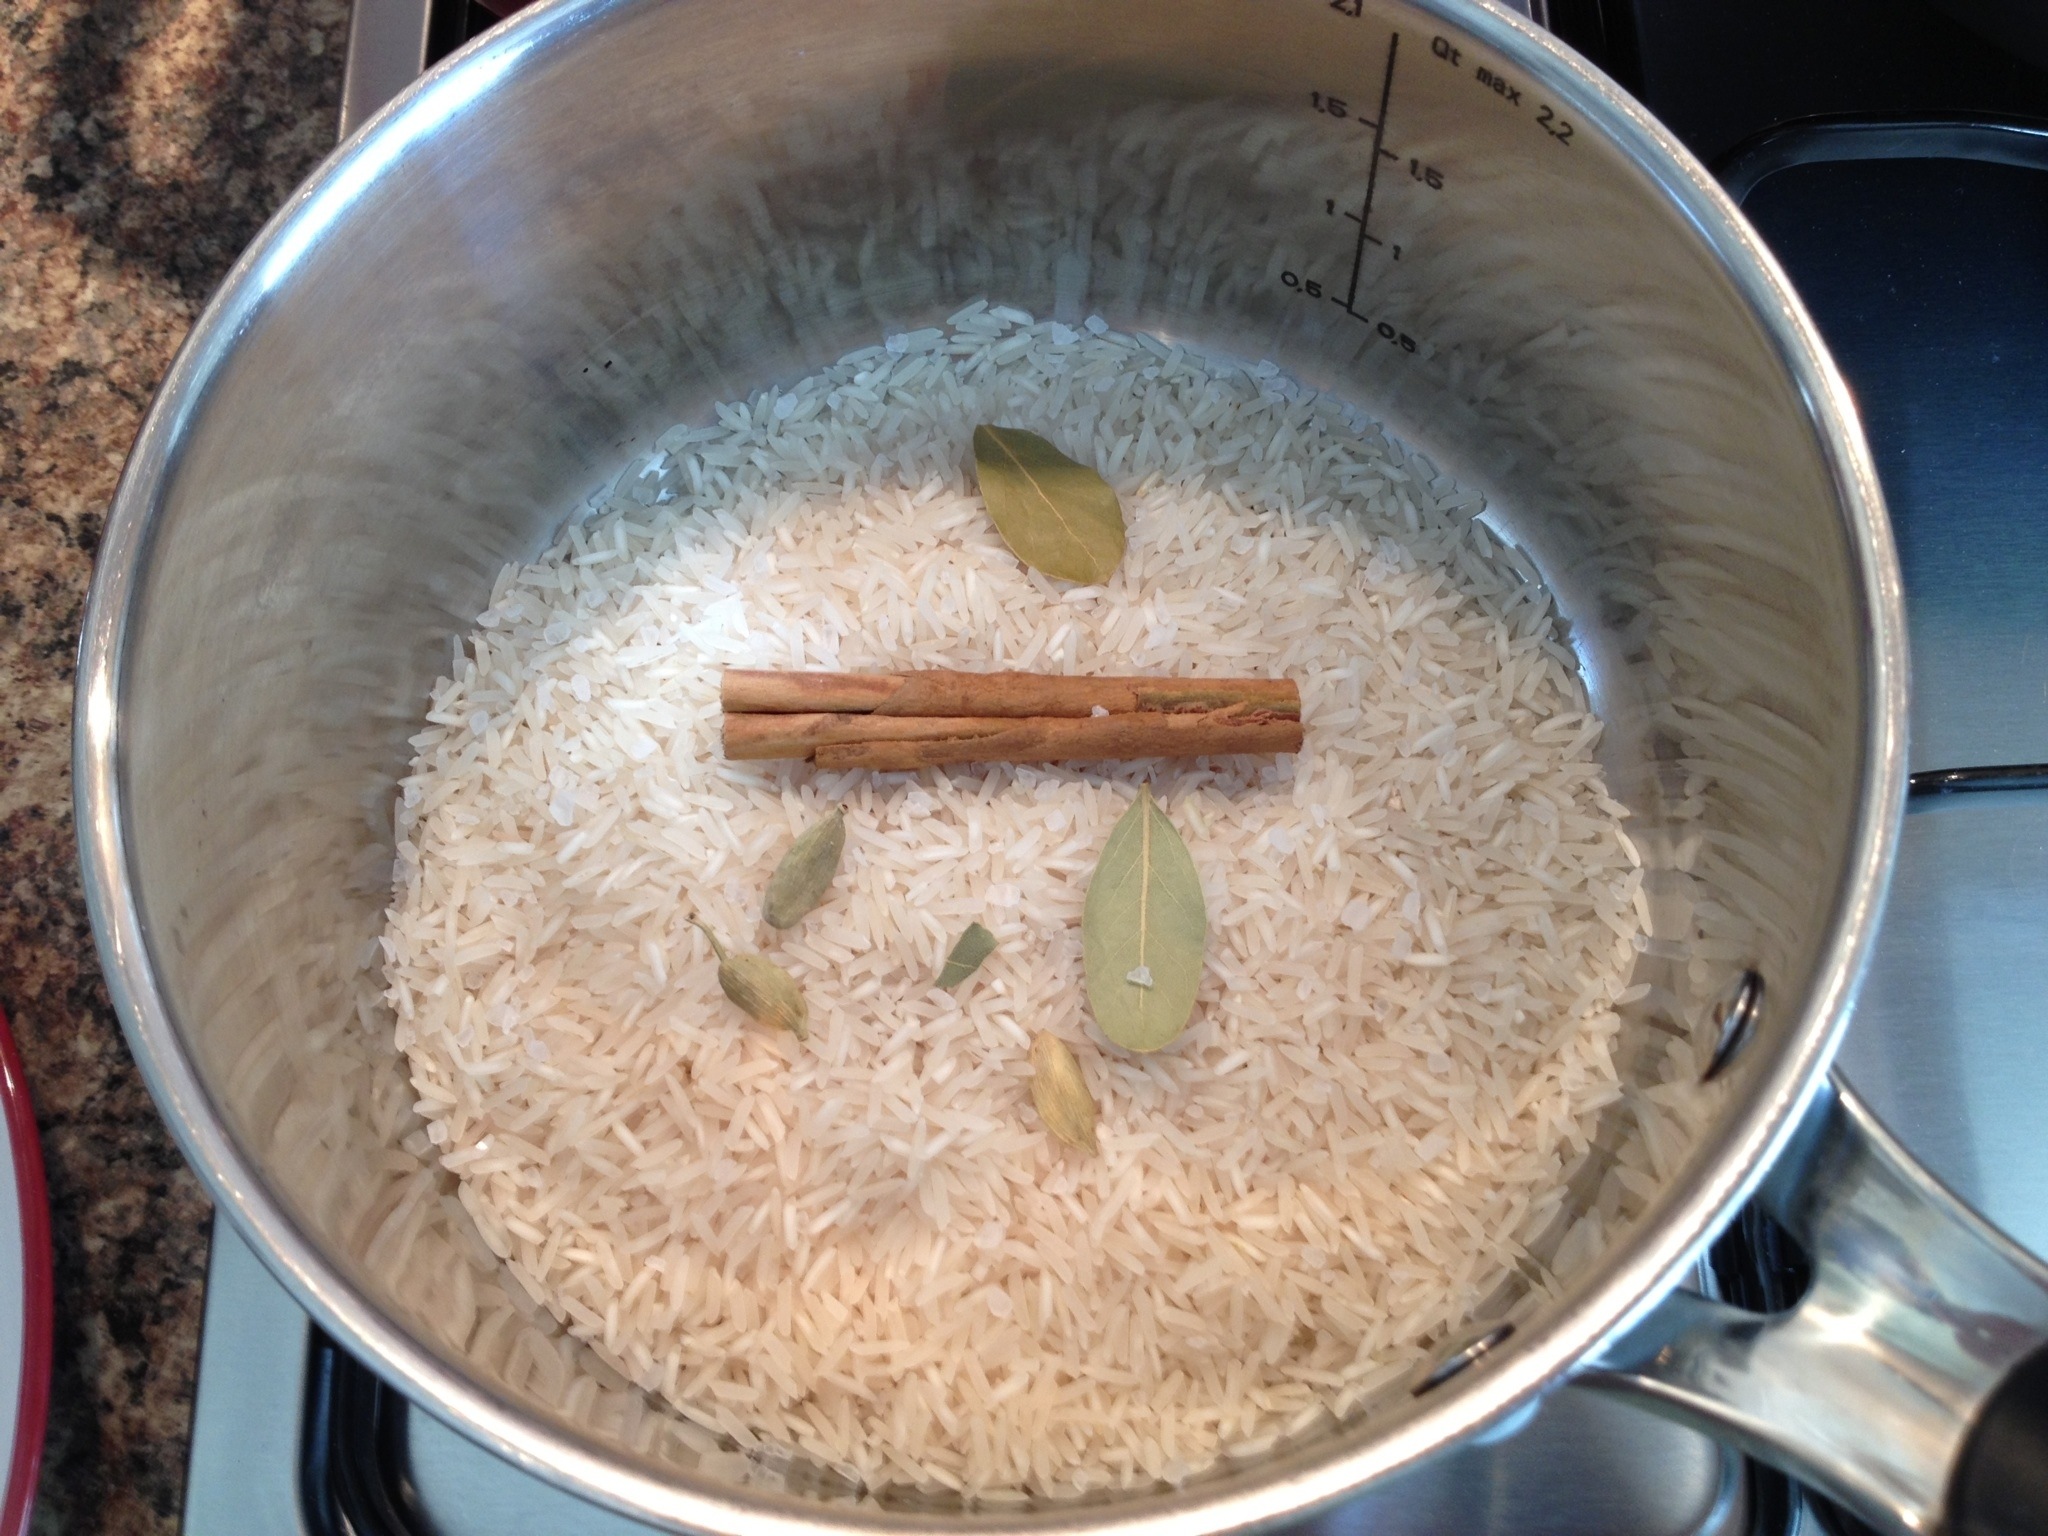
This method of cooking rice is dead easy. Get the pan on the heat straight away, don’t be afraid of burning anything, it won’t happen, you just need the pan hot before you put the water in it. While its heating up boil the kettle and put everything in it. Using the same cup as you measured the rice put double the amount of water in. Put the lid on and leave it for about 8 mins. Once all the water is absorbed, the rice is done. You can fish out all the bits and bats in it but I wouldn’t bother. At least people know what’s in it.
While the rice is cooking, get the oven on to warm the bhajis and naan’s through and get put the chicken tikka into the curry sauce to warm through. It’ll all be hot enough to serve by the time the rice is cooked.

I also bought some popadoms and mango chutney to go on the side. With that I mixed some left over yoghurt with mint sauce for a mint yoghurt dip and then chopped some red onion, tomato and coriander to make a relish.
All of this is a little effort but at the end of the day it’s totally worth it. All this will easily serve 4 people with plenty left over.
बॉन एपेतीत
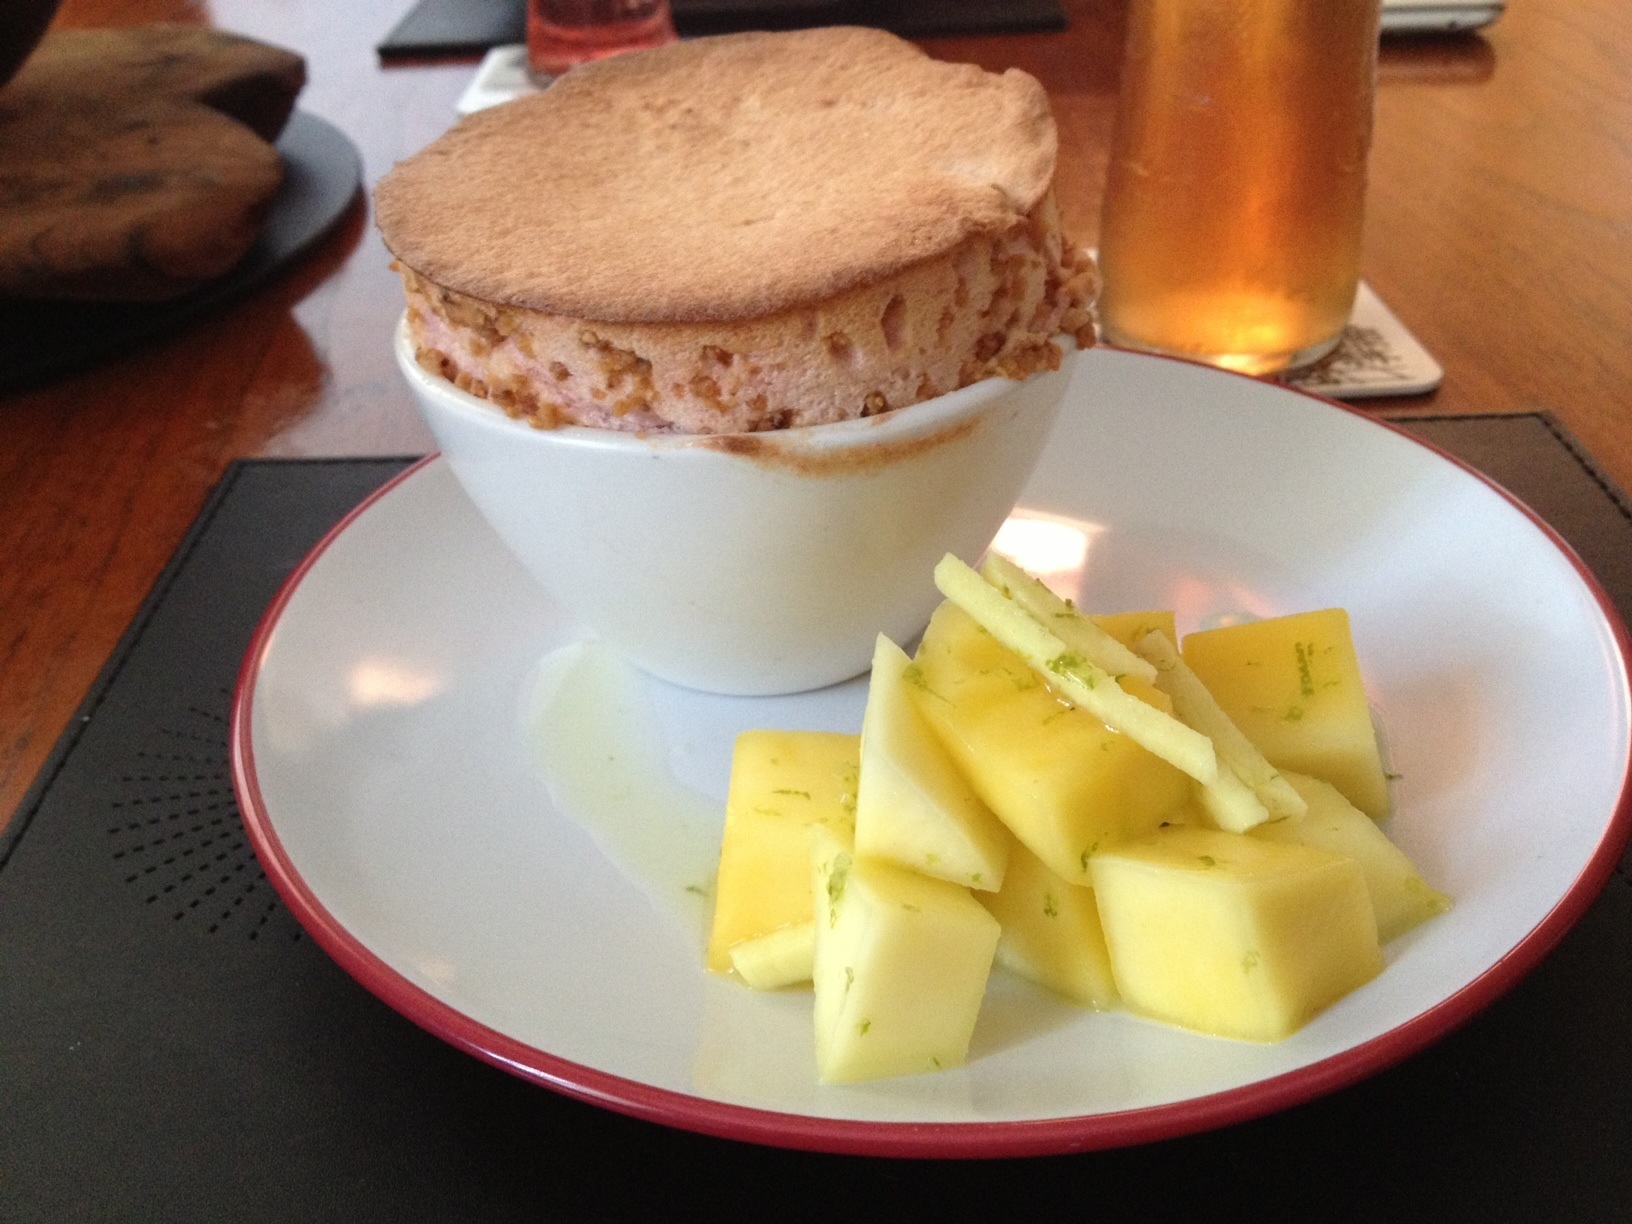
Not done a post for a while so thought I’d come back with something a little different. Soufflés. More specifically rhubarb soufflés.
With rhubarb being in season and being in West Yorkshire where some of the best rhubarb is produced it would be rude not to take advantage of it. Now when you think rhubarb you think: crumble. I wanted to do something completely different, but still keep the “traditional” feel of the classic dish. So I’m thinking modern twist on a classic. Going onwards and upwards and all that..
Here’s the shopping list: (should make 6)
For the soufflés
40g plain flour
30g diced unsalted butter
120g caster sugar
40g flaked almonds
5 stalks of rhubarb
Glug of grenadine
4 egg whites
For the salsa
1 mango
1 lime
1/2 knob of stem ginger
First job is making the crumble. Pre heat your oven to 180 degrees C and put the flour and butter in a bowl and rub together until you get a breadcrumb consistency. Add 20g of the caster sugar and the almonds into the mix, tip onto a baking sheet lined with greaseproof paper and bake for 8-10 mins (ish) until golden brown. Set aside to cool. Once cooled blitz the mixture to get a fine breadcrumb consistency.
Next is the rhubarb base. Trim the rhubarb into about 2cm batons (discarding the top and bottom bits) and place in a pan with 60g of the caster sugar with a glug of grenadine. This is just for colour really. Place on a medium heat for around 8 minutes tossing it around every min or so. Once the rhubarb has started breaking down its done. Tip the whole mixture into a liquidizer and blitz to a purée.
Now we’ll prep the dishes. Melt a little butter and brush some small ish dished or moulds with the butter using upward strokes. This will encourage the soufflés to rise more. Tip in a little of the blitzed crumble and shake all around the moulds so its all covered. Keep in the fridge until needed.
Take the 4 egg whites and whisk up with an electric beater until soft peaks form. Then gradually add 40g of caster sugar while continuing to mix till stiff peaks form. This bit is all about speed so get the prepared moulds on a tray and ready to put straight in the oven. Take the rhubarb mixture and very carefully fold into the egg whites until combined. Tip into the moulds and then with a palette knife level off the tops of the moulds so they’re completely flat. Bang in the oven for about 10 mins and as is the way with soufflés: don’t open the bloody door!!!!!
For the salsa, chop up the mango into 1cm cubes and place in a bowl with the zest and juice of the lime. Julienne the ginger and add that in too.
Once the soufflés have risen to about 2-3cm over the top of the dish there done. Serve on a plate with the salsa on the side and enjoy!!!
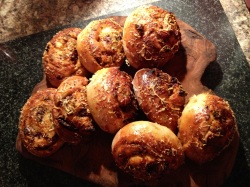
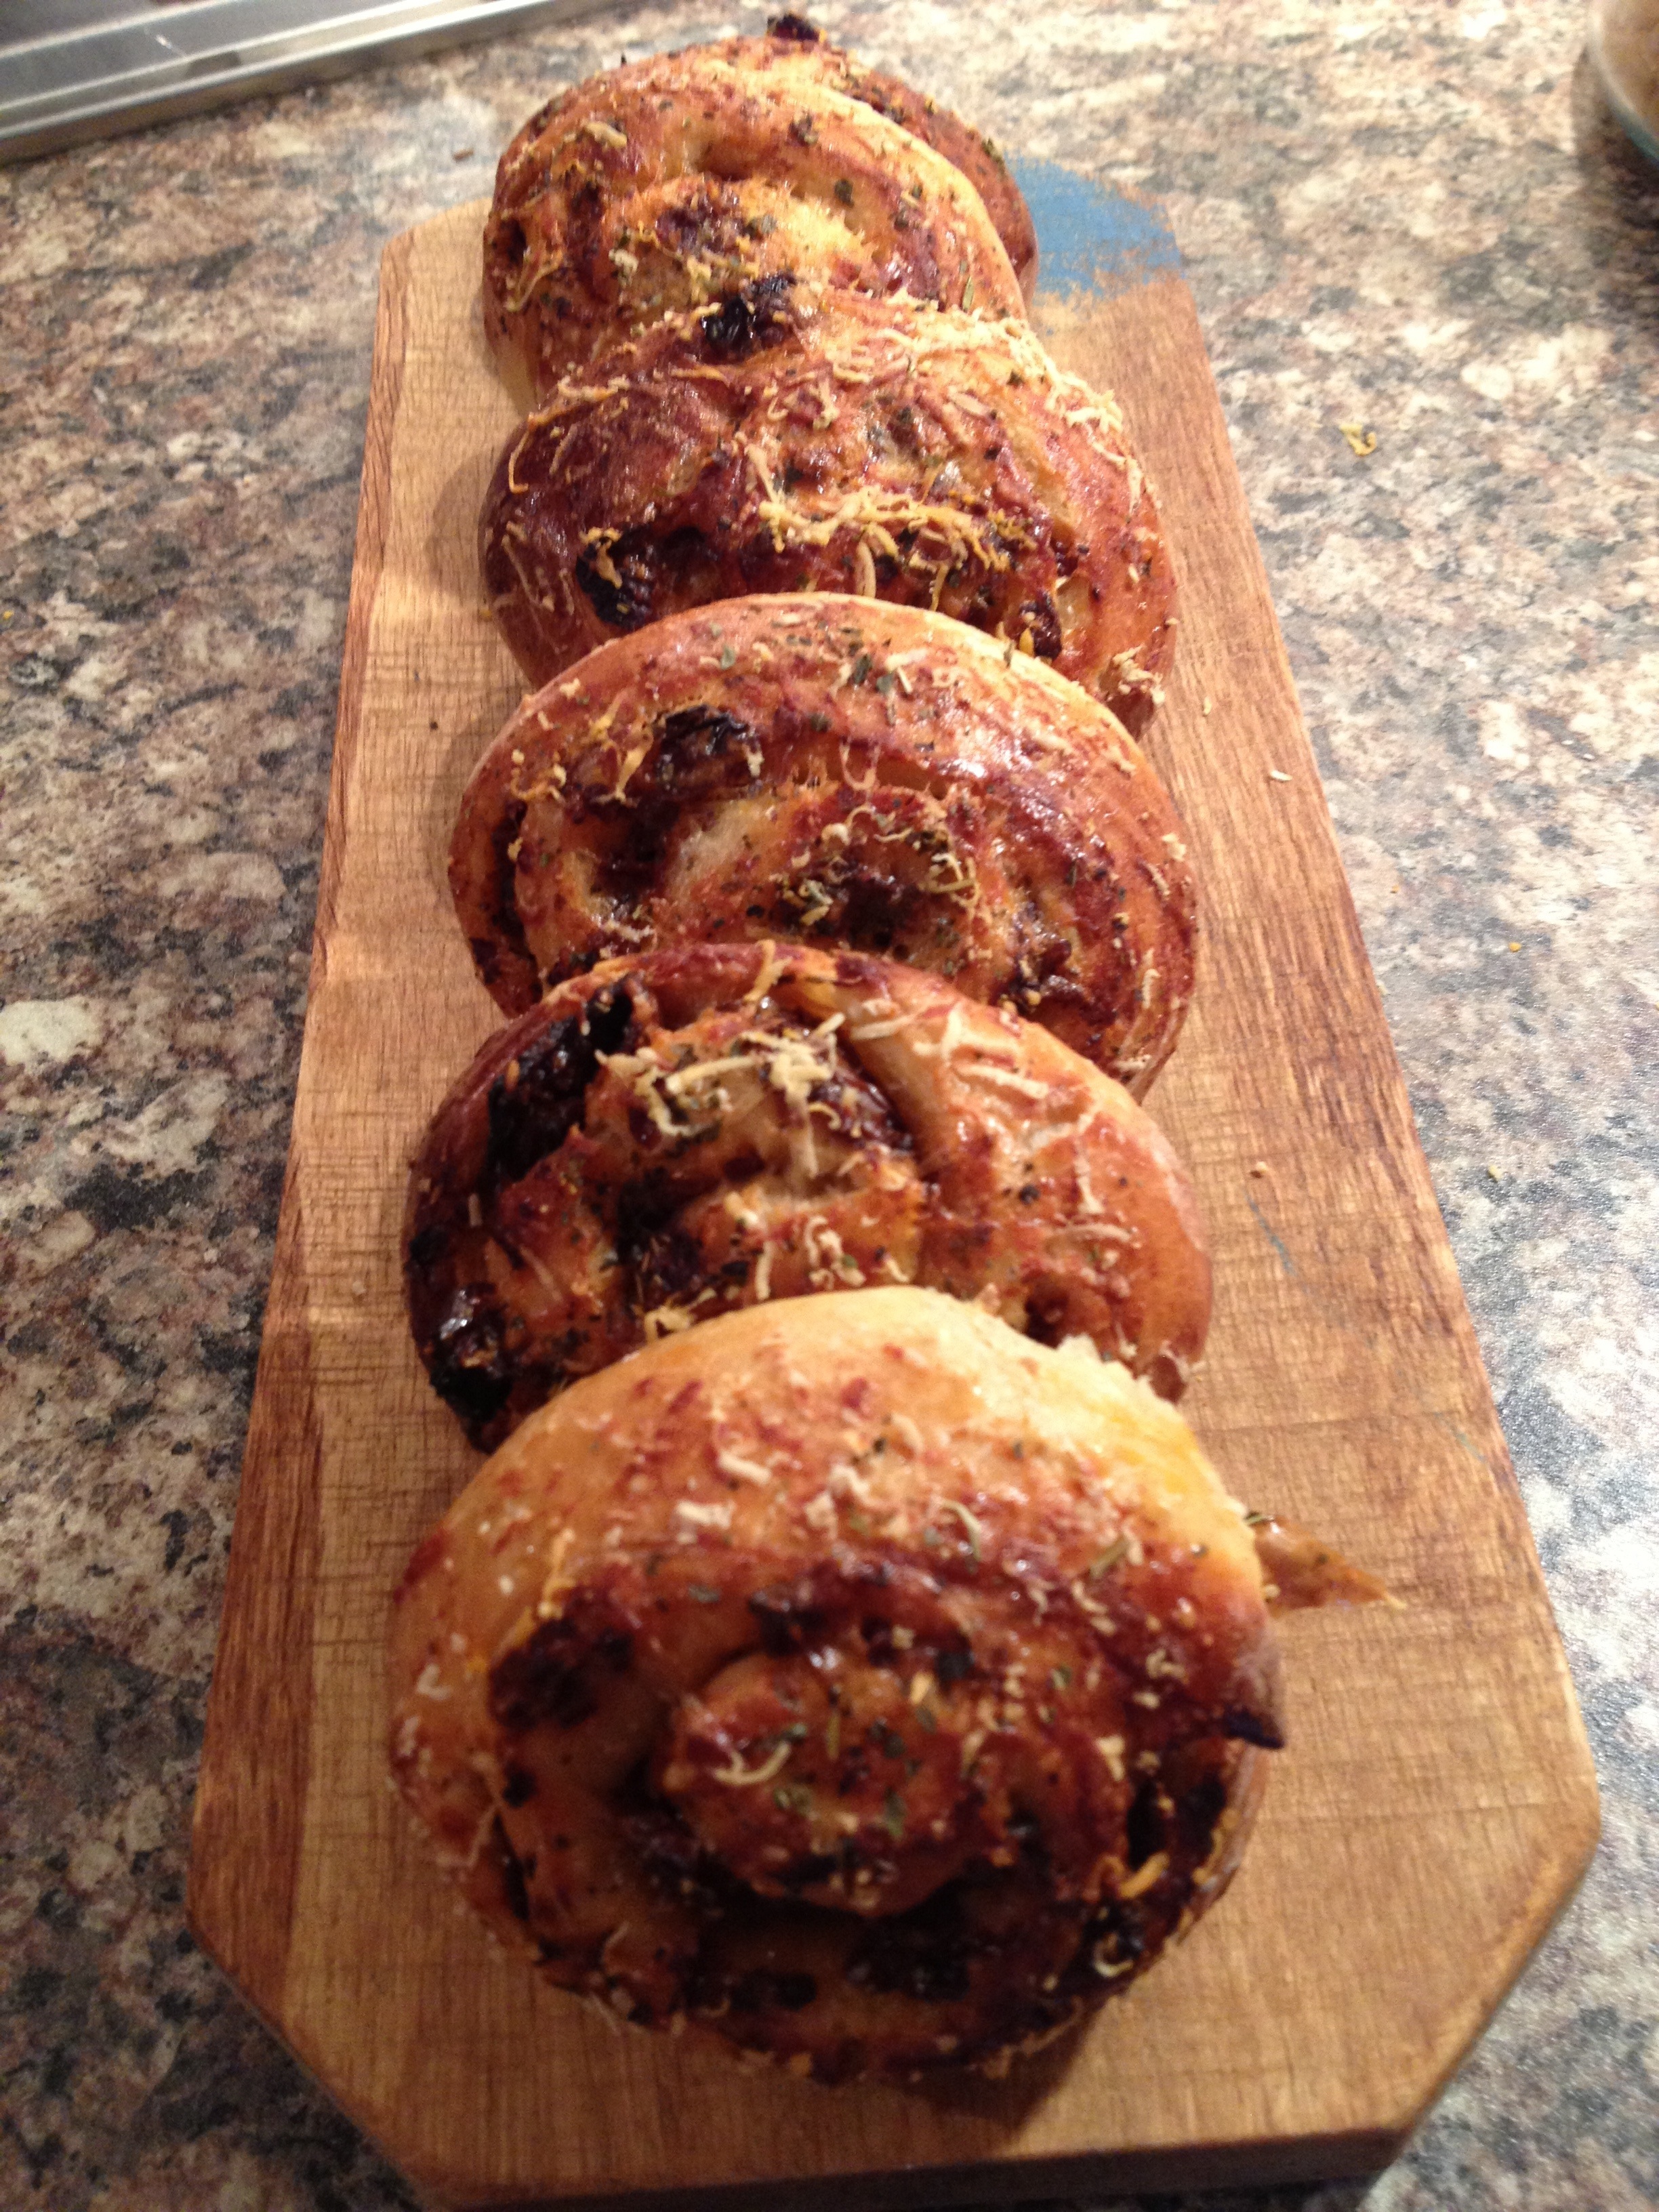
I thought I’d do something a little creative in this post. I’ve was thinking along the lines of the ‘Pain aux Raisins’ I made before but a savoury version.
I had some Parmigiano Reggiano cheese left over in the fridge from the weekend so went for a bit of that to get the ball rolling. After rooting around the cupboards i also found some jarred sun dried tomatoes and knew that the two would go.
I knew that the sun dried tomatoes would be quite sweet so I wanted something to challenge the flavour of it and thought that chipotle paste I also found in the cupboard would be a good combination. Finish it off with some dried oregano for a herby hit and job was a good one. Herders what I concocted:
For the bread
500g strong bread flour
10g salt
10g instant yeast
20g caster sugar
30g soft butter
2 eggs
250ml cool water
Some Olive oil
Set a mixer with a dough hook attachment fitted and add all the ingredients apart from the water into the bowl making sure the yeast and salt are on opposite sides of the bowl. Set on a low speed and add the water slowly till it comes together. You want a soft but not soggy dough, so you might not need all of the water. Up the speed to medium once combined and keep going for 5-8 mins.
If you don’t have a mixer just do the same by hand and knead for 5-10 mins. If you do it this way, once it’s combined and the dough had cleaned the sides of the bowl, place it on a work surface coated in a little olive oil. I think it’s easier to work with and if you keep adding more flour the dough can become tough when baked.
Once it’s finished using either method, coat it in a little oil and place in a bowl to prove for a couple of hours or doubled in size.
For the filling
75g of Parmigiano Reggiano
2 tsp of chipotle paste
Jar of sun dried tomatoes
Dried oregano
1 Beaten egg
Once the dough has proved, carefully roll it out to about 35×30 cm. With the long side towards you, dot about the chipotle paste and sun dried tomatoes and grate most of the Parmigiano Reggiano on top of the dough with some oregano. Then roll the dough up like a Swiss roll and press to join the seal.
Cut into 12-15 pieces each about 2cm long and lay them flat side down in a prepared baking tin lined with baking parchment (exactly like the Pain Aux Raisins in one of my earlier posts).
Leave again to rise for about an hour and then brush with egg, grate the remaining Parmigiano Reggiano over the top with the oregano and bake in a pre heated oven at 220 degrees for 15-20 mins.
Best served warm. Think sun dried tomato pizza but rolled up.. Ha


I’d seen these on the telly and had to give them a go!! They looked absolutely mega.
I changed one or two things to my liking too but didn’t mess about too much with the original recipe:
Ingredients
– 6 tbsp thickish honey
– 3 tbsp soy sauce
– ¼ tsp chilli flakes
– 3 whole star anise (crushed up)
– 1 tsp of Chinese 5 spice
– 1/2 tsp salt
– 1/2 tsp black peppercorns
– 3 cloves garlic
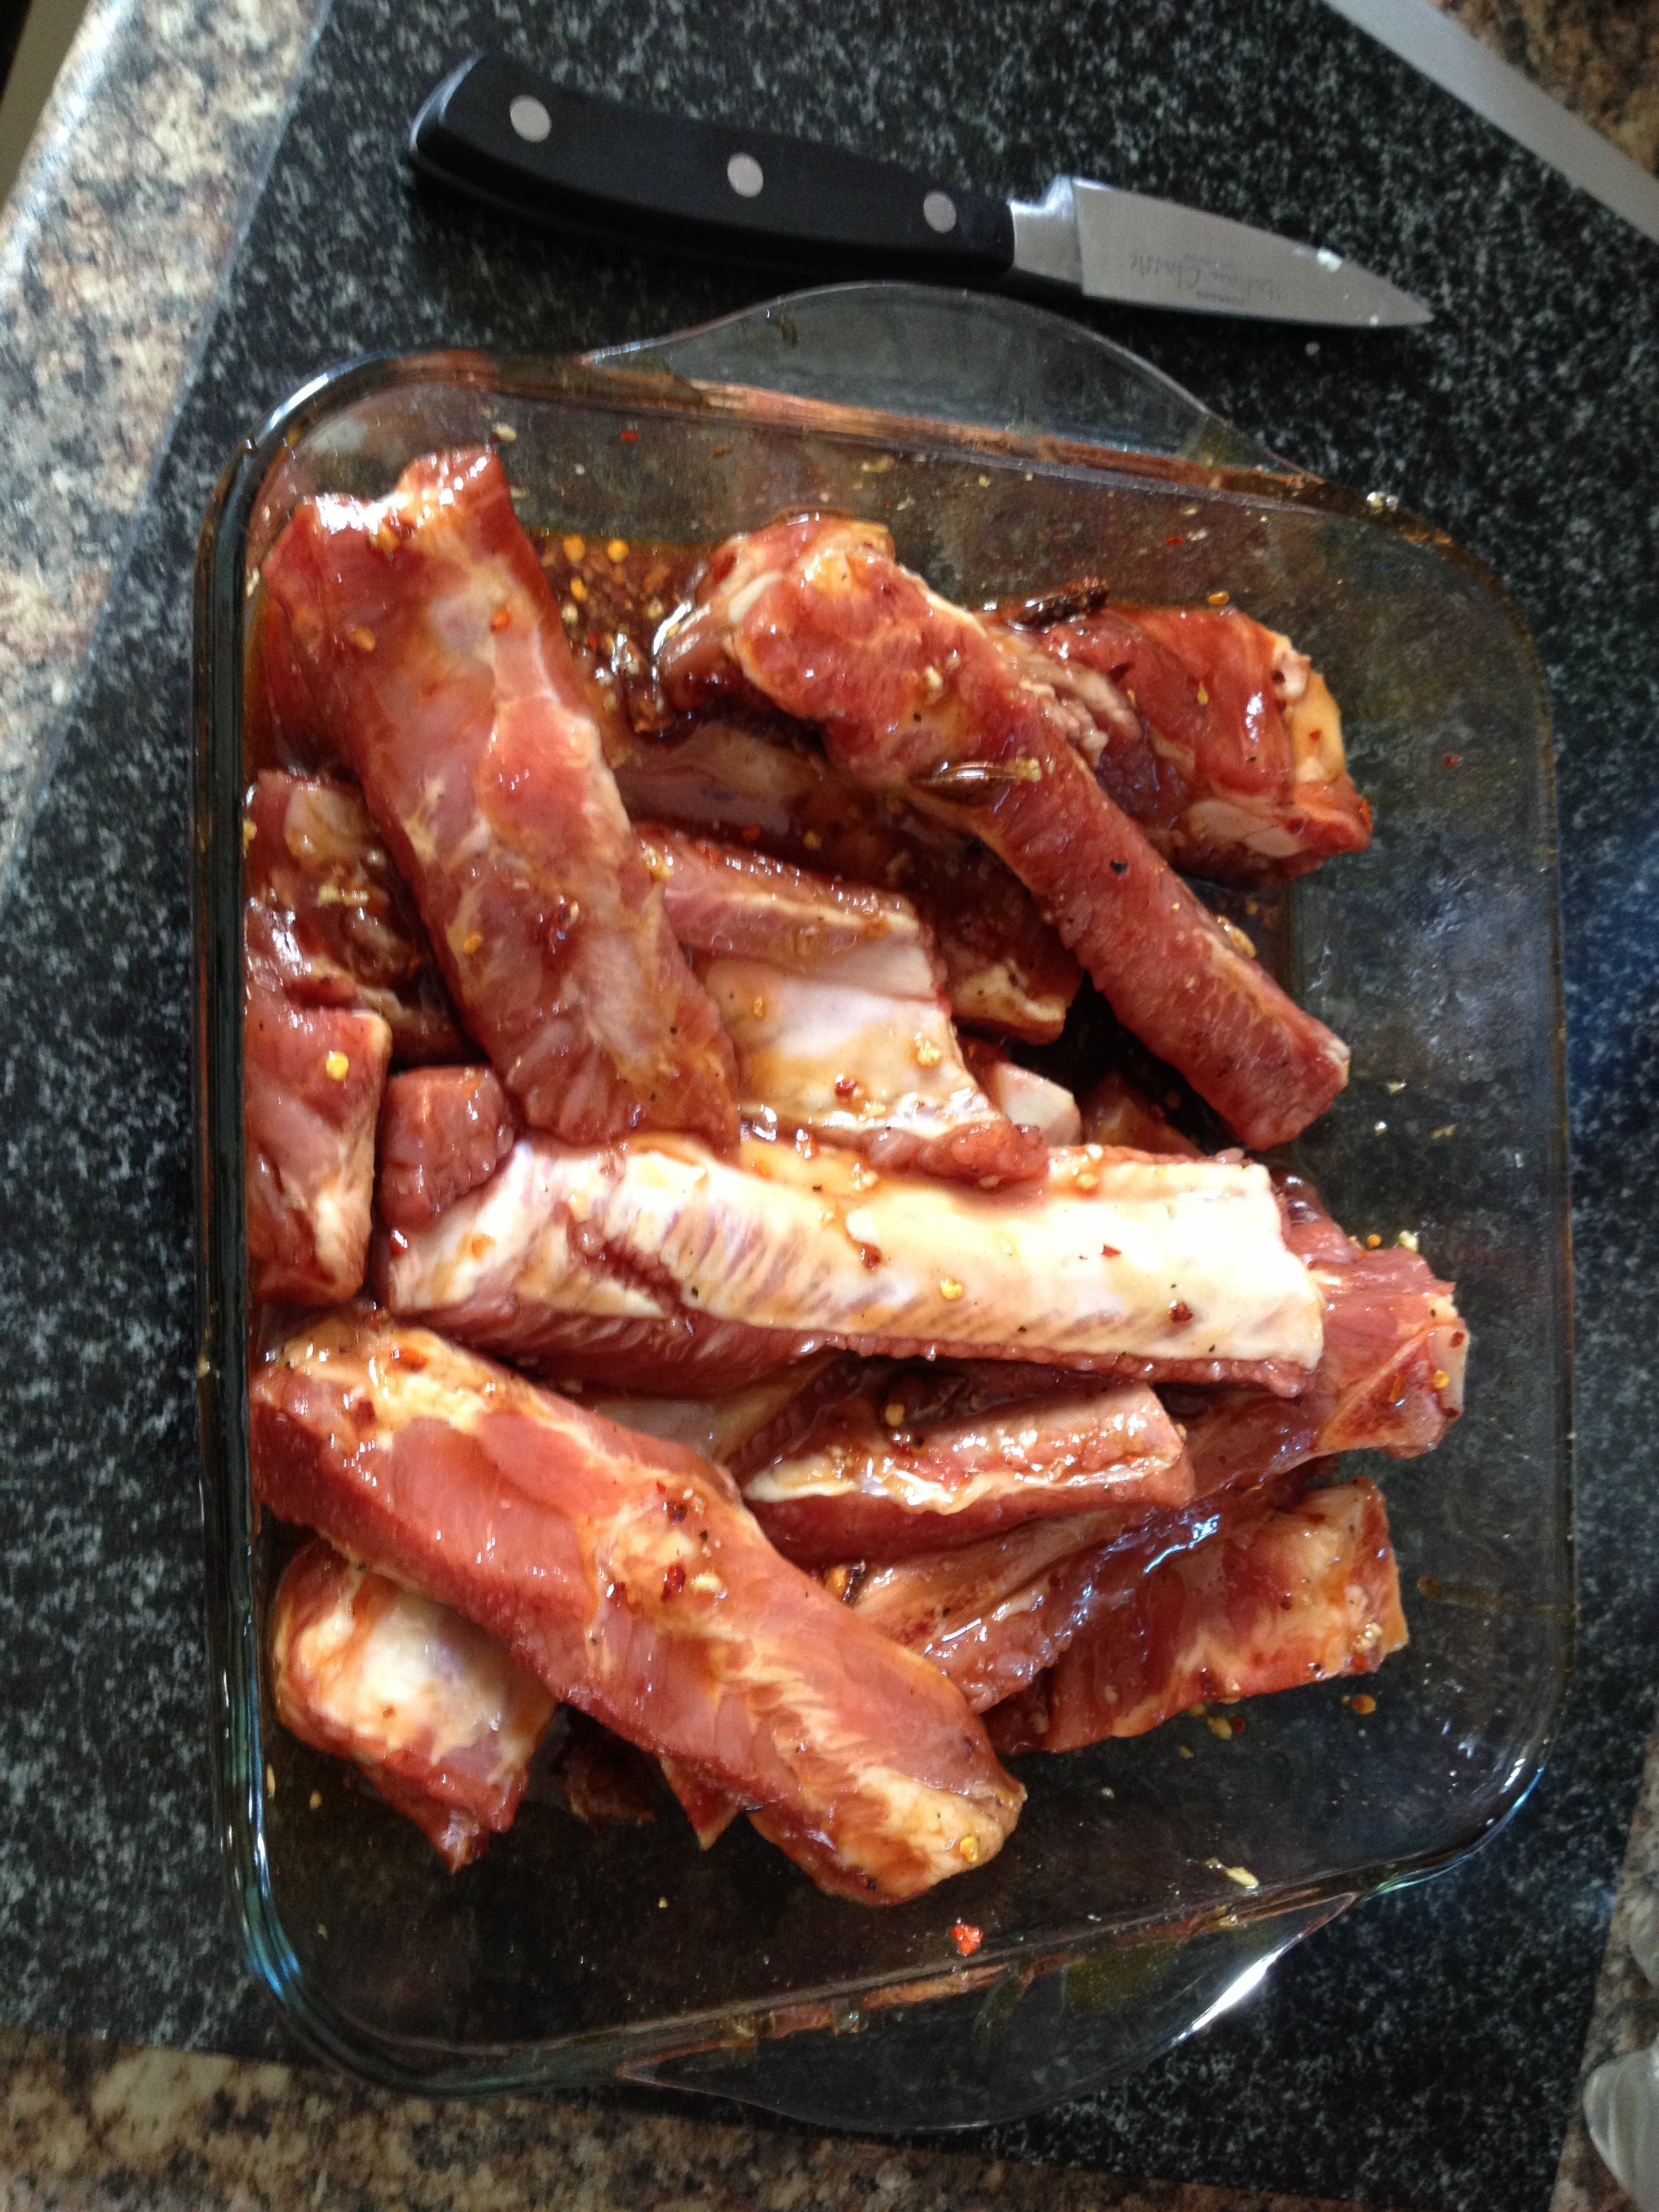
– 1.5kg/3lb 5oz meaty pork ribs
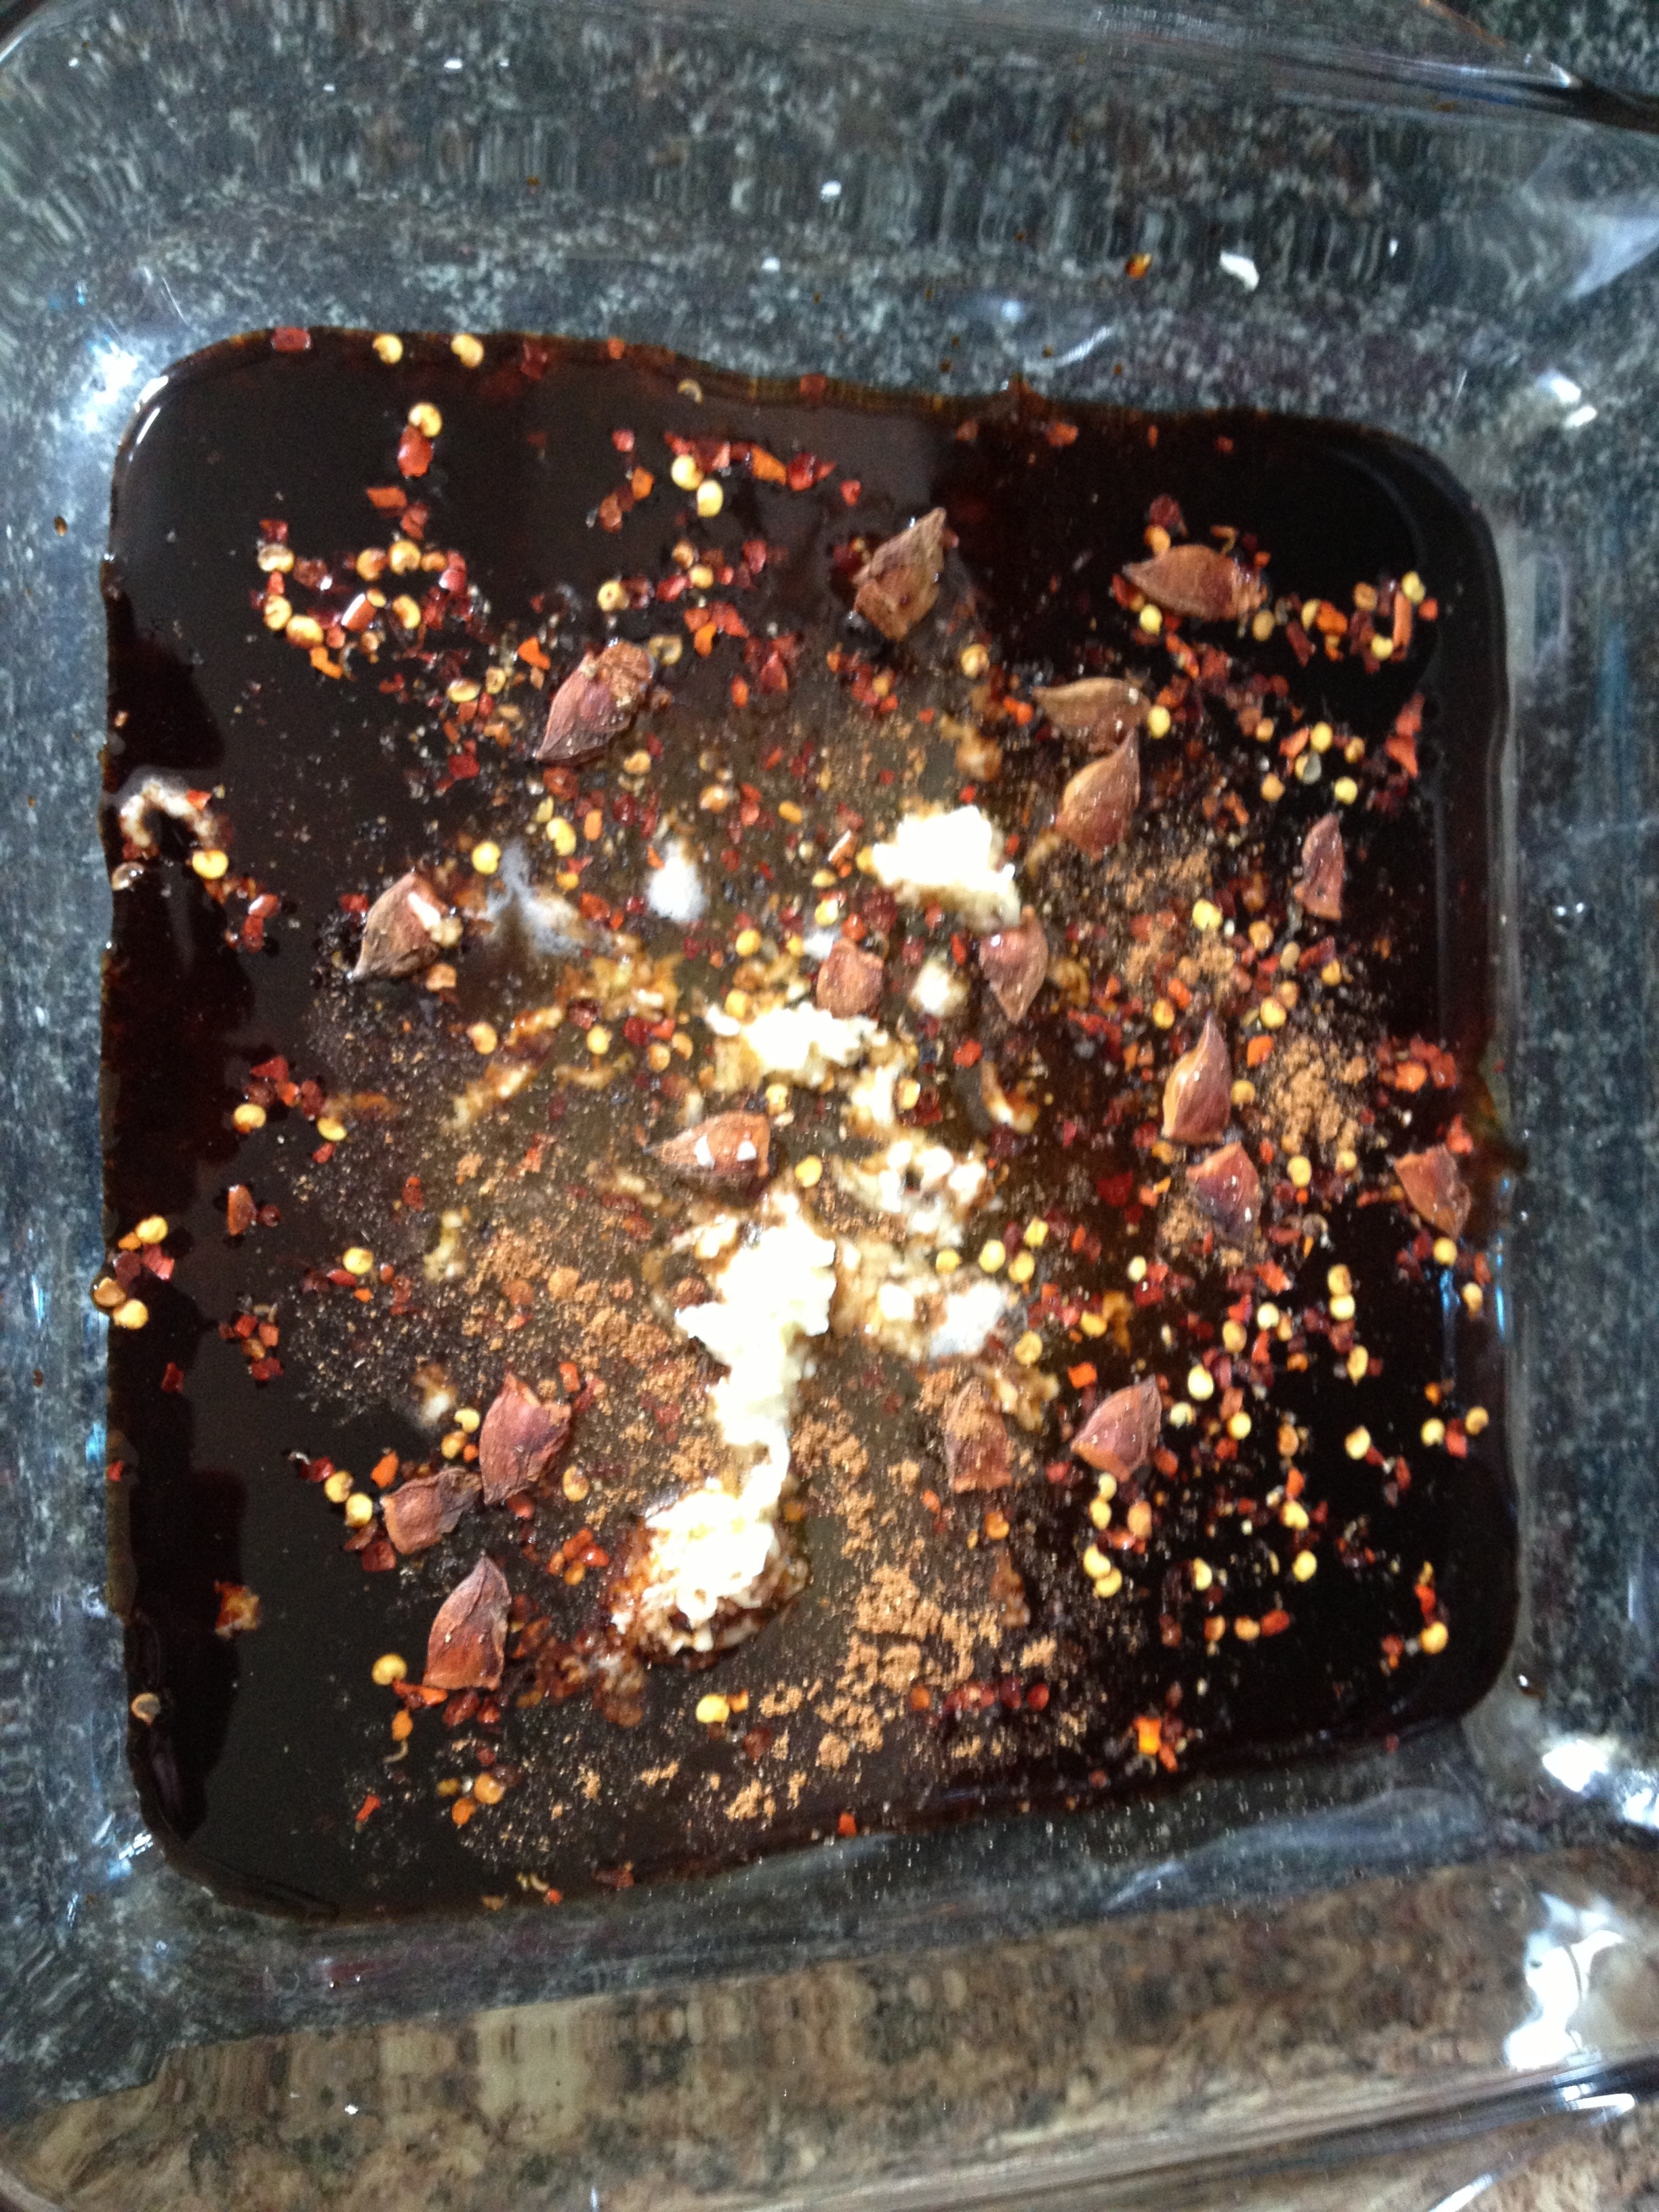
To make the marinade, spoon the honey and soy sauce into a roasting tin or baking dish. Add the chilli flakes, star anise, 5 spice and salt. Grind the peppercorns and add them to the marinade. Mince the garlic up and add that in too.
Toss the ribs in the marinade then set aside for at least 2 hours. It wouldn’t hurt if they stay there overnight.
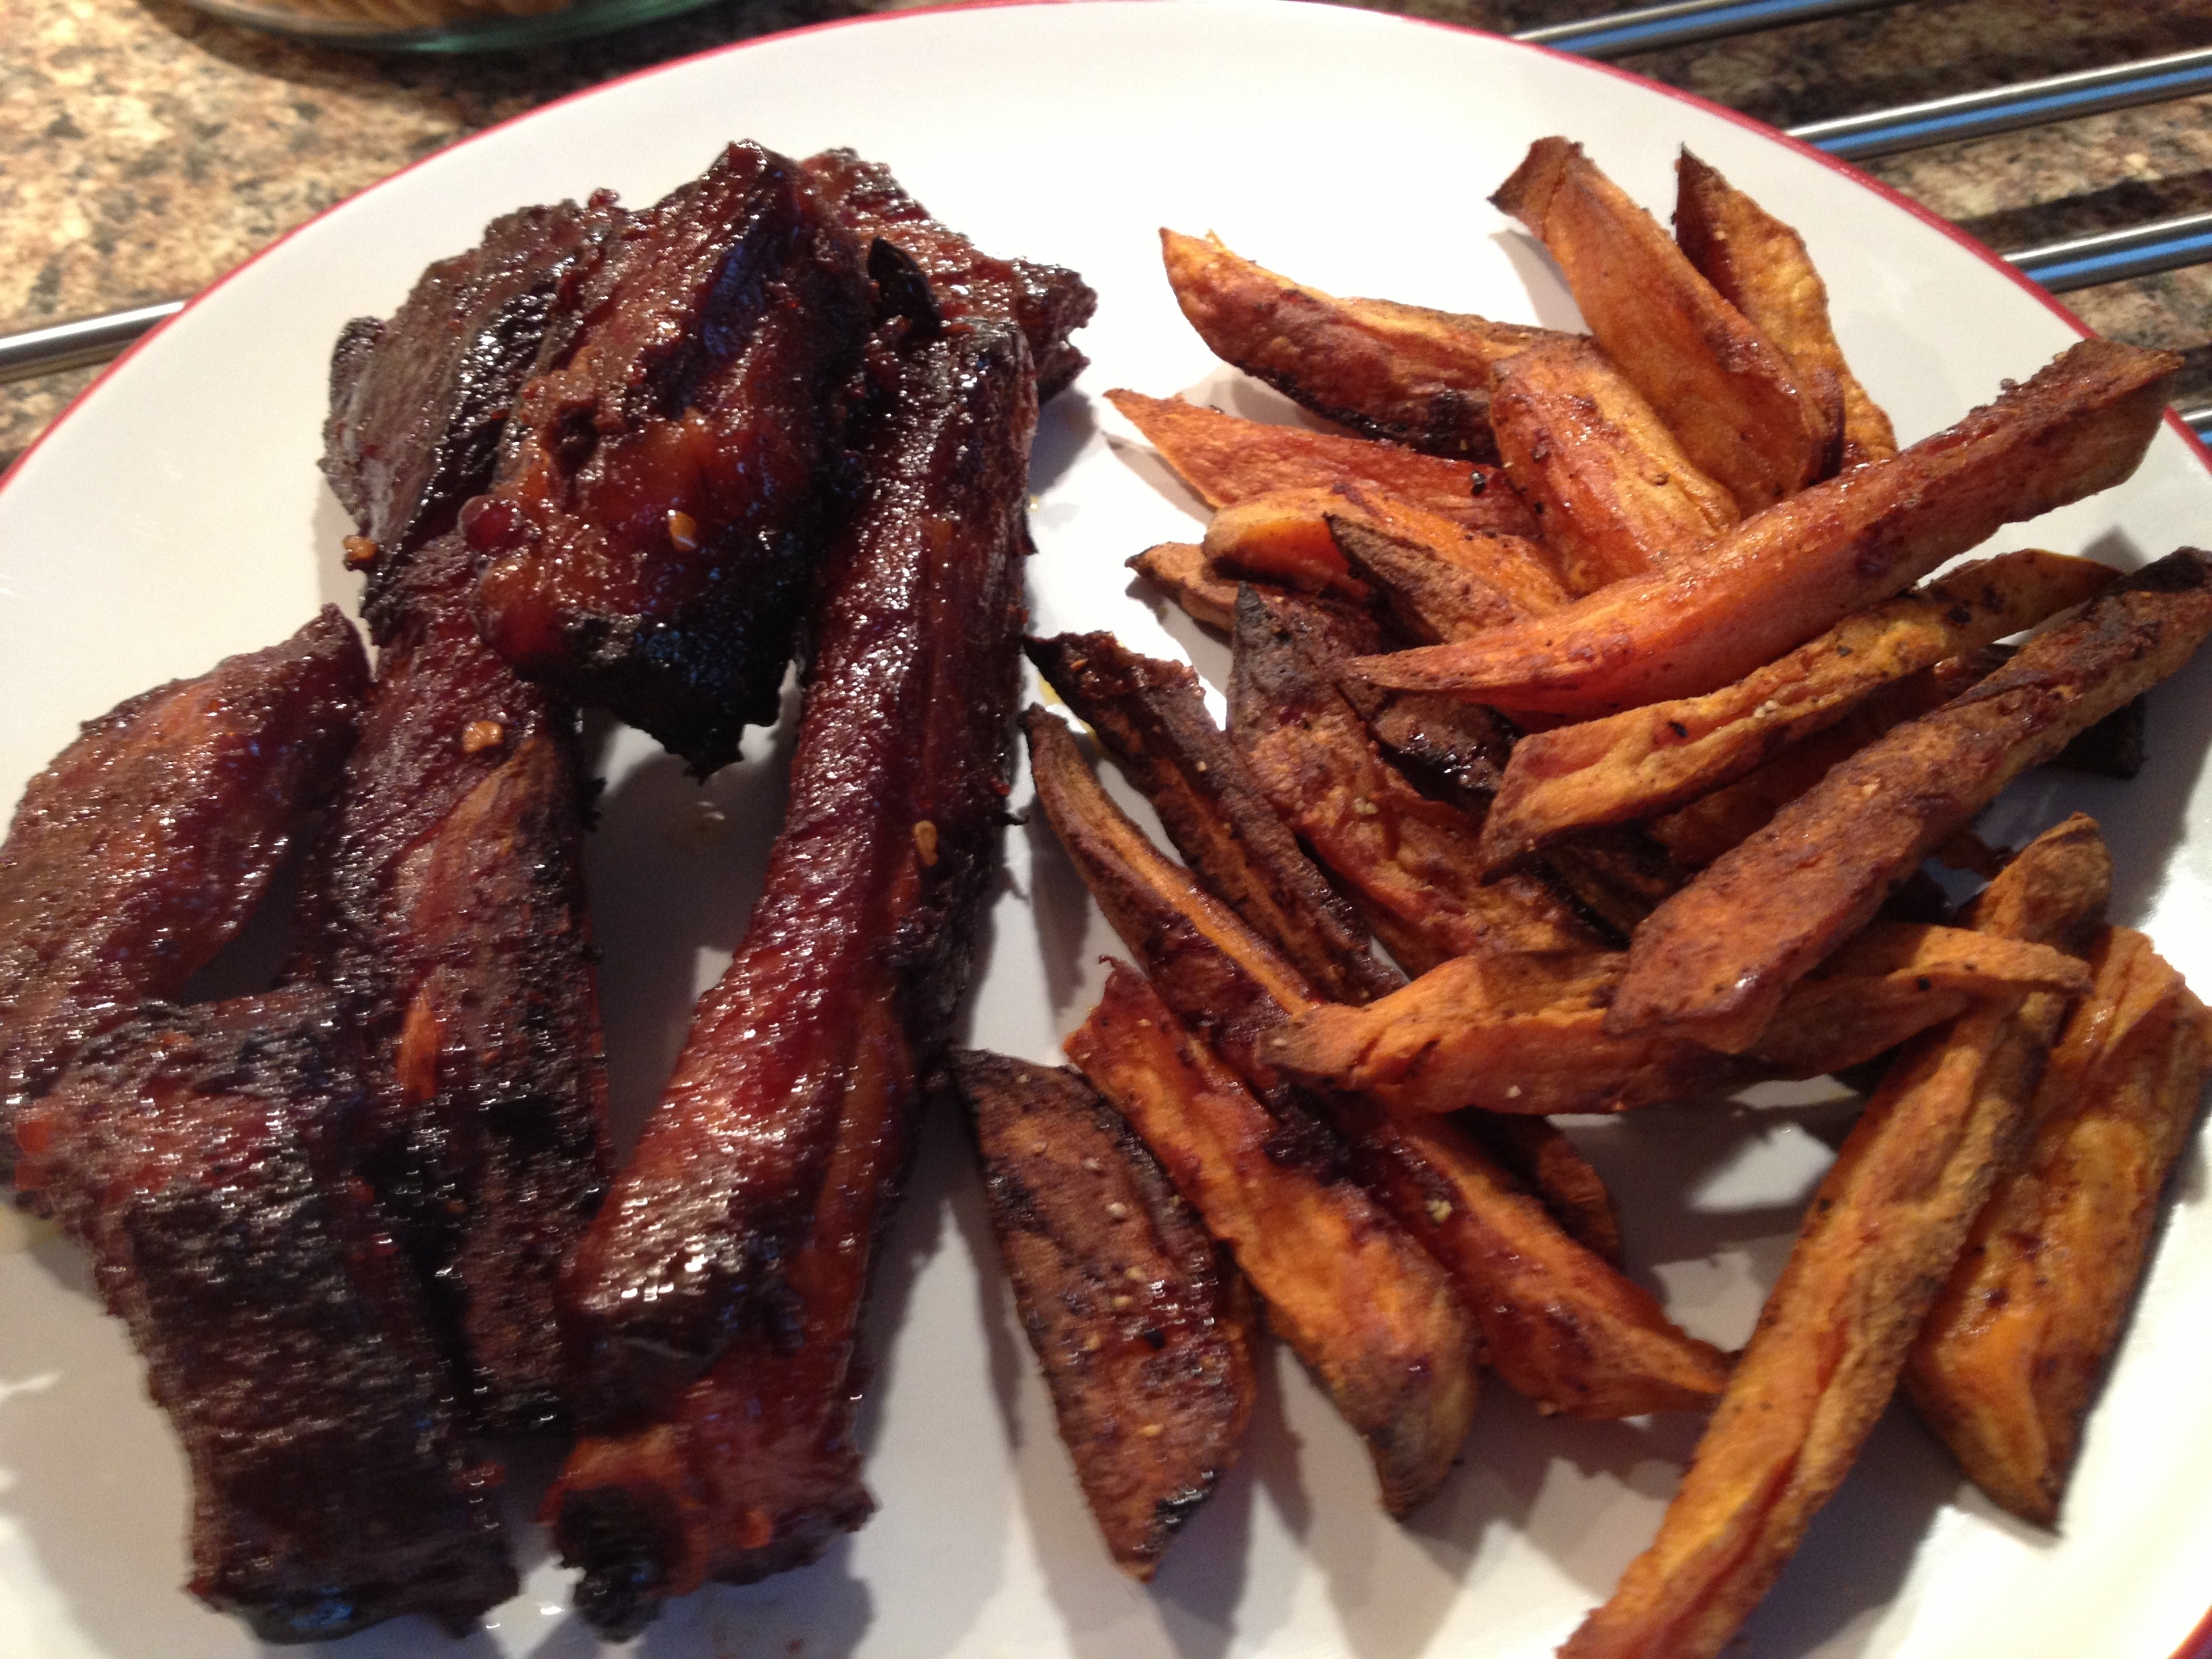
Roast the ribs at 160C/325F/Gas 3 for 90 minutes, turning them in their sauce from time to time.
Then turn the heat up to 200C for 15 minutes, Keep an eye on them, as sometimes they burn easily. They are ready when the meat is tender, though far from falling off the bone, and the ribs are sticky and almost charred.
I served mine with sweet potato fries just for a change to having chips but you can have whatever you like with them.

Always after a cooking a chicken for Sunday lunch I’m already thinking about the chicken stock the next day and I really do think its amazing for a clear out opportunity.
Of course homemade anything is better so why not stock. Plus, I’ve always got left over veg and stuff in the fridge from recipes I’ve attempted earlier in the week, and all the leftover veg from the Sunday dinner so the stuff is there ready to make it anyways.
As is the way with me I look at a few different recipes on how to make anything to get a sort of basic way of doing it. And then literally was a case of getting all the leftover veg and whatever else and chucking it in. This is what I came up with:
(*ill make a note of saying now that this is how i made it this time, it changes every time depending on what I’ve got in the fridge or leftover)
Leftover Chicken Stock
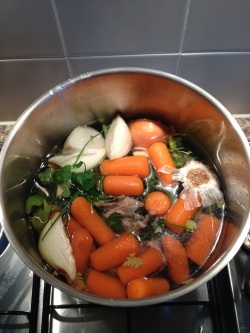
The leftover chicken caucus from Sunday lunch
2 onions
1 shallot (don’t remember buying it but I wasn’t wasting it)
Couple of carrots (I had 2 large ones)
Some celery (including the heart, I had about half a head left)
Some garlic (2 cloves left on a bulb so I threw that in too)
Hand full of parsley (including the stalks)
Half a bunch of chives
Around 10 peppercorns
2 crushed bay leaves
About a Glass of rosé wine (again a leftover in the fridge that I wasn’t going to drink so why not)
Enough water to cover everything
The basic gist of chicken stock is throw all the above in a deep sided pan and simmer for a couple of hours, skimming it every so often to get rid of the scum and grease.
After around 2 1/2- 3 hours, strain the stock through a fine sieve and put into containers.
I freeze mine and i’ll usually get about 2-3 tubs worth out of it. If your going to use it straight away just refrigerate. Should last for a good 3 days.
It’s all really simple to do, better than cubes and uses left over stuff. Win Win Win all round!!!

So since I started this food blog I’ve always been quite big on Jamie Oliver’s 15 minute meals and have been working me way through the book. This was the next one I attempted.
Now if you’ve read my blog before you’ll know that I’m down with using what you’ve got in. A friend came round and had to conjure up for something to eat. I turned to the 15 min meals book and was looking for a recipe based on what I knew I had in. Obviously there was a bit of this missing and I had some of this leftover so I tweaked the recipe and here’s what came out….
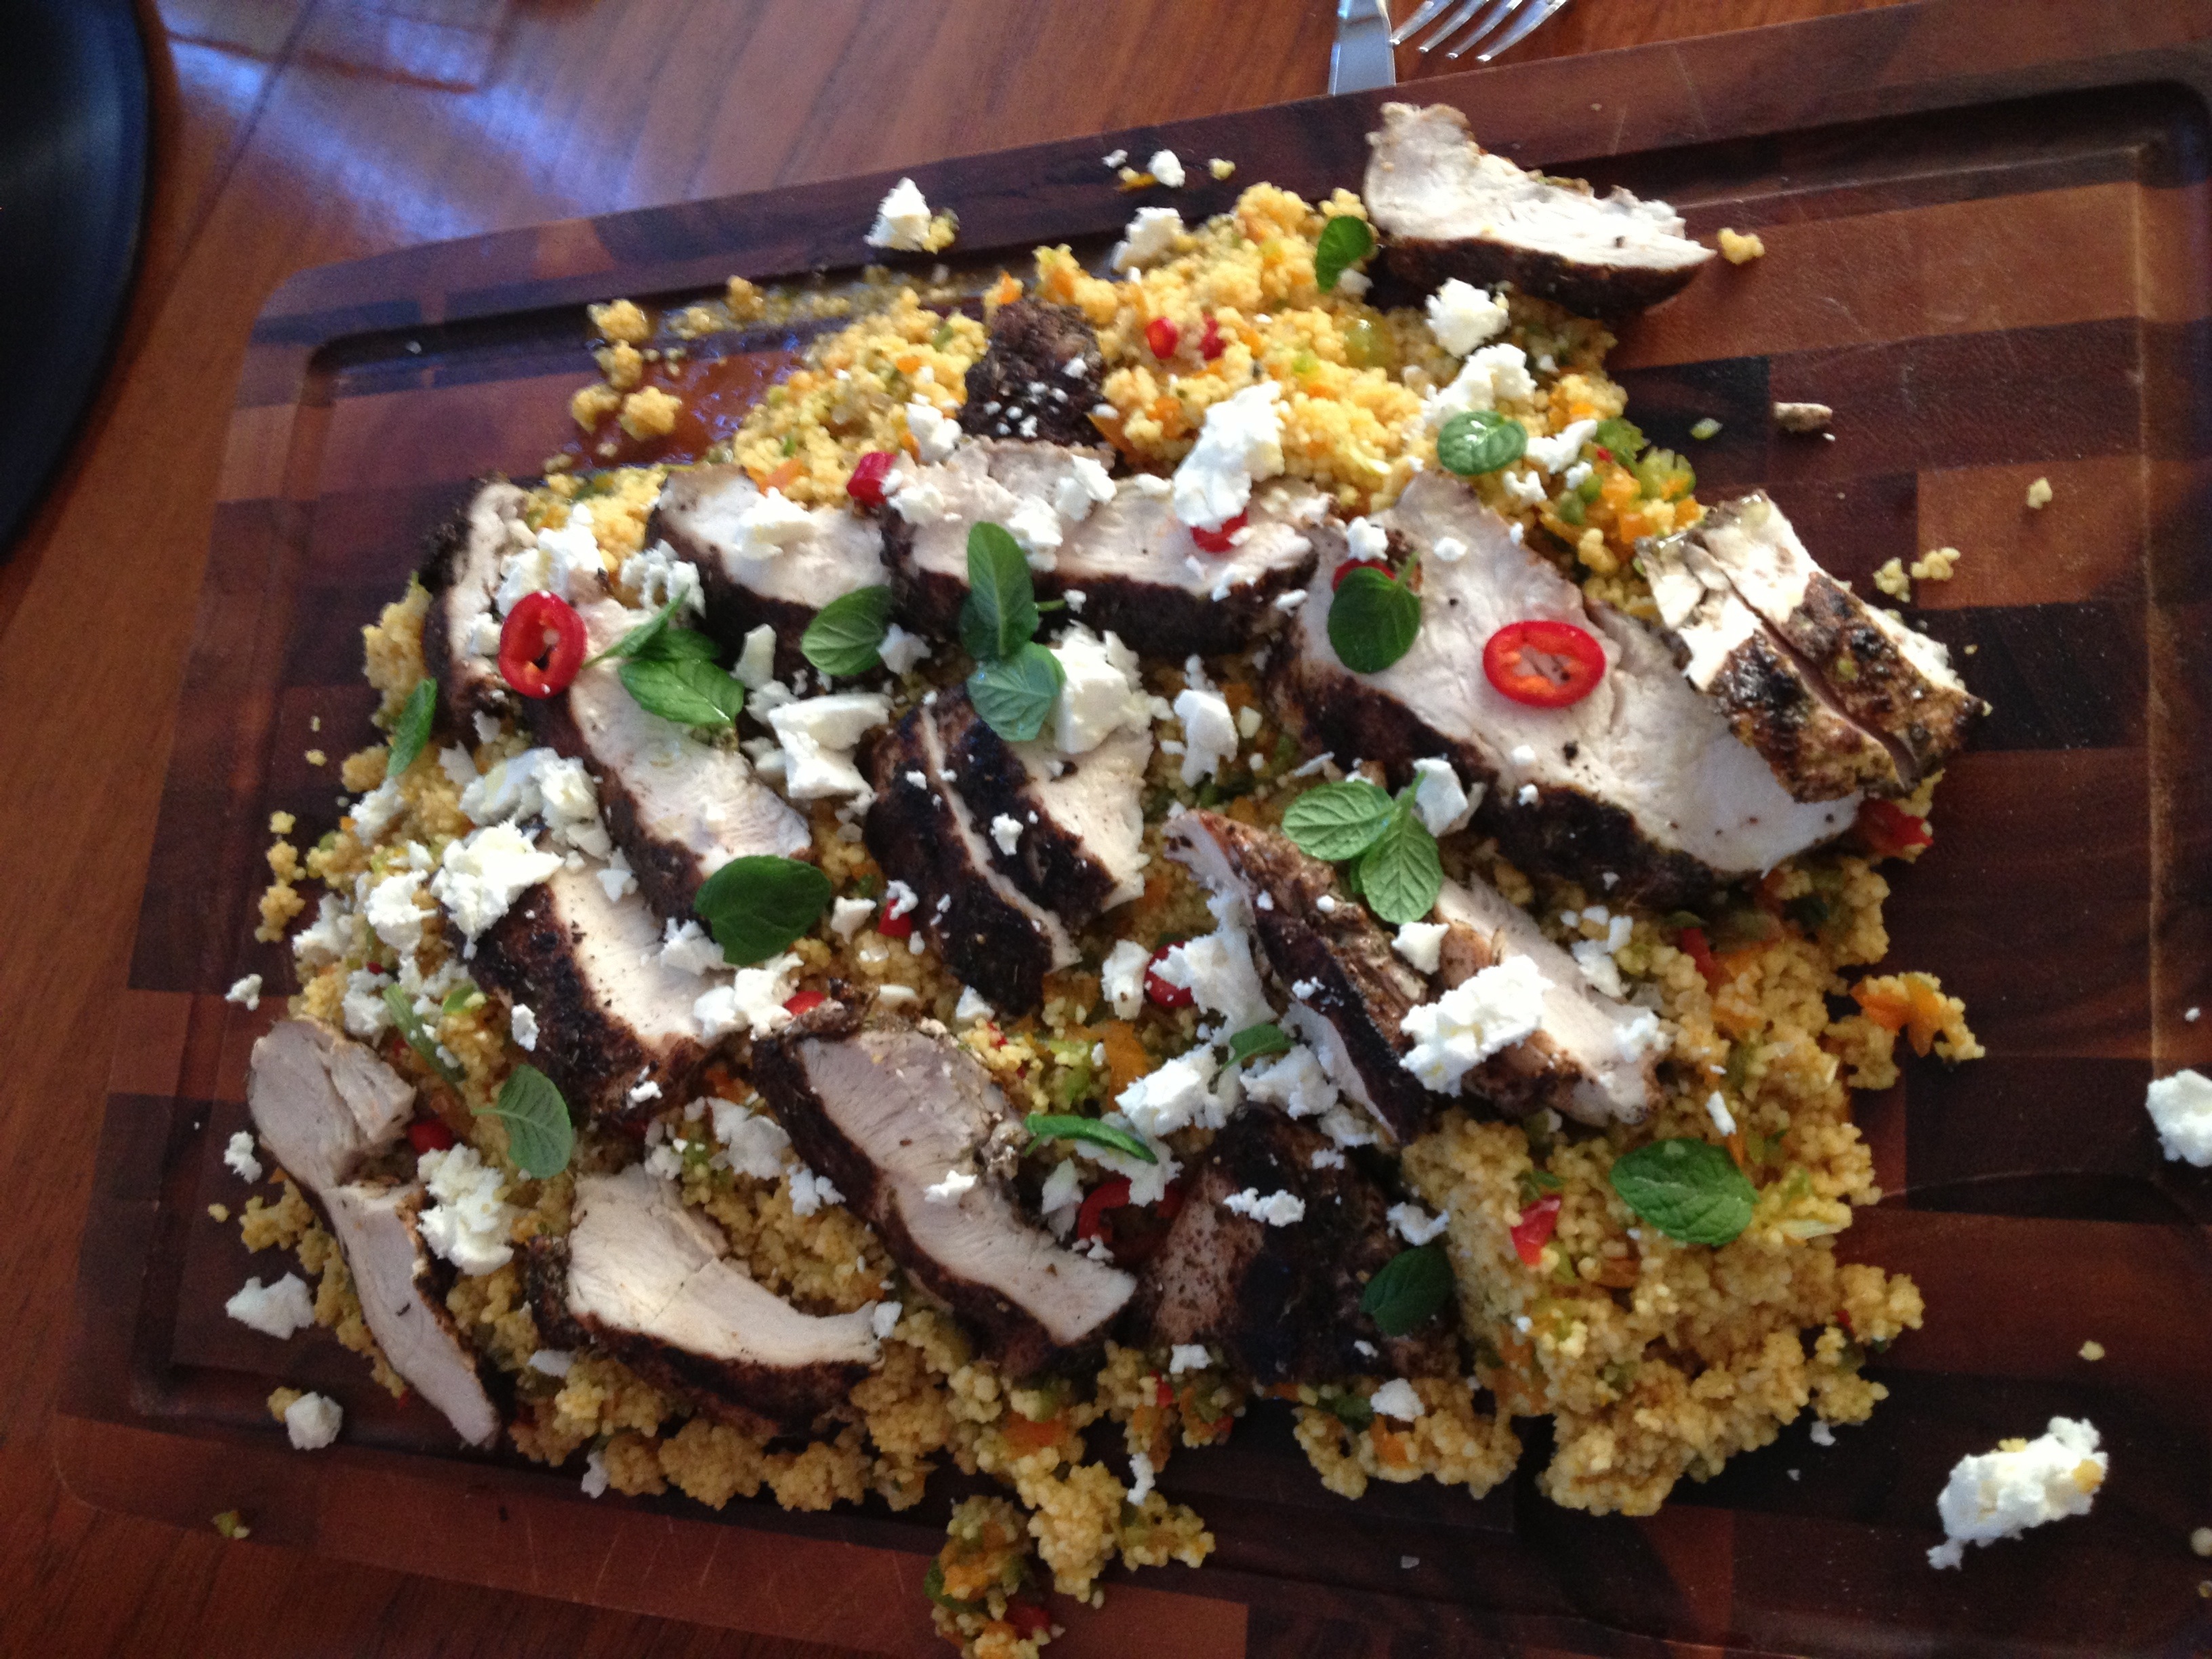
So for my ‘version’ you’ll need:
1 mug of couscous
2 different Colour peppers
2 fresh red chilli
4 spring onions
40g feta cheese
1 tsp of tika paste
2 chicken breasts
1 heaped tsp of dried oregano
1 tsp of allspice
10 mint leaves
1 lime
Olive oil
If any of you have the book this is the ‘gorgeous Greek chicken with herby veg couscous and tzatiki’ recipe. Clearly because I didn’t intend on cooking the recipe I didn’t have everything in to make it fully so I improvised. As is the bishbashbosh way.
Get a cast iron griddle pan on full whack and a food processor ready before you start.
Firstly, I got the kettle on the boil. Measure a cup of the couscous in to the bowl and then 2 cups of the boiling water into it. Put the tikka paste in the bowl, stir around leave to stand (covered).
Next job is the chicken. Put the breasts on some greaseproof paper and top with the all spice and oregano and add salt and pepper, fold the paper over and then get a rolling pin and whack them so there about 1 1/2 cm thick. Mop up the leftover spice rub and place on the griddle pan.
Set the food processor going and add In the peppers (trimmed and seeds removed), 1 chilli, and spring onions and blitz until finely chopped.
Turn over the chicken and then place the chopped peppers into the middle of a chopping board or serving platter.
Fluff up the couscous with a fork and add to the chopped Peppers on the board. Mix in well.
Take the chicken off the griddle pan (once cooked) and slice in strips. Place on top of the couscous and pepper mix.
Chop the other chilli and sprinkle over the top with the mint leaves and the chilli. Finish with a drizzle of olive oil.
The original recipe had a tzatziki too which would have been an amazing addition (clearly why it’s in the book,) I just didn’t have the stuff in to make it so I left it out. It was still mega though. Fully recommend.
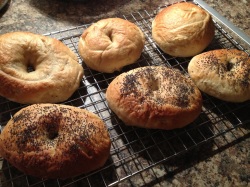
I’ve been wanting to make bagels for a while now. I was thinking what to have for breakfast tomorrow morning and thought yeah, the time has come for the bagel to make an addition to my baking repertoire.
Now I knew that the New York Bagel was the one to go for simply because time and time again you hear about them being ‘THEE’ bagel so I’m not going to argue. I firstly trawled through all the forums for recipes and found that they were all different (every single one!!!!). So there was only one thing for it…..
Make up my own recipe!!!!
I’ve taken the basic principles of bread making and combined a few of the recipes I looked at and sort of concocted my own version. Since I’d never made bagels before it was complete gamble as to how these would turn out but I wasn’t put off.
Here’s what I did:
3 cups of strong white flour
1 cup of tepid water
2 1/2 tsp of dried yeast
1 1/2 tbsp of caster sugar
1 tsp salt
1 tbsp of soft brown sugar
Bit of flavourless oil
So, firstly get the water, yeast and caster sugar in a jug and give it a little wiggle and leave for 5-10 mins till its frothy.

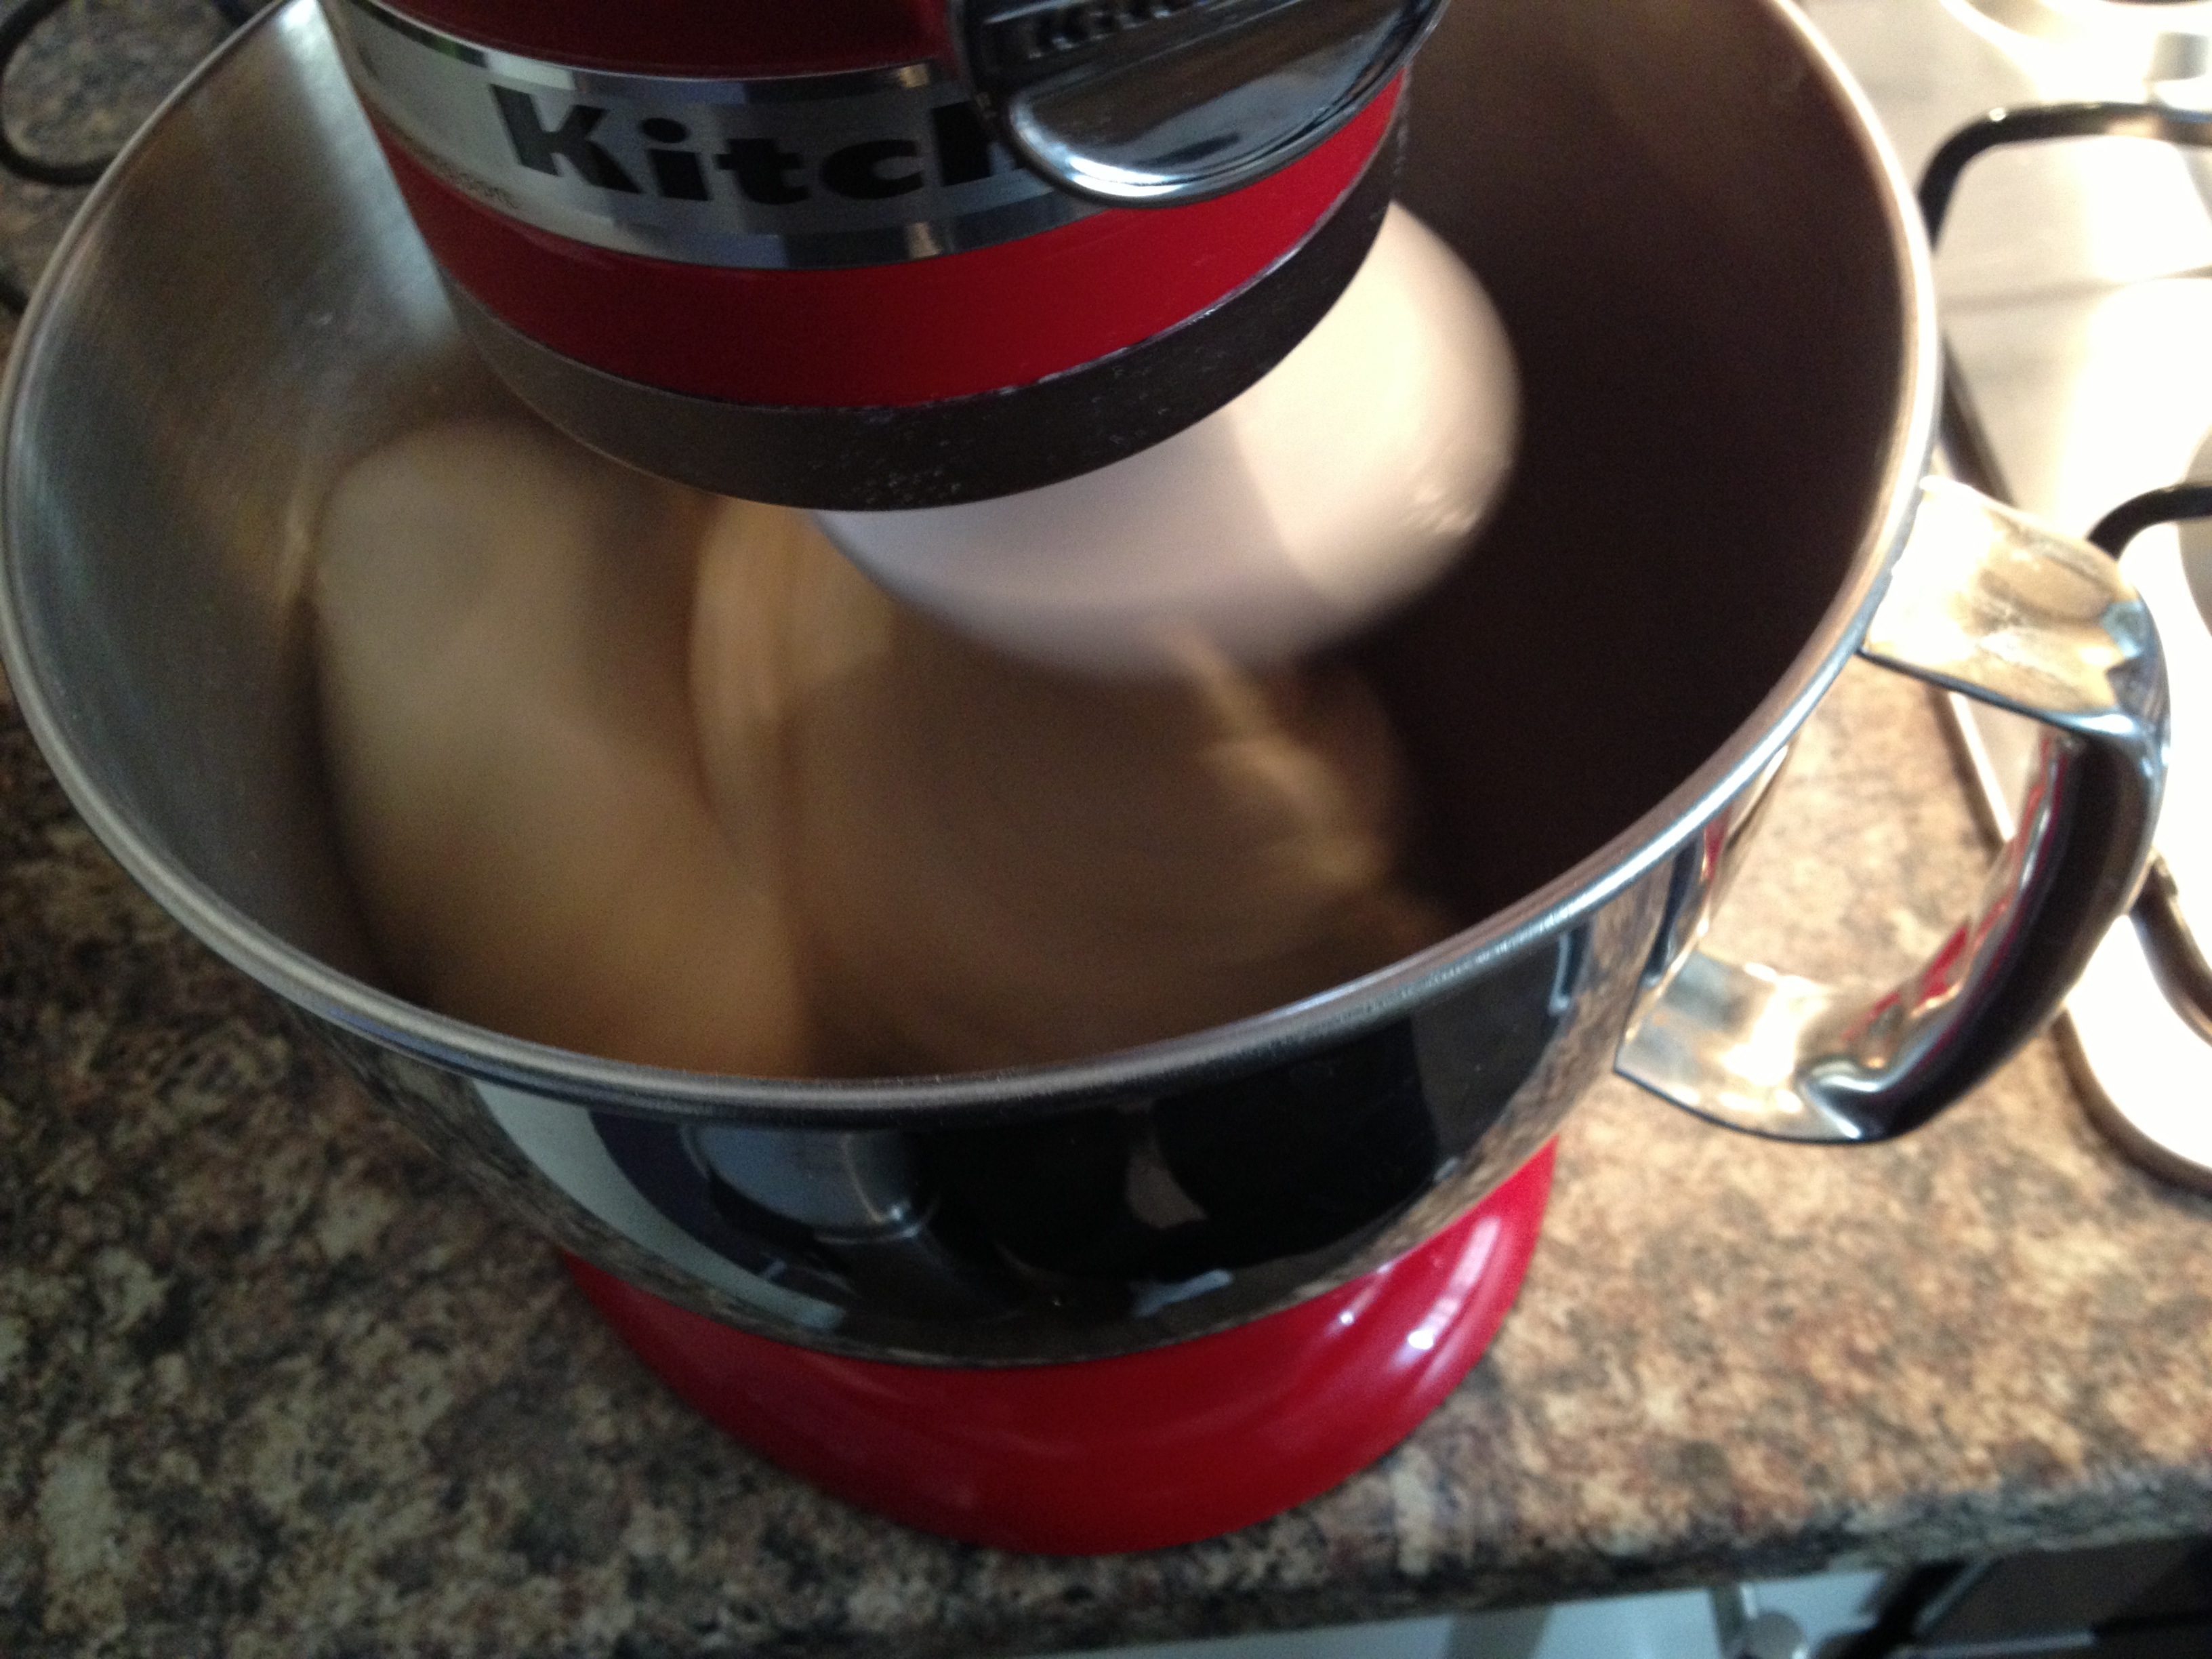
While that’s doing its stuff, get the flour, salt and soft brown sugar into a mixer bowl with a dough hook attachment fitted.

Set the mixer on a low speed and slowly add the water and yeast mixture. The dough will be a really tough one so you’ll need to turn up the speed as it all comes together. Carry on mixing for about 10 mins until there’s no excess dough on the sides of the bowl.
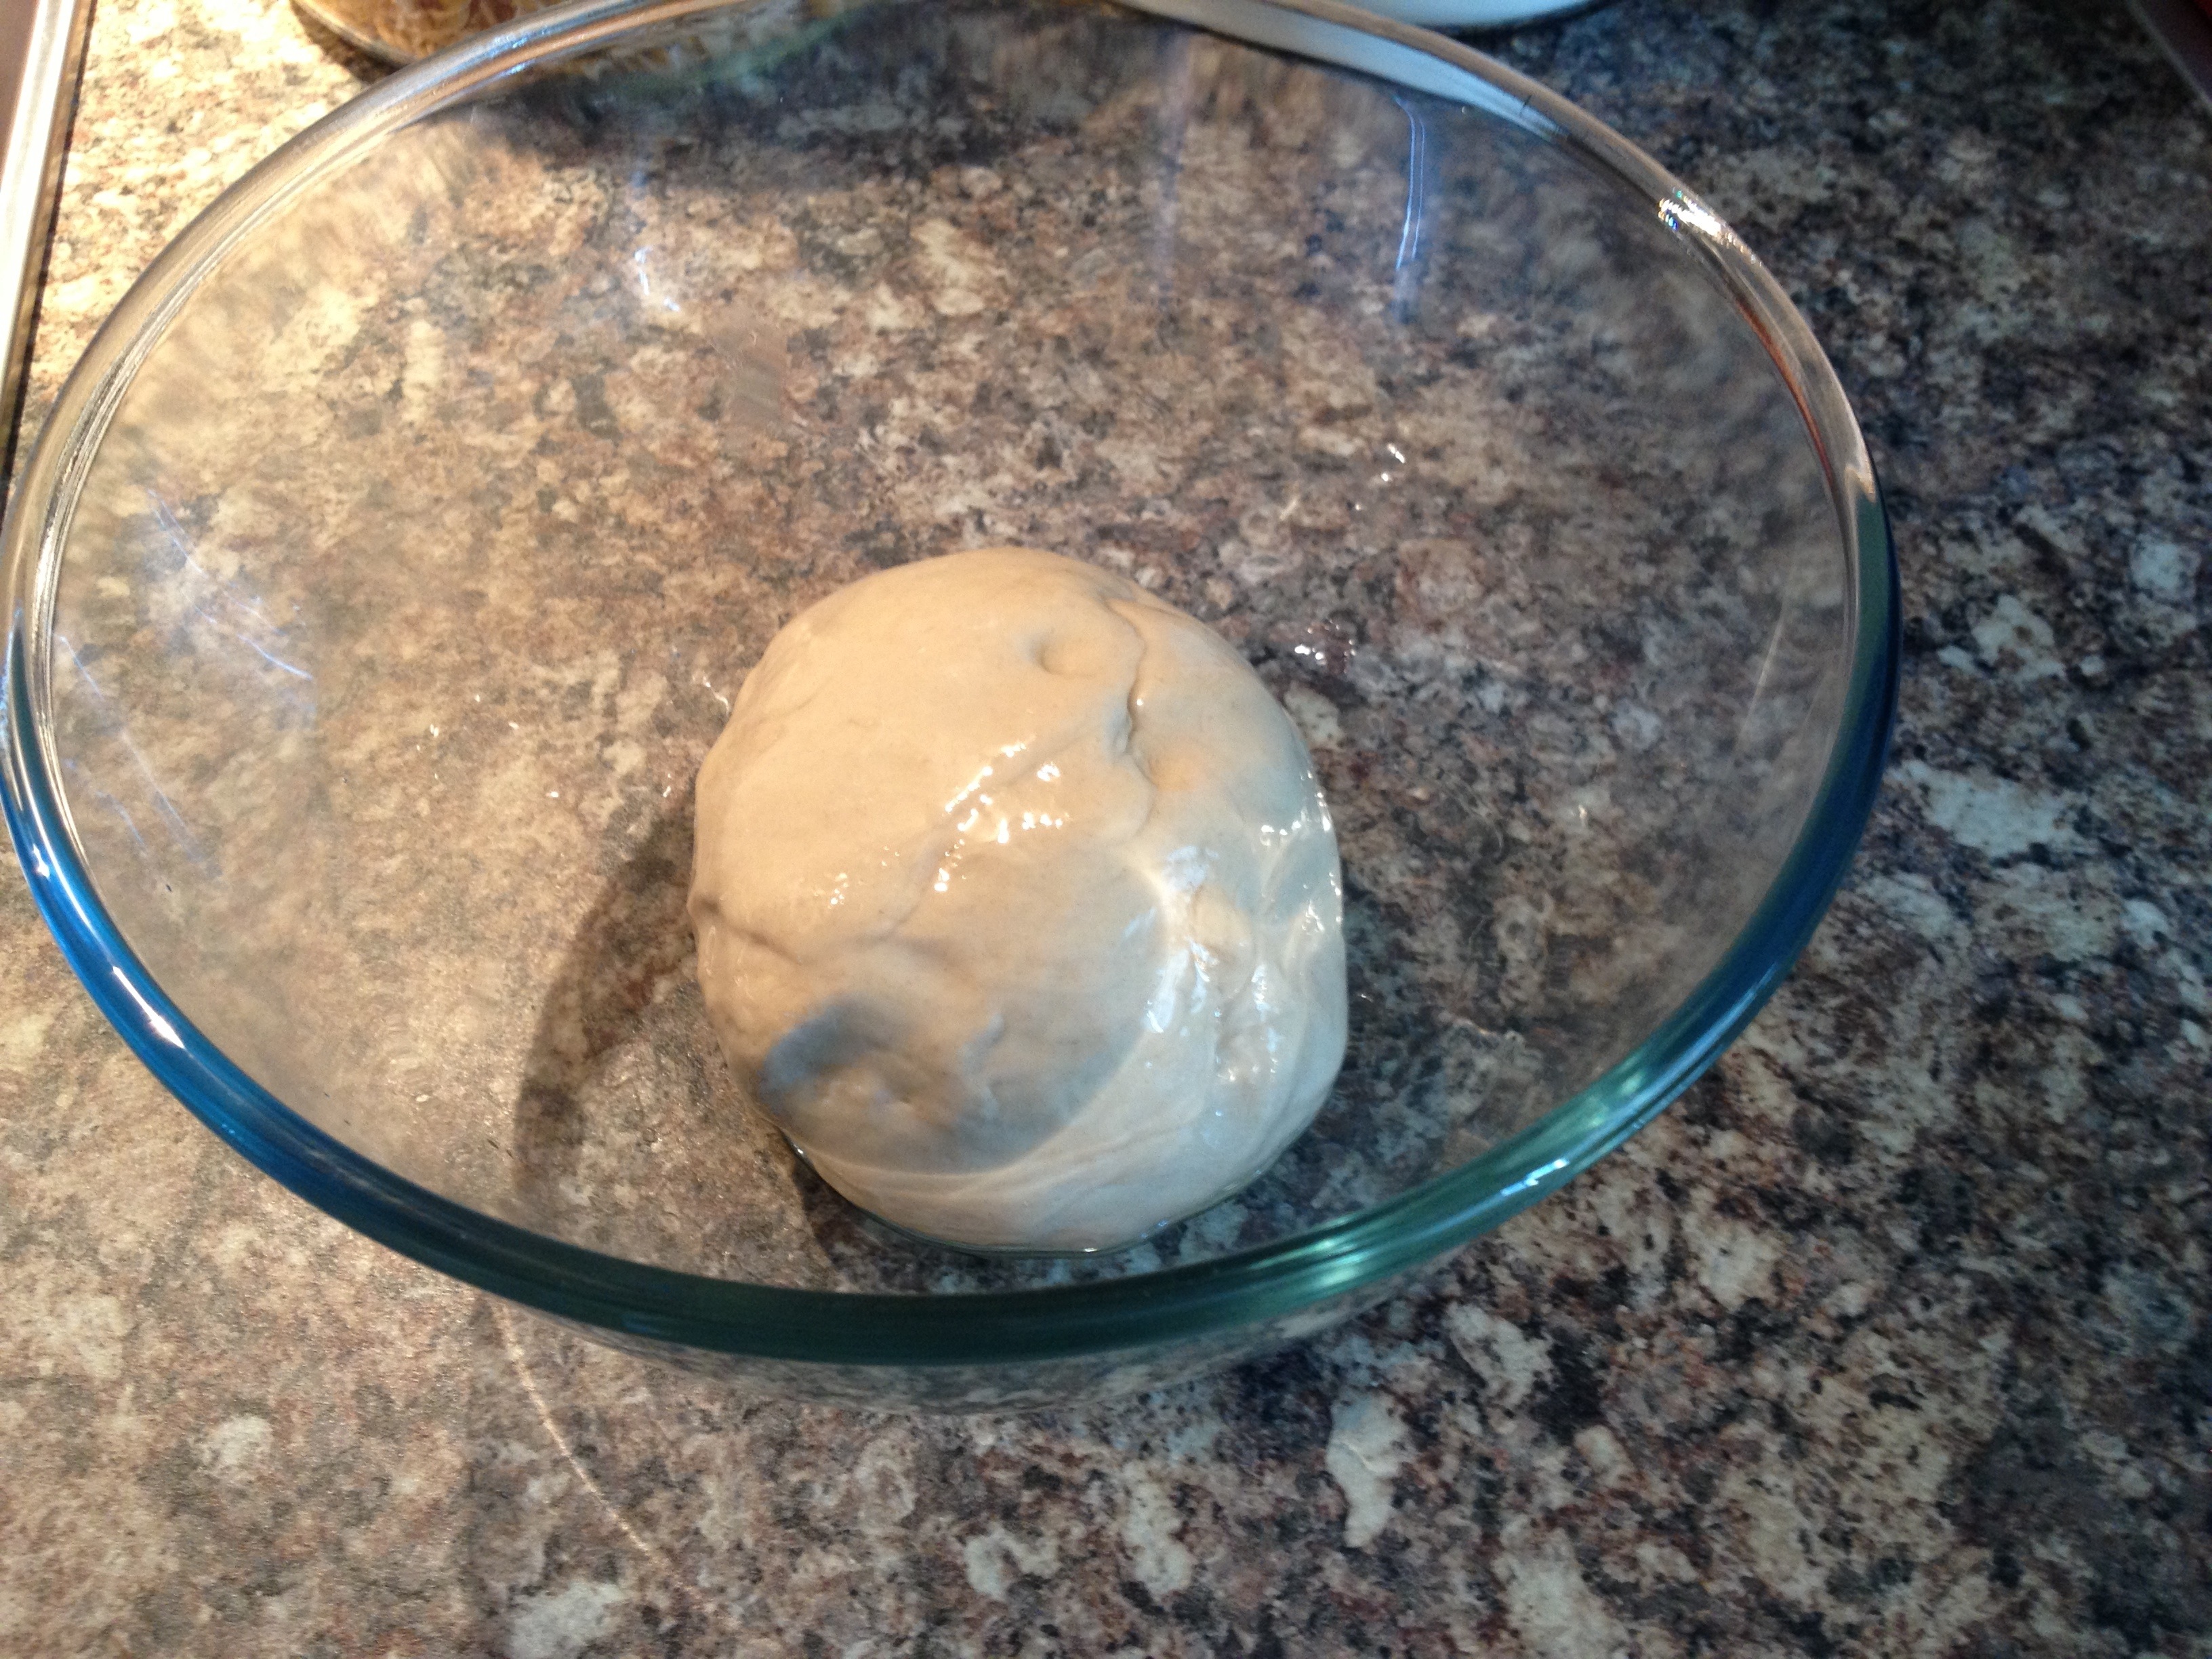
Coat the dough lightly in oil and place In a bowl to prove for around 2 hours or doubled in size.

Knock the dough back getting rid of all the air created by the yeast and divide into 6. Shape them into round balls first then stick your finger through the middle to make the ‘bagel’ shape and rotate on your finger for a little bit. Make the hole bigger than you think because the dough is gonna rise again for a bit and will also expand when cooked. Once there all done place them on greaseproof paper for another hour or so to rise a touch.
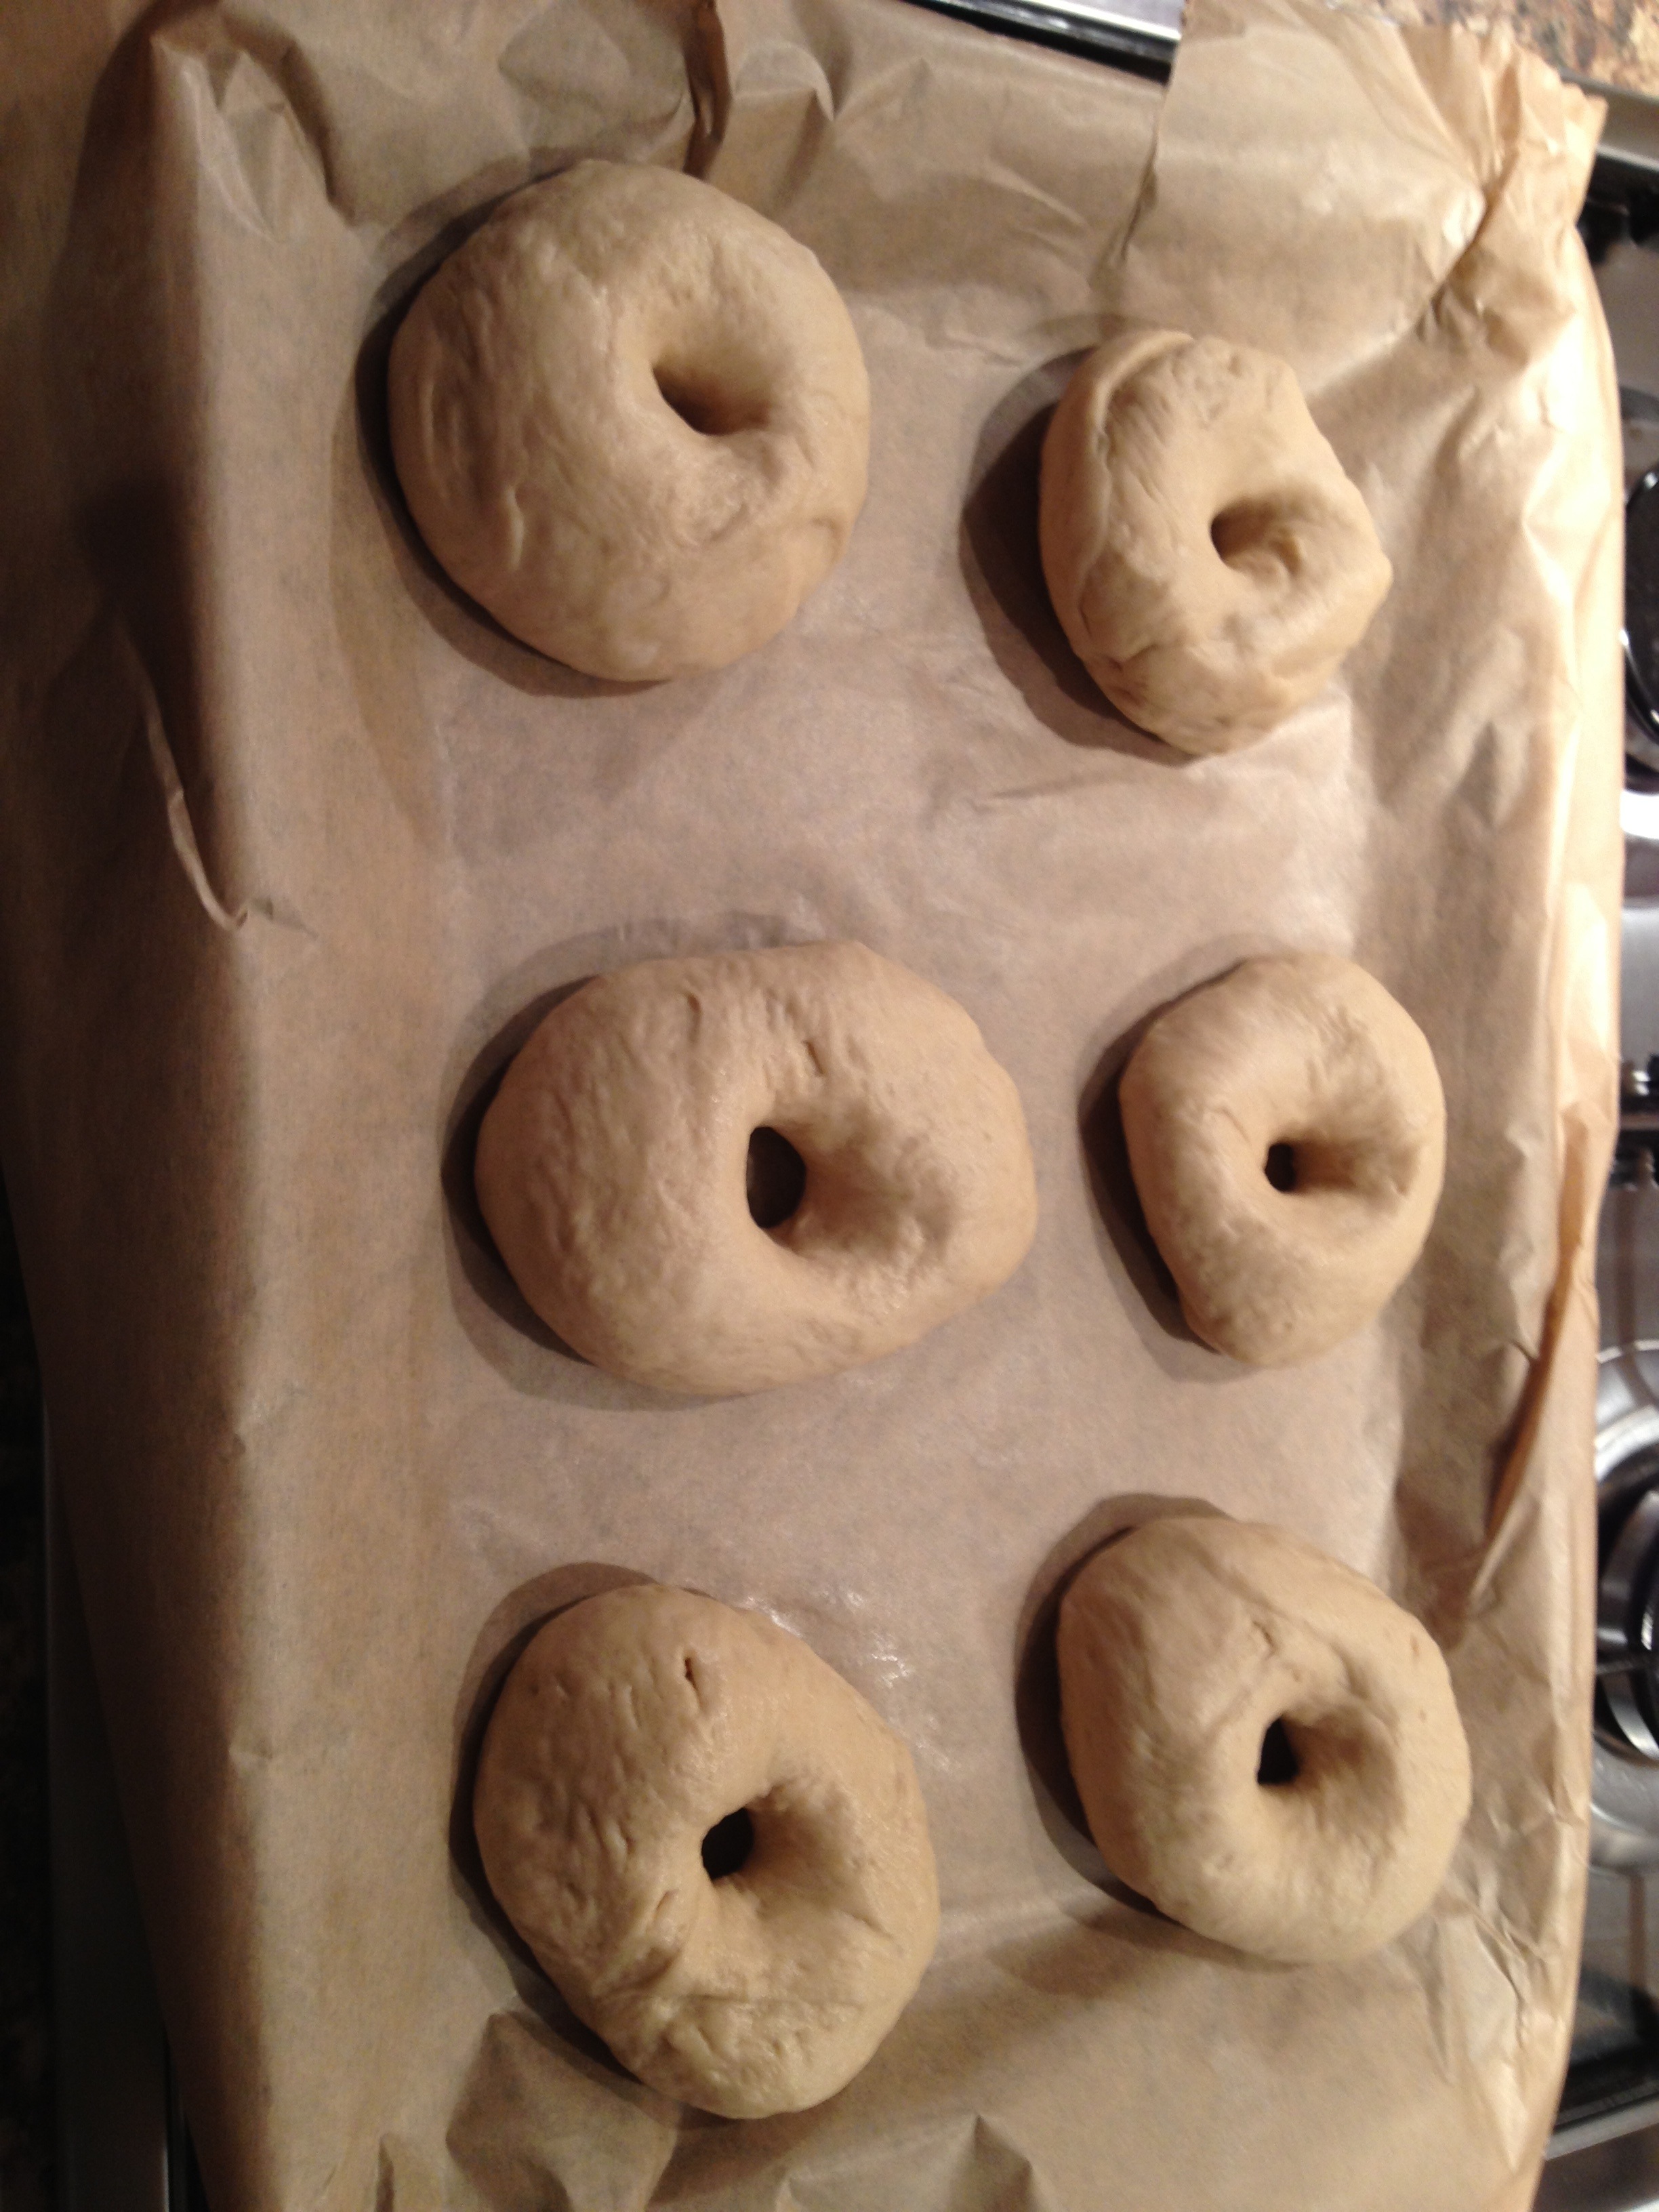
Preheat your oven to 180 degrees and get a pan ready with boiling water and a tablespoon of sugar. I used a deep sided frying pan so I could get three in at a time but if you haven’t got one just use whatever you have and adjust accordingly.
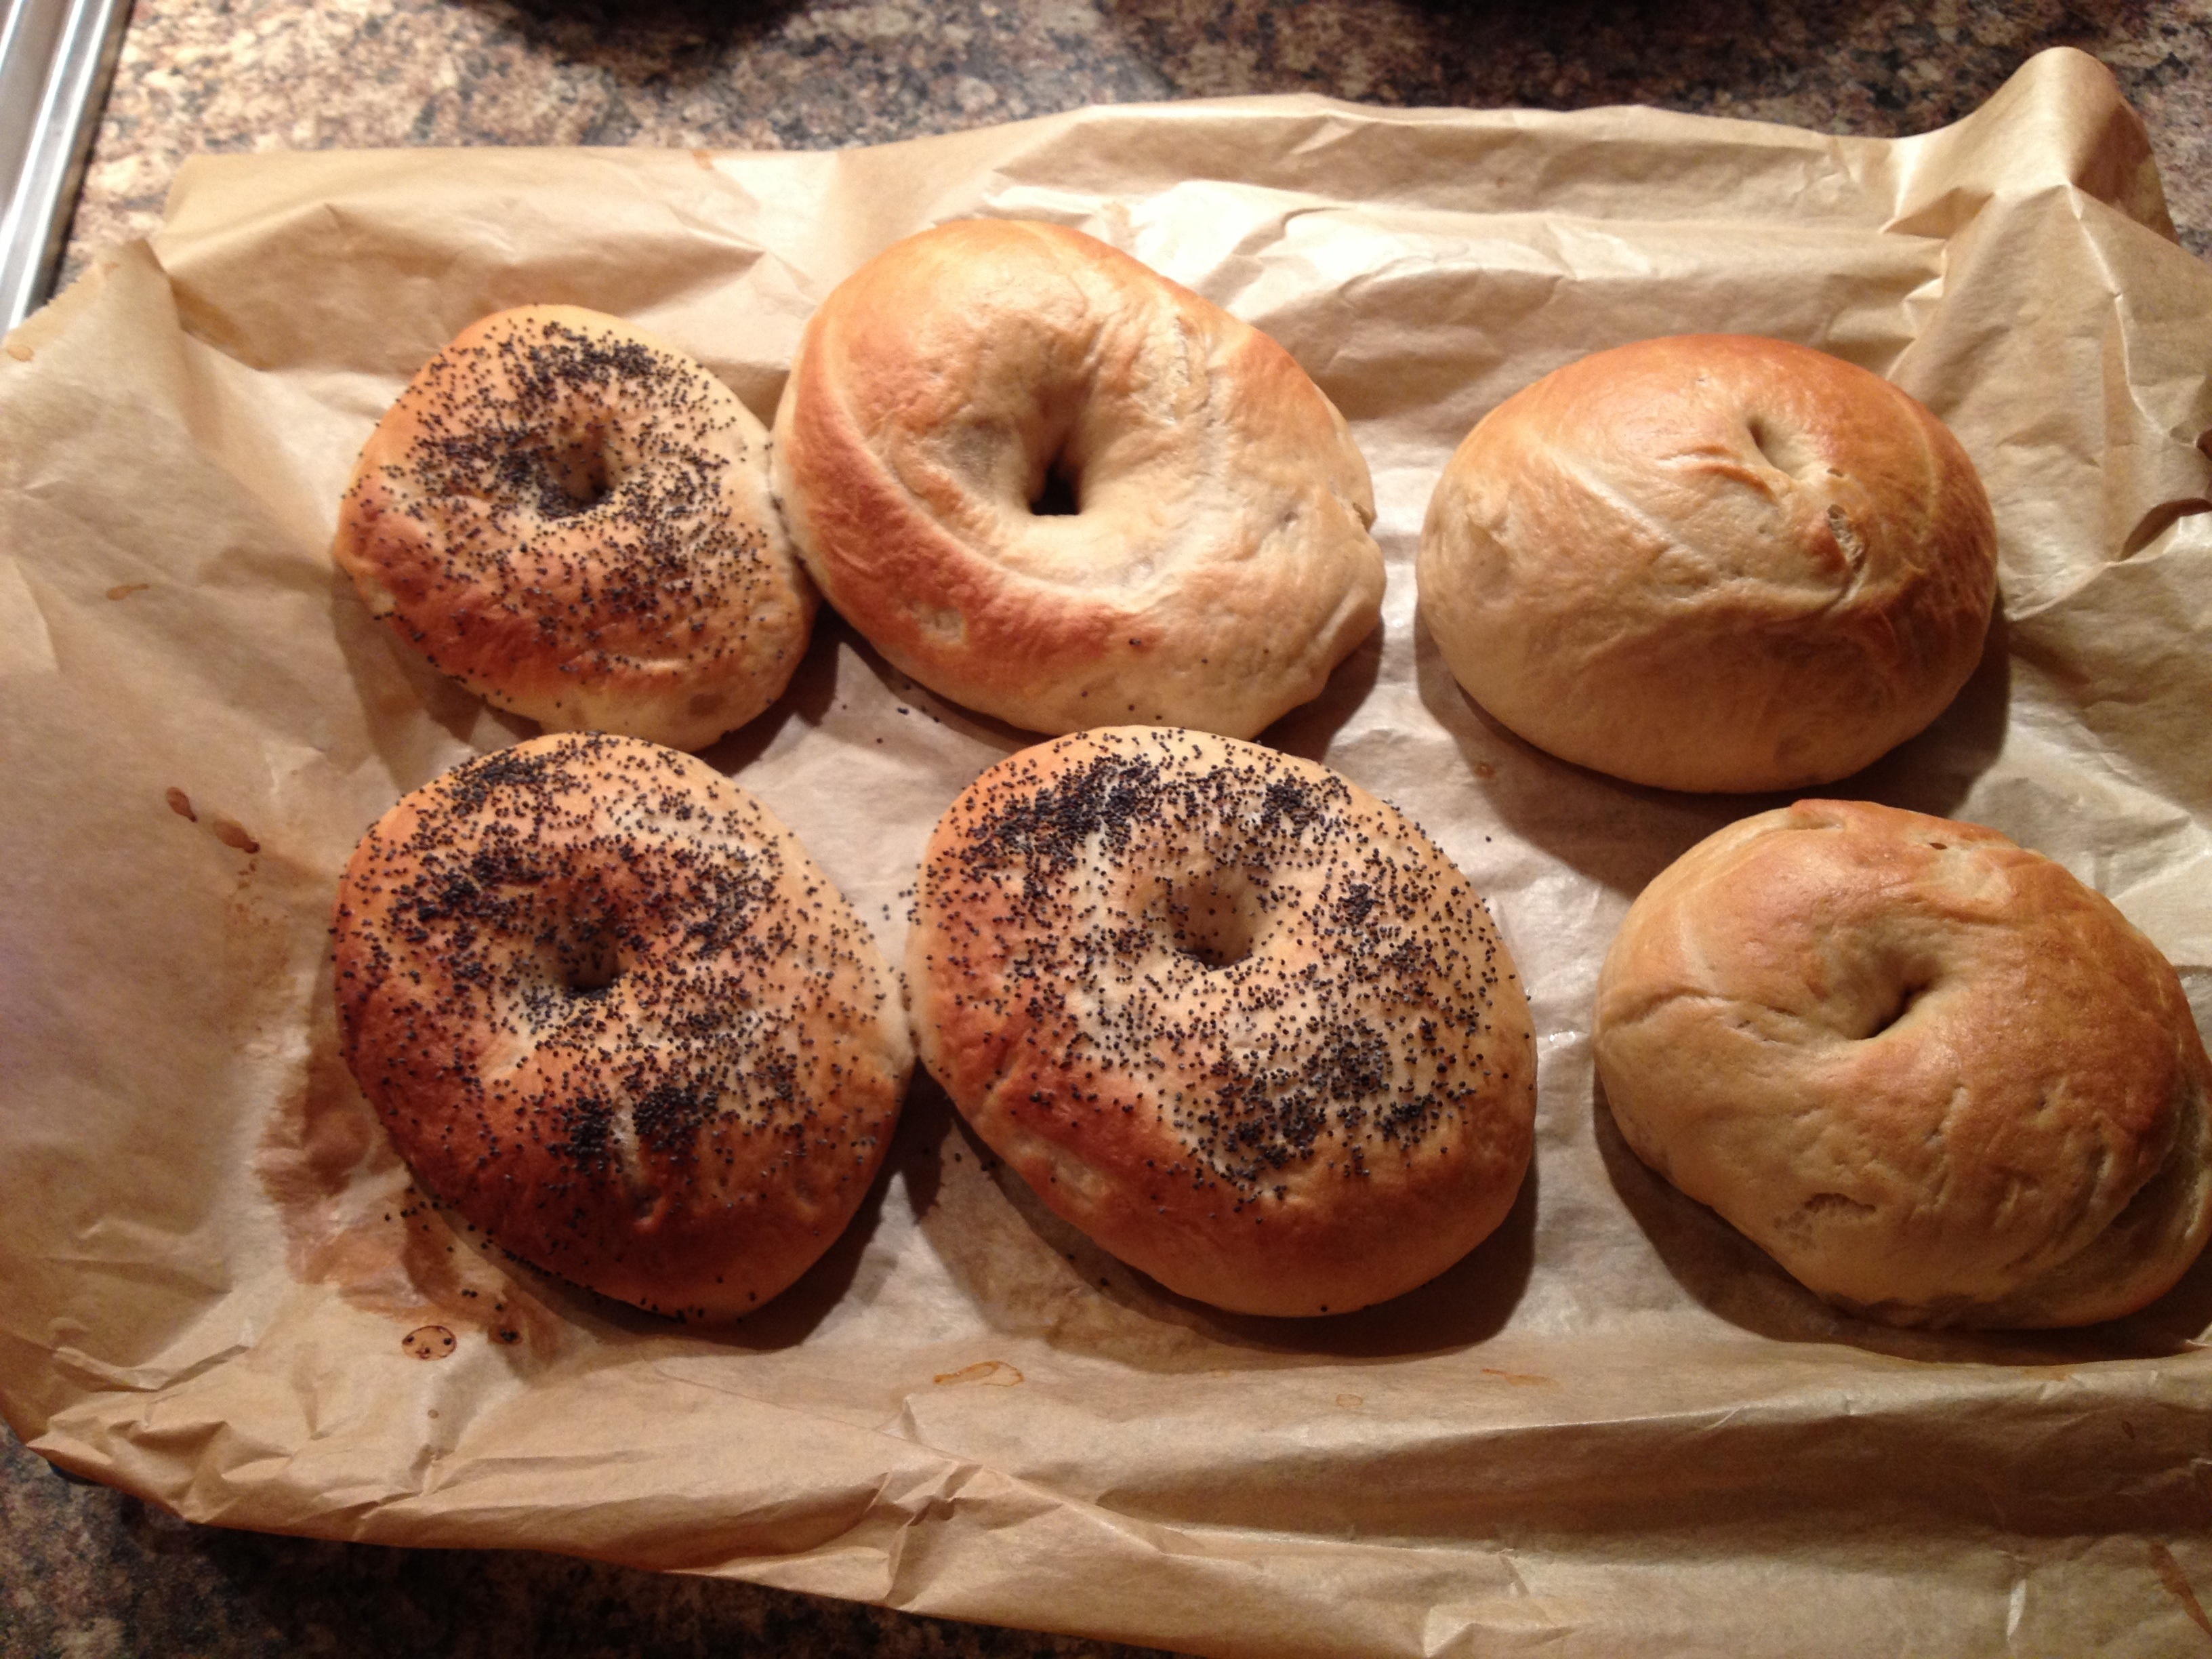
Boil the bagels for 45 secs to a minute per side and put back on the greaseproof paper. This is the time to add topping if you want. I’ve put poppy seeds on half of them while the dough is still wet so they stick and once there all boiled pop them in the oven for 5-10 mins or lightly browned.

Leave to cool completely and serve with whatever takes your fancy 🙂
I thought I’d go all out this week and make a Mega Gourmet Burger. Seen as I’m going all out I’ve only gone and made everything from the Bun to the French fries!!!!!
Now, I watch a lot of cooking programmes on the telly, as I’m sure a few of you will, and burgers and the competition of ‘who’s burger is best’ seems to be everywhere. Now if you’ve seen these TV shows, they talk about making burgers as a bloody science in itself. I personally wouldn’t go that far but there are a few factors that makes a ‘mega’ burger stand out.
Firstly is the beef. The burger ‘scientists’ will tell you that you need a good fat content to meat, 80% meat to 20% fat is a good ratio. Seen as I’m going to make my own mince I thought I’d try using a ribeye steak mainly because I know that there is a greater marbling of fat in the steak itself. Might not be 80:20 but its gonna be certainly more than a rump for example.
Then comes the fries. I wanted these to be like the fast food French fries and apparently if you soak the fries in sugar and corn syrup before frying they go really really crisp and add a sweet note. Ive never tried it this way before and thought I’d give it a bash.
And finally you cant have a burger without a bun. Now again the burger ‘boffins’ state that a soft glazed bun is ‘THEE’ way forward so I’m not going to argue. Glazed and soft it is.
If your not wanting to go the whole hog and make everything I don’t blame you. Just skip to the burger recipe. I’m only making everything because I have far too much time on my hands and because I can. Here’s the low down on what to do:
Glazed Burger Bun
1 cup warm water
3 tablespoons warm milk
2 teaspoons active dry yeast
2 1/2 tablespoons sugar
2 large eggs
3 1/2 cups bread flour
1 1/2 teaspoons salt
2 1/2 tablespoons unsalted butter, softened
In a measuring jug, combine one cup warm water, the milk, yeast and sugar. Let stand until foamy, about five minutes.
Add the flour, butter, an egg and the milk water and yeast mix into a mixer bowl with the mixers dough hook attachment fitted and set it going at a low-medium speed for around 6-8 mins.You want the dough to remain slightly tacky, as the more flour you add, the tougher they will be when baked.
Shape dough into a ball and return it to the bowl. Coat the dough with a flavourless oil and cover the bowl with plastic wrap and let rise in a warm place until doubled in size, around 1 to 2 hours.
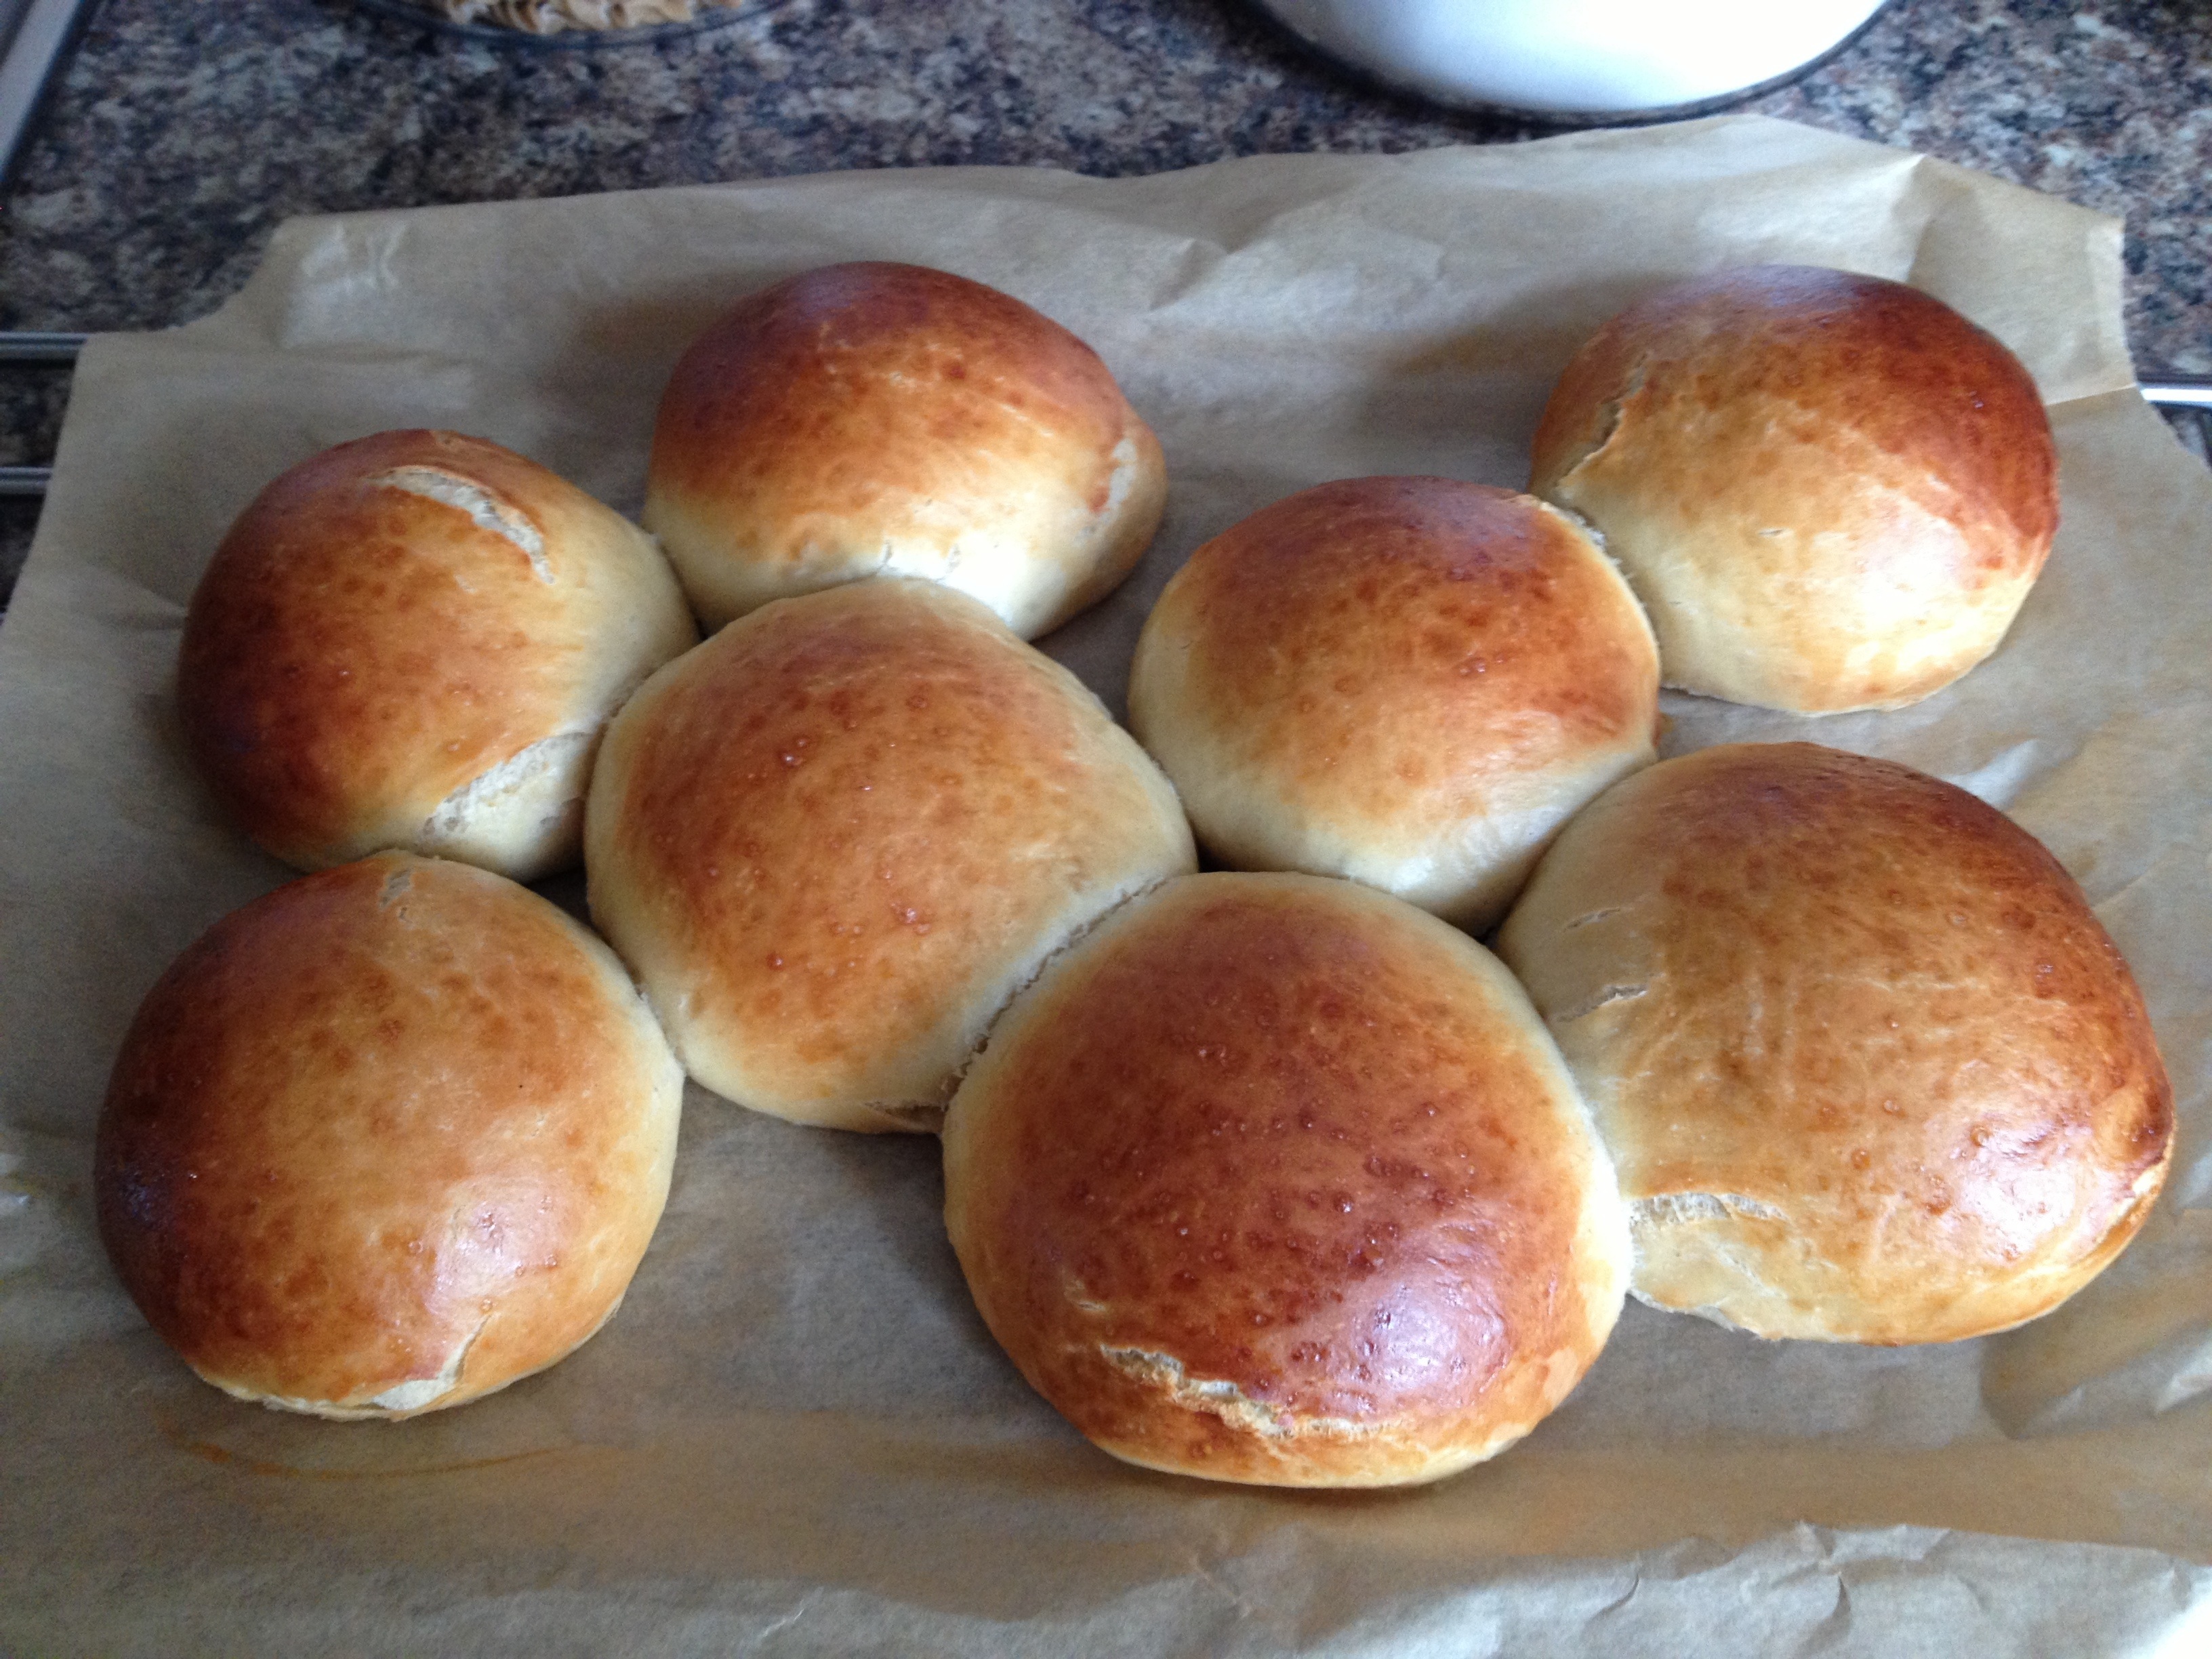
Line a baking sheet with parchment paper. Using dough scraper, divide the dough into 8 equal parts (the oil used to cover the dough will prevent it sticking to the work surface). Gently roll each into a ball and arrange two to three inches apart on baking sheet. Cover loosely with a piece of plastic wrap lightly coated in nonstick spray and let buns rise in a warm place for 1 to 2 hours.
Set a large shallow pan of water on oven floor. Preheat oven to 400 degrees with rack in center. Beat remaining egg and brush some on top of buns. Bake, turning sheet halfway through baking, until tops are golden brown, about 15 minutes. Transfer to a rack to cool completely.
The French Fries

4 large Maris Piper Potatoes (longer shaped ones are better)
2 tbsp of sugar
1 tbsp of corn syrup
1/3 cup of polenta (fine corn meal)
1 tsp of garlic powder
1 tsp cayenne pepper
1 tsp salt
Oil for deep frying
First job is to peel and cut the potatoes. I’m sure you all know what shape French Fries are so how you get there is up to you. I just used a knife but you can use a mandolin or a ‘chip press’ or whatever your in the mood for.
You’ll then need to soak them in water to get rid of the starch. I kept a running tap on the tub until the water went clear.
In a separate tub, add boiling water, sugar and corn syrup and mix until dissolved and soak the potatoes in it for around 10-15 mins.
Next drain the fries and pat dry with paper towels or kitchen roll and get the dry ingredients in a bowl. Now I’ve used polenta because I know it goes crispy when fried. Is was a little experiment of mine which seems to work. And the other ingredients are simply seasonings. You can use whatever you fancy. I just like cayenne pepper and garlic salt so I put it in but there’s no reason why you couldn’t put anything in it. You could use dried herbs such as oregano for herbed French fried. Place the fries in the seasoned polenta and toss till evenly coated all over. Place them in a tub and then in the freezer for a few hours.
If you have a kitchen top fryer get it on at 135 degrees. If not get a pan of oil on the go ( same temp just use a kitchen probe) making sure there is a 2 inch gap from the top of the pan (safety first on this one!!)
Fry the frozen fries for about 2-3 mins. The effect your going for is the potato should be cooked or ‘blanched’ in the oil but have no colour on it. Leave them to cool again.
When your ready to serve, whack the fryer onto 180 degrees and cook through to a lovely light gold colour. Season with a touch more salt just as they come out and serve immediately.
The MEGA Burger
3 10oz Ribeye Steaks
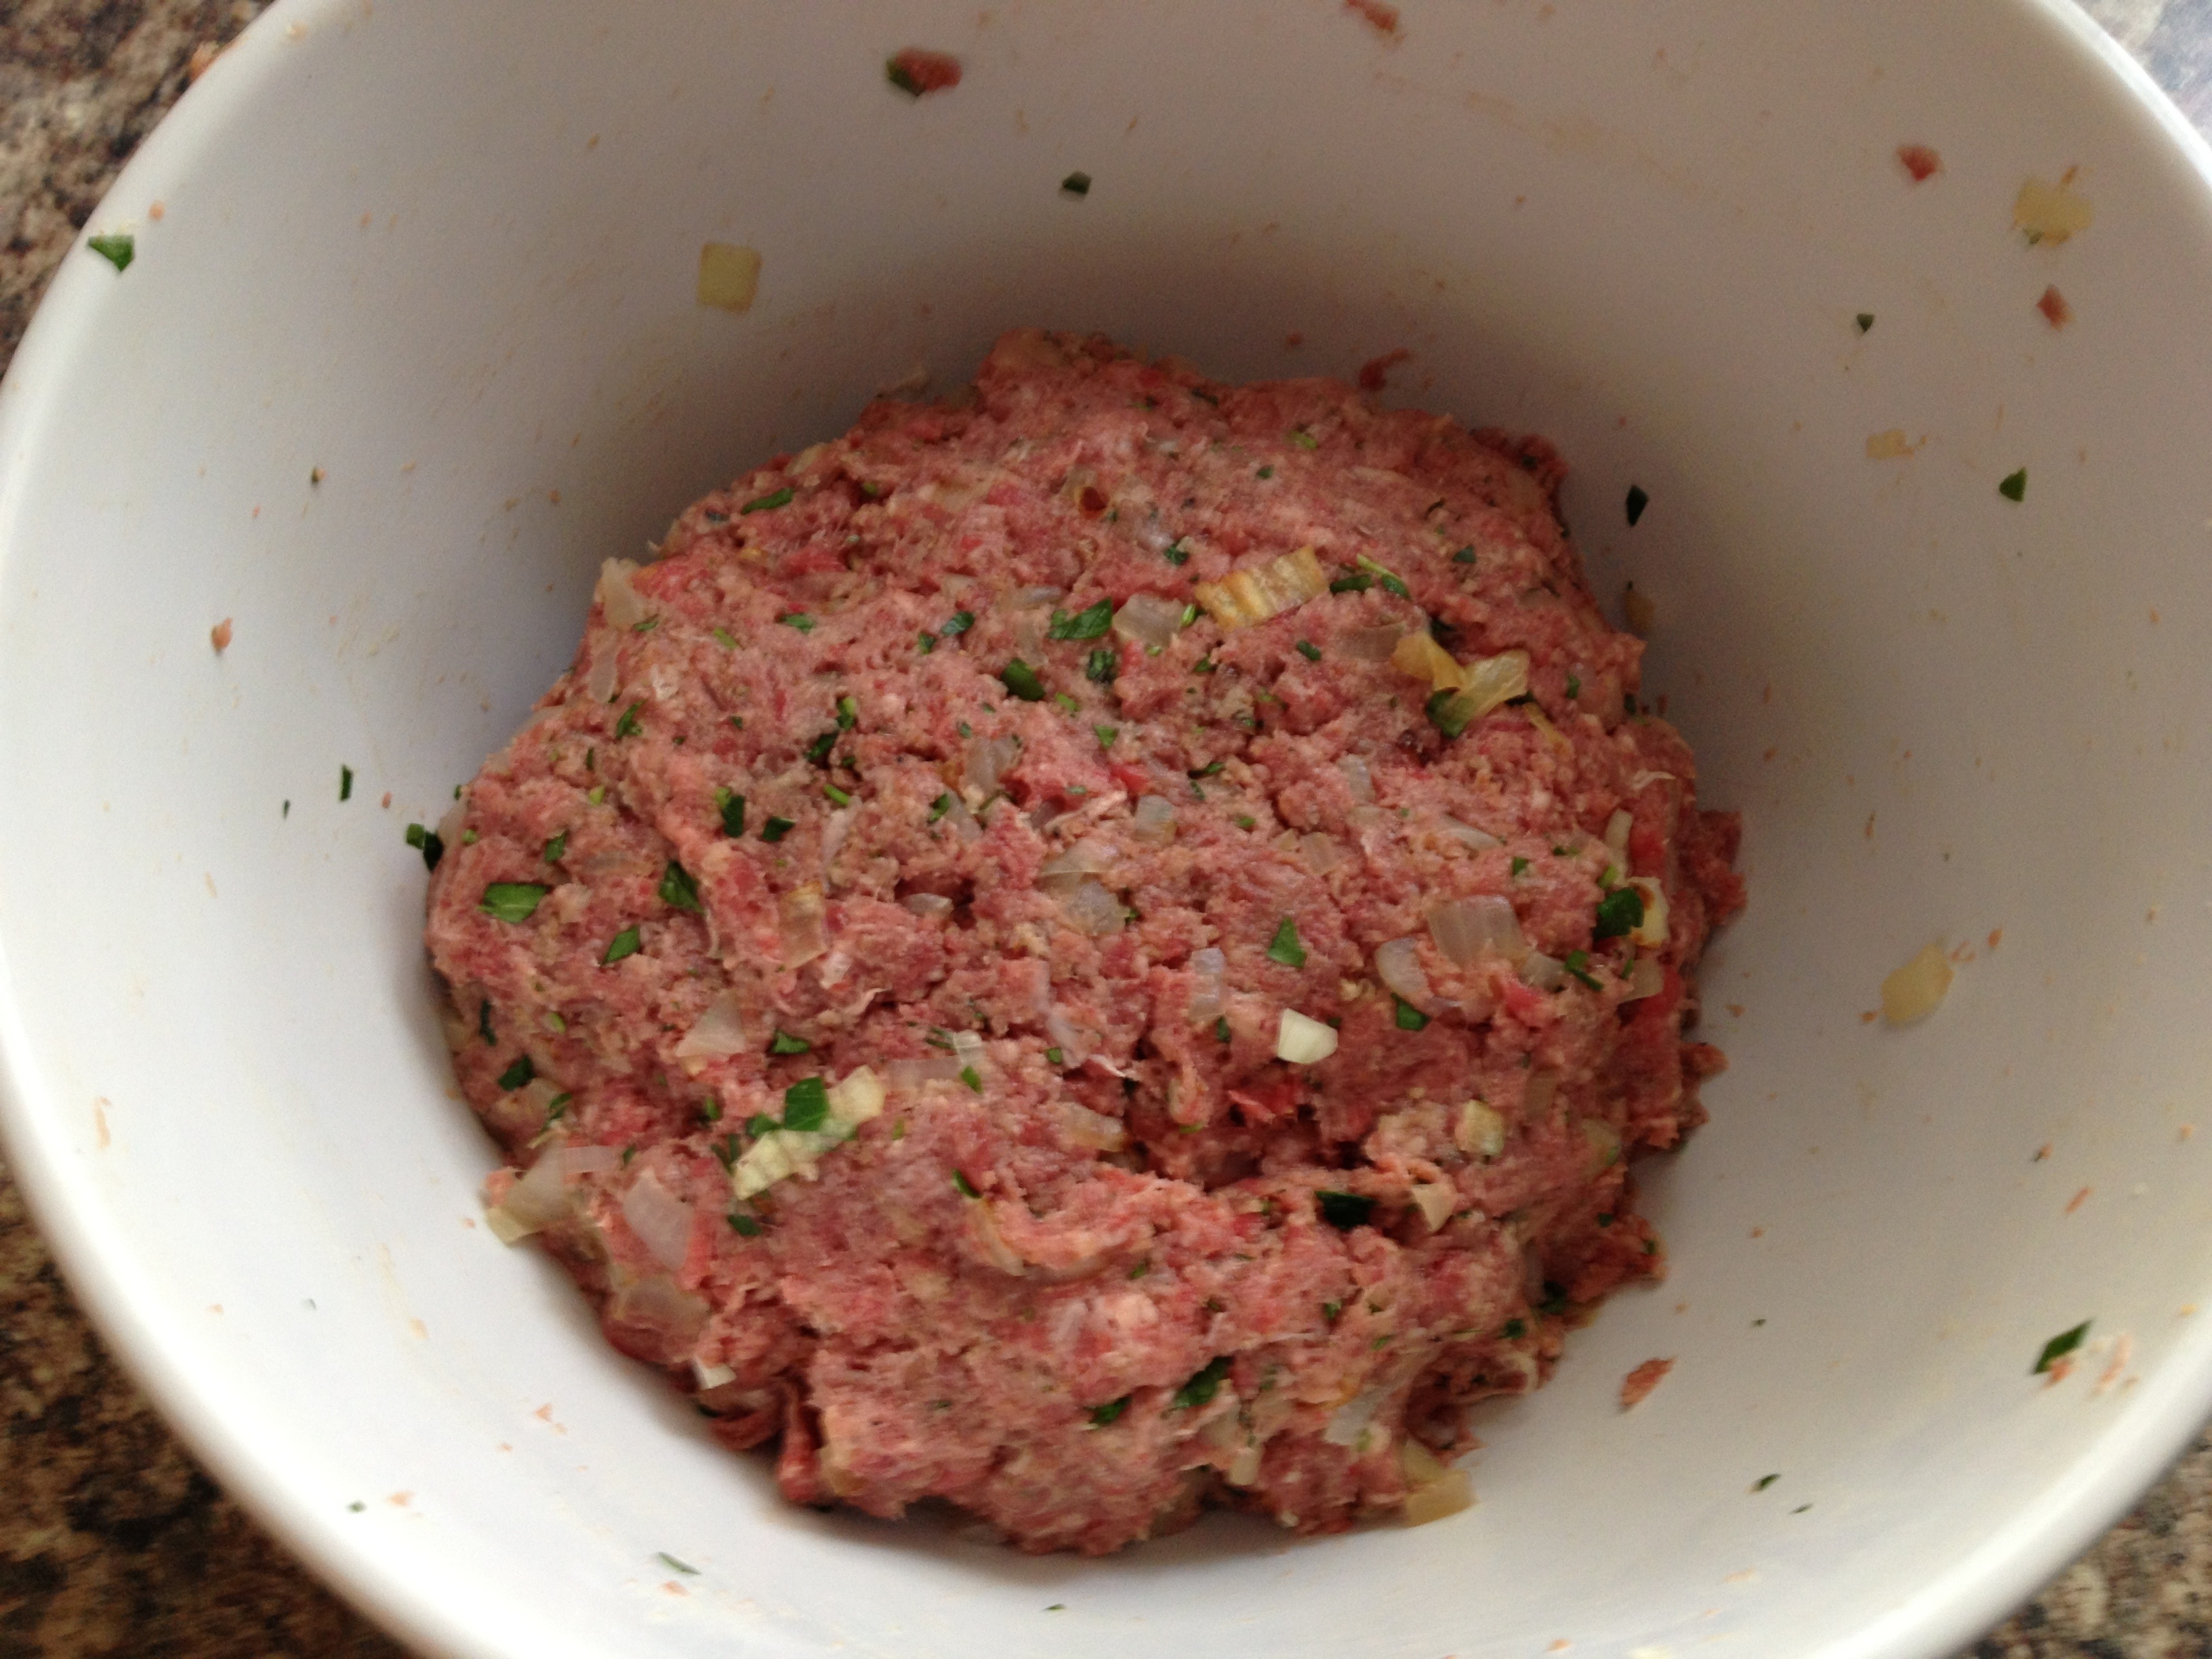
3 slices of bread (made into breadcrumbs)
1 egg
Hand full of Fresh Parsley
Plenty of S and P
I think we should start this section of the recipe with the ribeye and a birra burger science. You actually want Ribeyes with a really good marbling of fat. Because we’re not adding any other fat to the mixture, the fat in the steak is really important for this recipe. I don’t think we’re going to achieve the recommended 80:20 ratio but there will definitely enough fat in there to keep the burgers moist. The addition of the breadcrumbs will also help absorb the fat when cooking too, well this is my hypothesis.
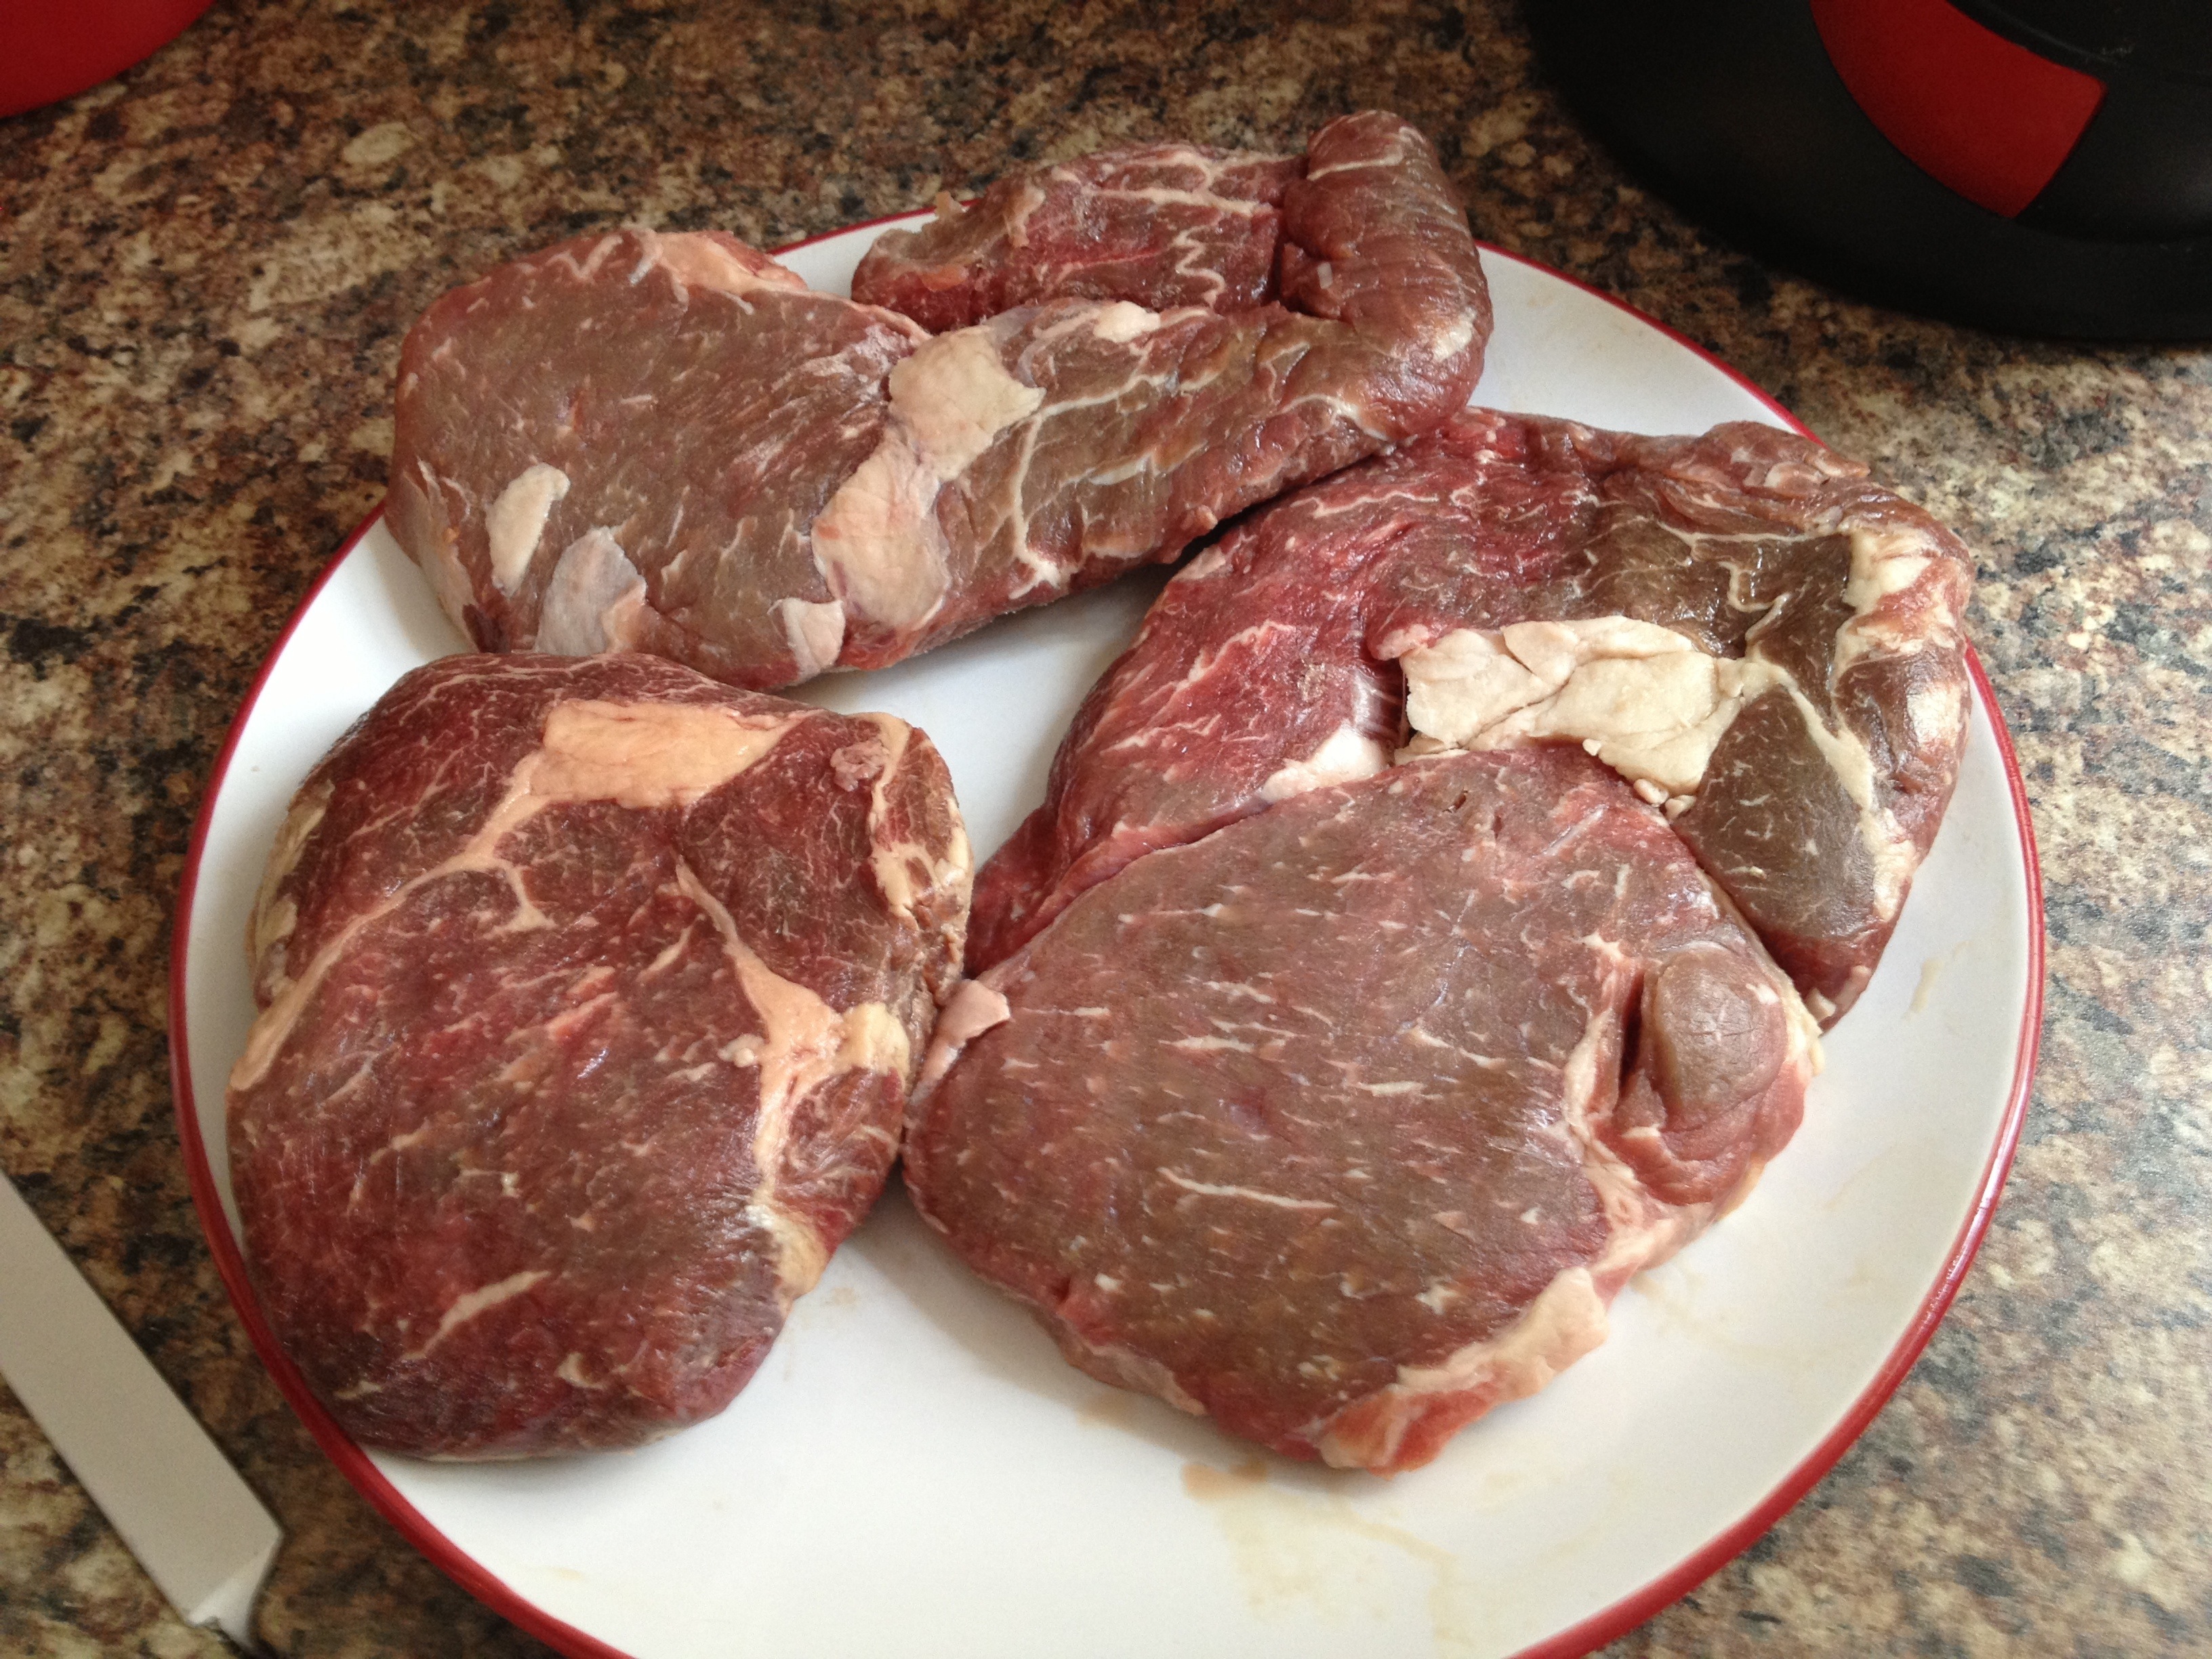
The first job is to blitz the steaks up in a blender. If you have a mincer that’s fantastic ( and on my shopping list) but if you don’t just pulse them in a blender until you have the closest texture to mince that you can. You can see the white bits of fat in the mince.

Next job is to whack it all the ingredients into a bowl and get stuck in with your hands till everything is well combined.

At this point I weighed out the mixture and formed into a “burger” shape. I weighed them out to 7oz per burger. If there all the same weight then you can ensure that the cooking times are the same if your cooking more than one at a time.
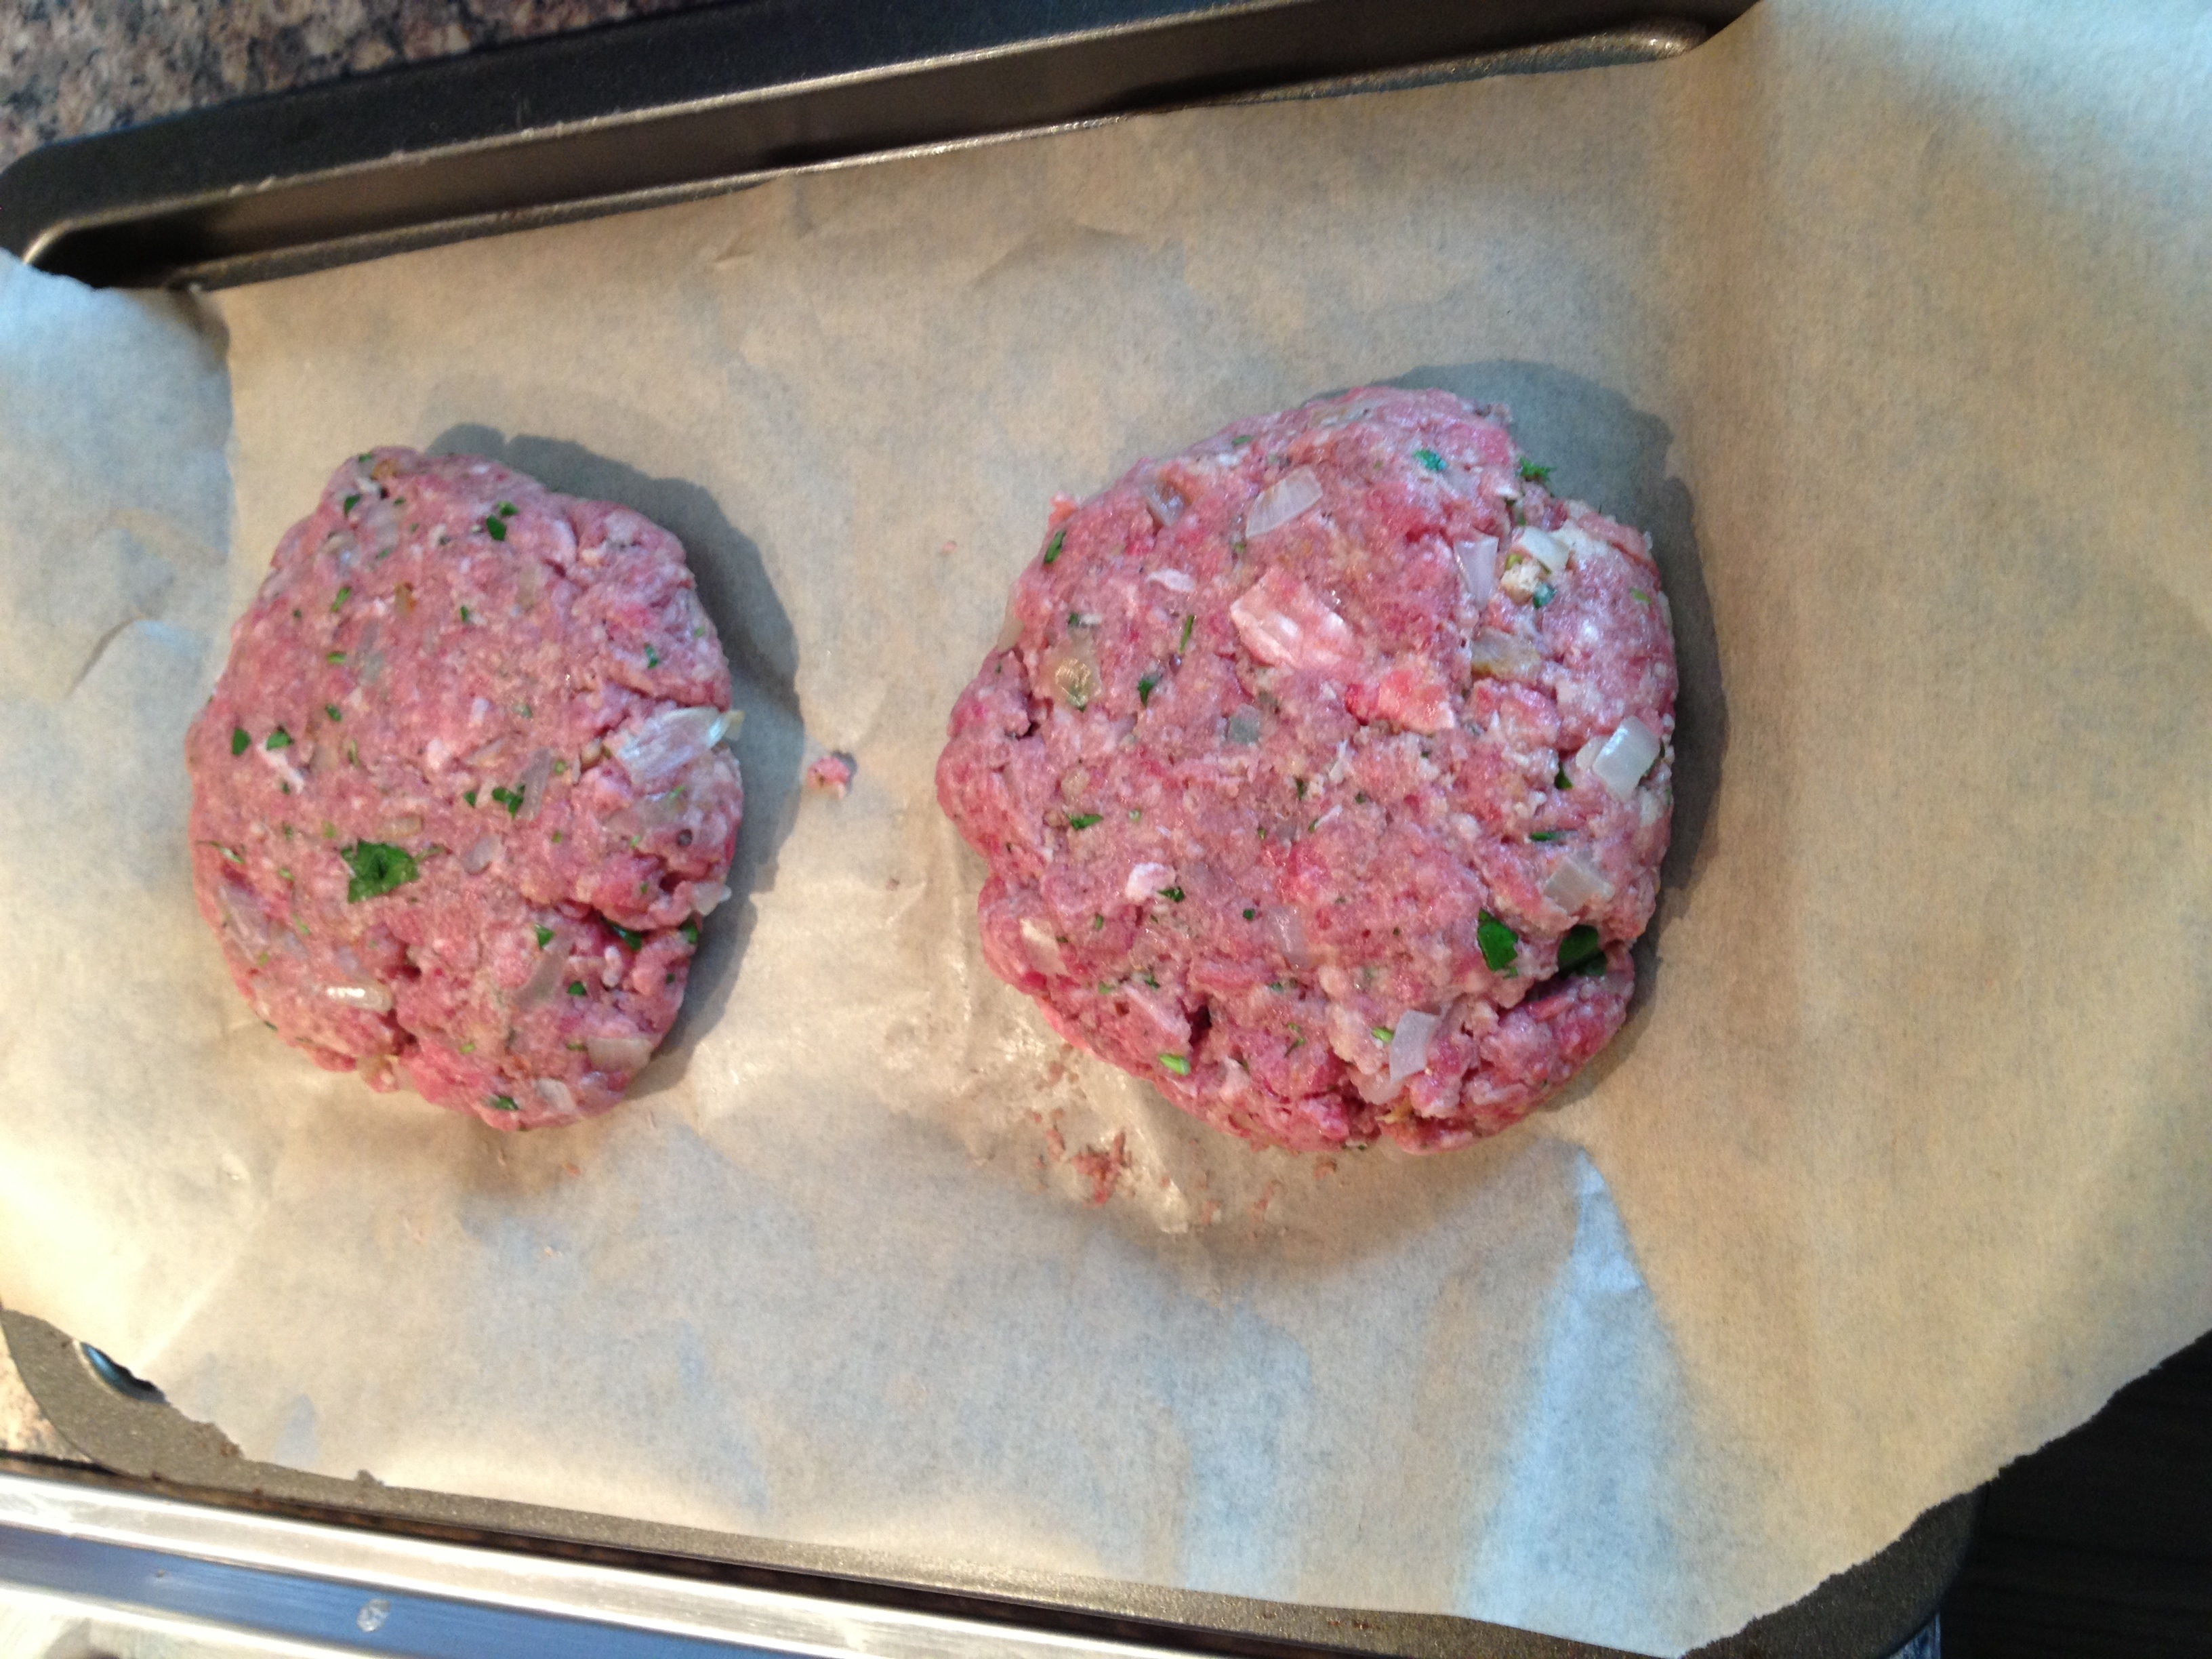
Chill in the fridge until your ready to cook.
I’m only cooking two burgers, so for the other ones I’ve just put them in plastic tubs and put them in the freezer for whenever I fancy them again.

Heat a cast iron griddle pan up on a high heat, turn on your extraction to full and open every single window in your kitchen. I’m not gonna lie, it’s going to smoke. The reason I’m doing it this way is because the high heat of the pan will make a crust on the burger, which is what you want ( obviously according to mr Burger Boffin). If you don’t fancy the drama of a smoke filled kitchen, use a regular pan, seal off your burgers and then chuck the pan in a preheated oven (about 180 degrees). They’ll still be nice this way but this is a recipe for a MEGA burger, so I’m sticking with boffins and drama and going with the griddle pan.
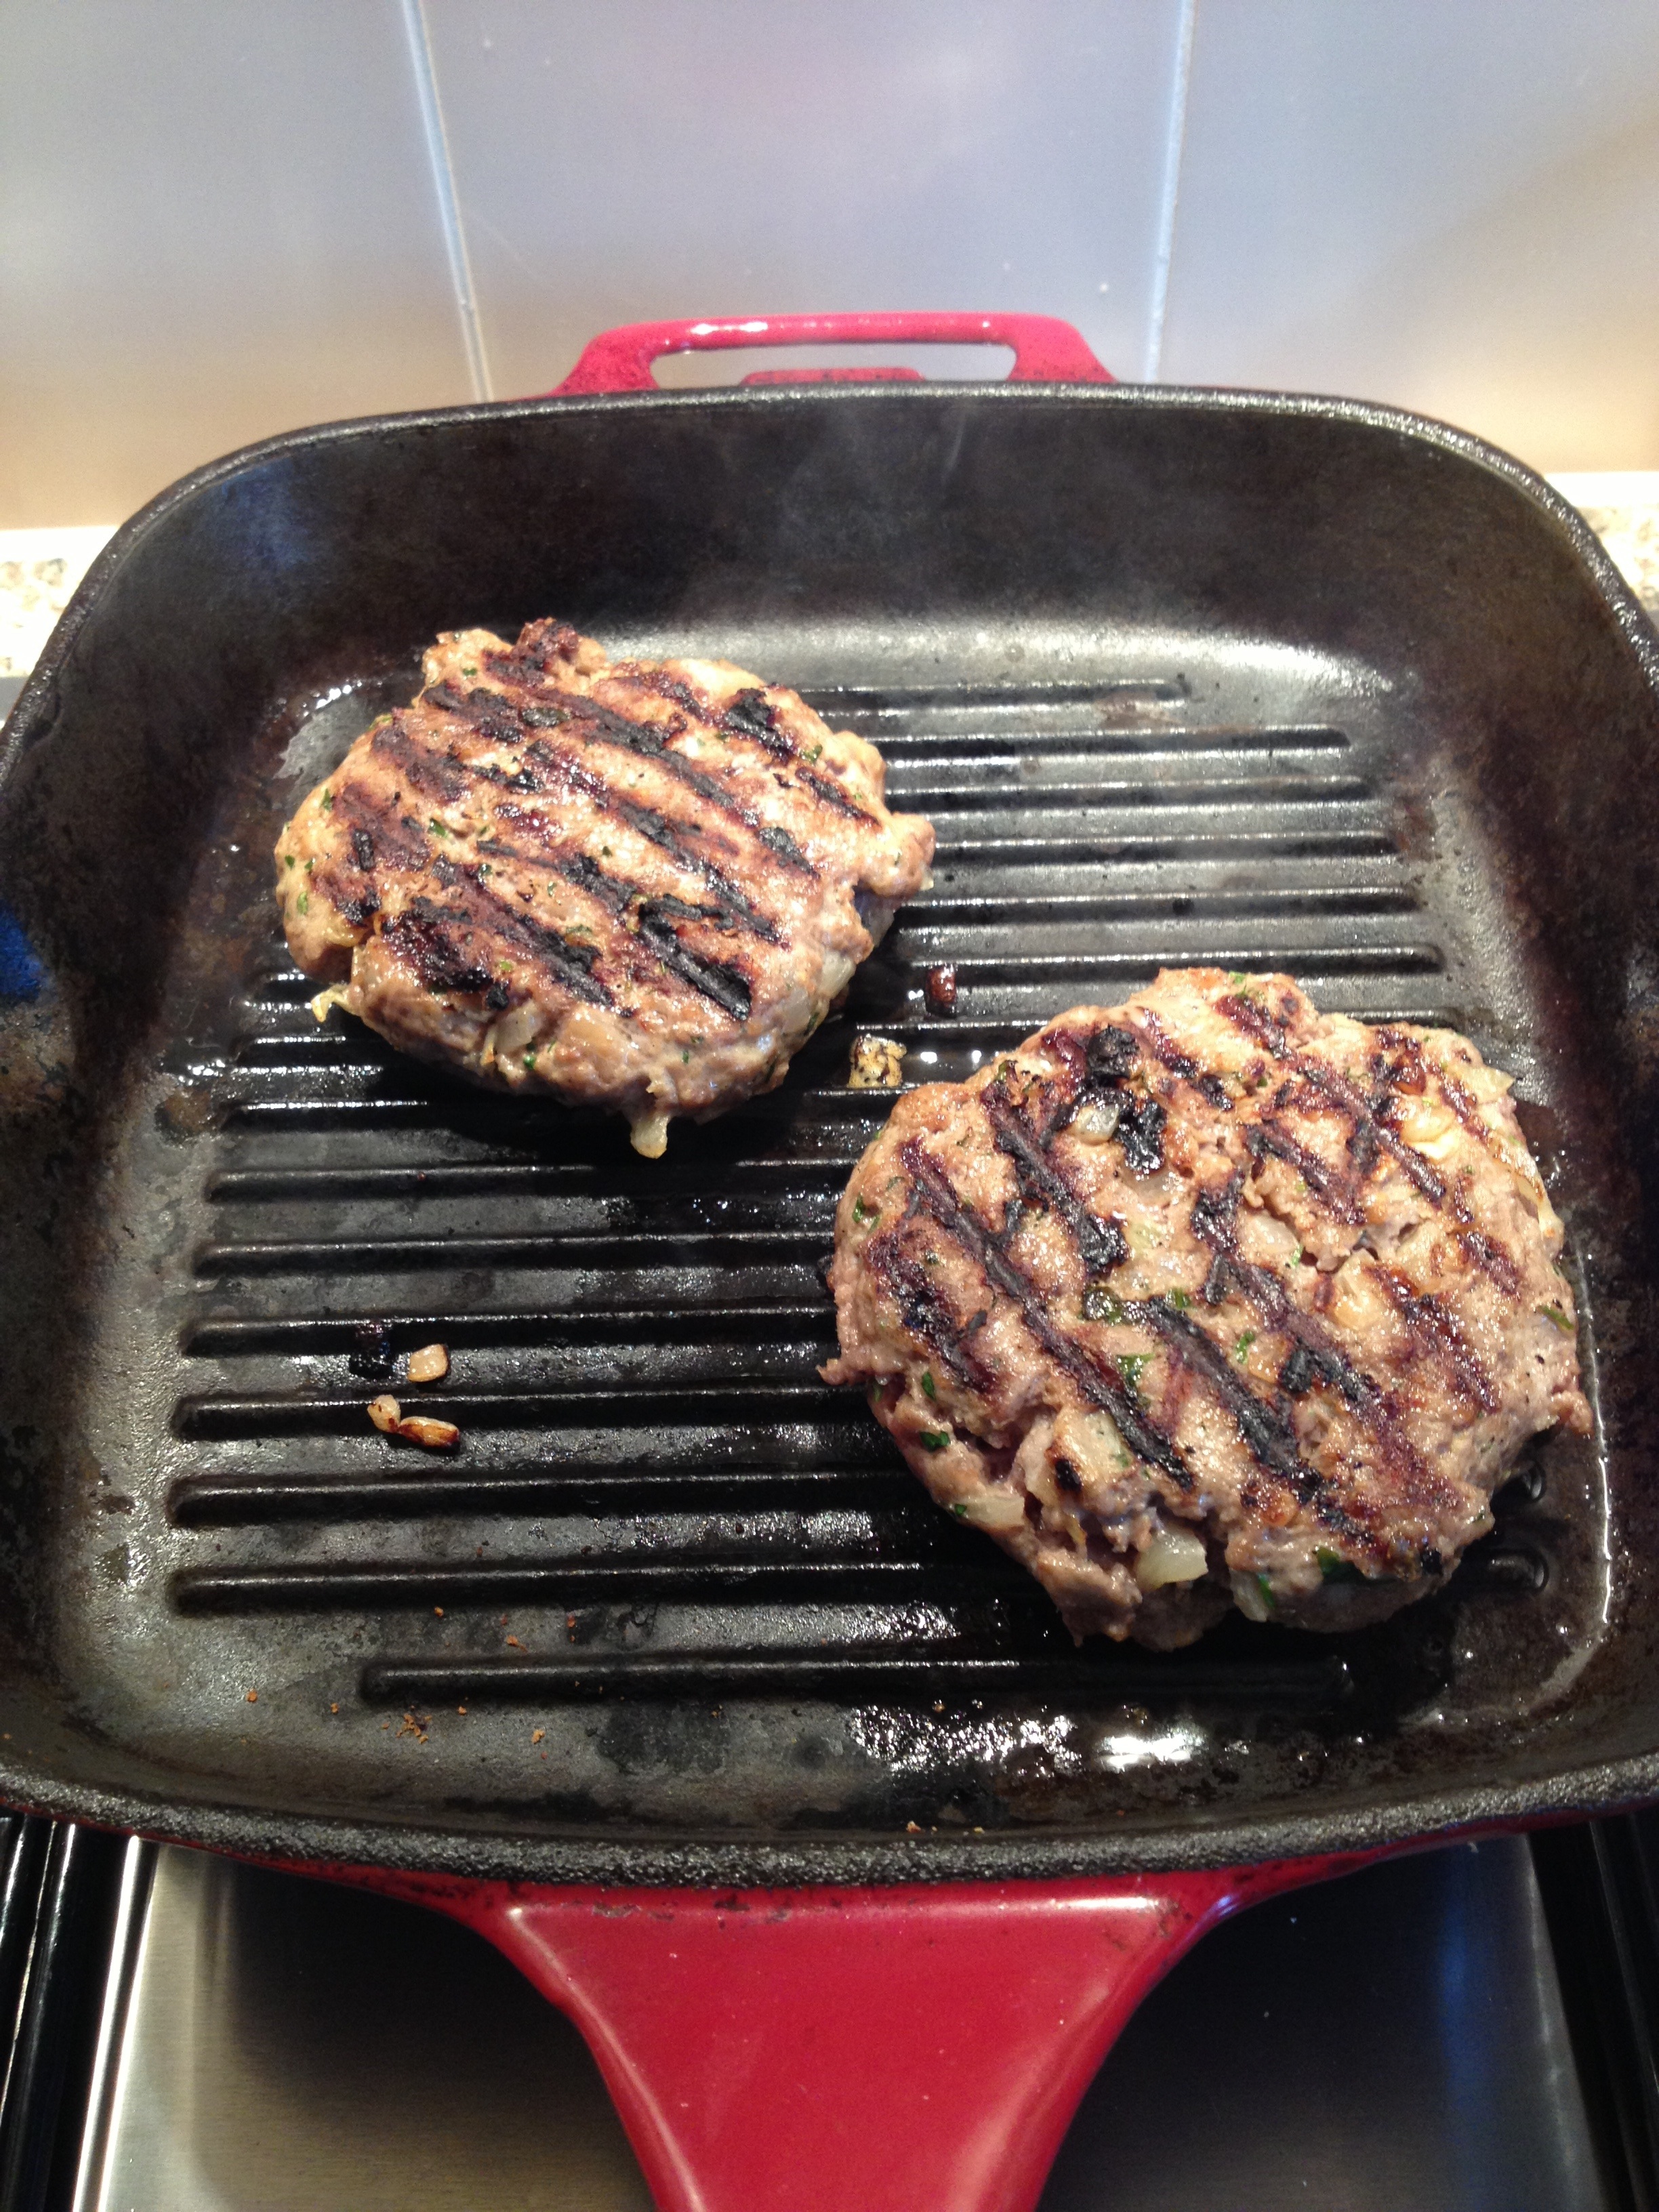
Also because these burgers are made from steaks, you can cook them how you like. I recon its gonna be about 3-4 mins a side for a medium rare- medium, and 8 mins plus for a fully cooked burger. I’d go for a medium to medium well on this occasion just because you’ll want to render a bit of the fat in the burger. If your going for the oven method, after sealing the burgers go for about 6-7 min sort of time for medium, just keep checking on them. The firmer they are to the touch the more cooked they are. You’ll be going for a slightly firm feeling but with some bounce back. I’ve you’ve got a kitchen thermometer, its 65 degrees for med. Failing that just cut into it and have a look.
Just before the burgers are done, toast the burger buns in the griddle pan and put some cheese on top of the burgers to melt slightly.
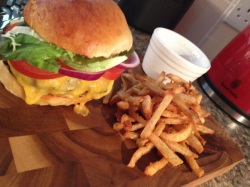
You can serve whatever you like in your burger but for me it’s got to be lettuce, red onion and tomato, and some burger sauce. Visually it’s colourful and attractive, and its just a classic combination that works.
Serve with the fries and a side pot with some more of the burger sauce in it and bobs your uncle. 
One MEGA Gourmet Burger.
We fancied something a little different for tea and were trawling round the supermarket looking for inspiration. We came across a ‘mac n cheese’ packet mix and my partner expressed interest in getting a few of those for the occasion.
Now I’ve never made mac and cheese before so as ever I jumped at the chance to give it a go myself. Here’s what went down….
Half a bag of macaroni
1 onion
1 clove of garlic
Knob of butter
Spoonful of flour
Around 4 different cheeses* (250g in total)
Cup of milk
Creme freiche
S and P
Cayenne pepper
*Note: There will be a million different recipes online for mac n cheese all telling you that a specific cheese is needed or whatever. Don’t buy into it. Just either use what you have left over in the fridge or do as I did and raid the ‘reduced’ section of the supermarket. You can guarantee there is nearly always a bit of cheese that’s nearly out of date or whatever in there from the deli counter. It’s bucket loads cheaper than getting specific this and that. Sure it will taste different dependant on what cheese you get but get what you like. Just use common sense, theres no point getting a ‘blue cheese’ for example, just because its reduced knowing you don’t like it, that’s just silly.
Method
Boil the pasta till ‘Al dente’ or ‘firm’ then set aside
Fry the onion in the butter till translucent and crush in some garlic when there nearly done.
Stir around for 30sec to a min then add a spoonful of flour and cook out for a few mins to get rid of the raw flour taste
Continue to add the milk and whisk till thickened.
Off the heat add most of the cheese ( I used Irish cheddar, Cheshire and mozzarella cheeses) and carry on whisking in till smooth. Add back to the heat if necessary, this will melt the cheese. Don’t worry if its too thick.
Once combined, add the creme freiche, cayenne pepper and season to taste.
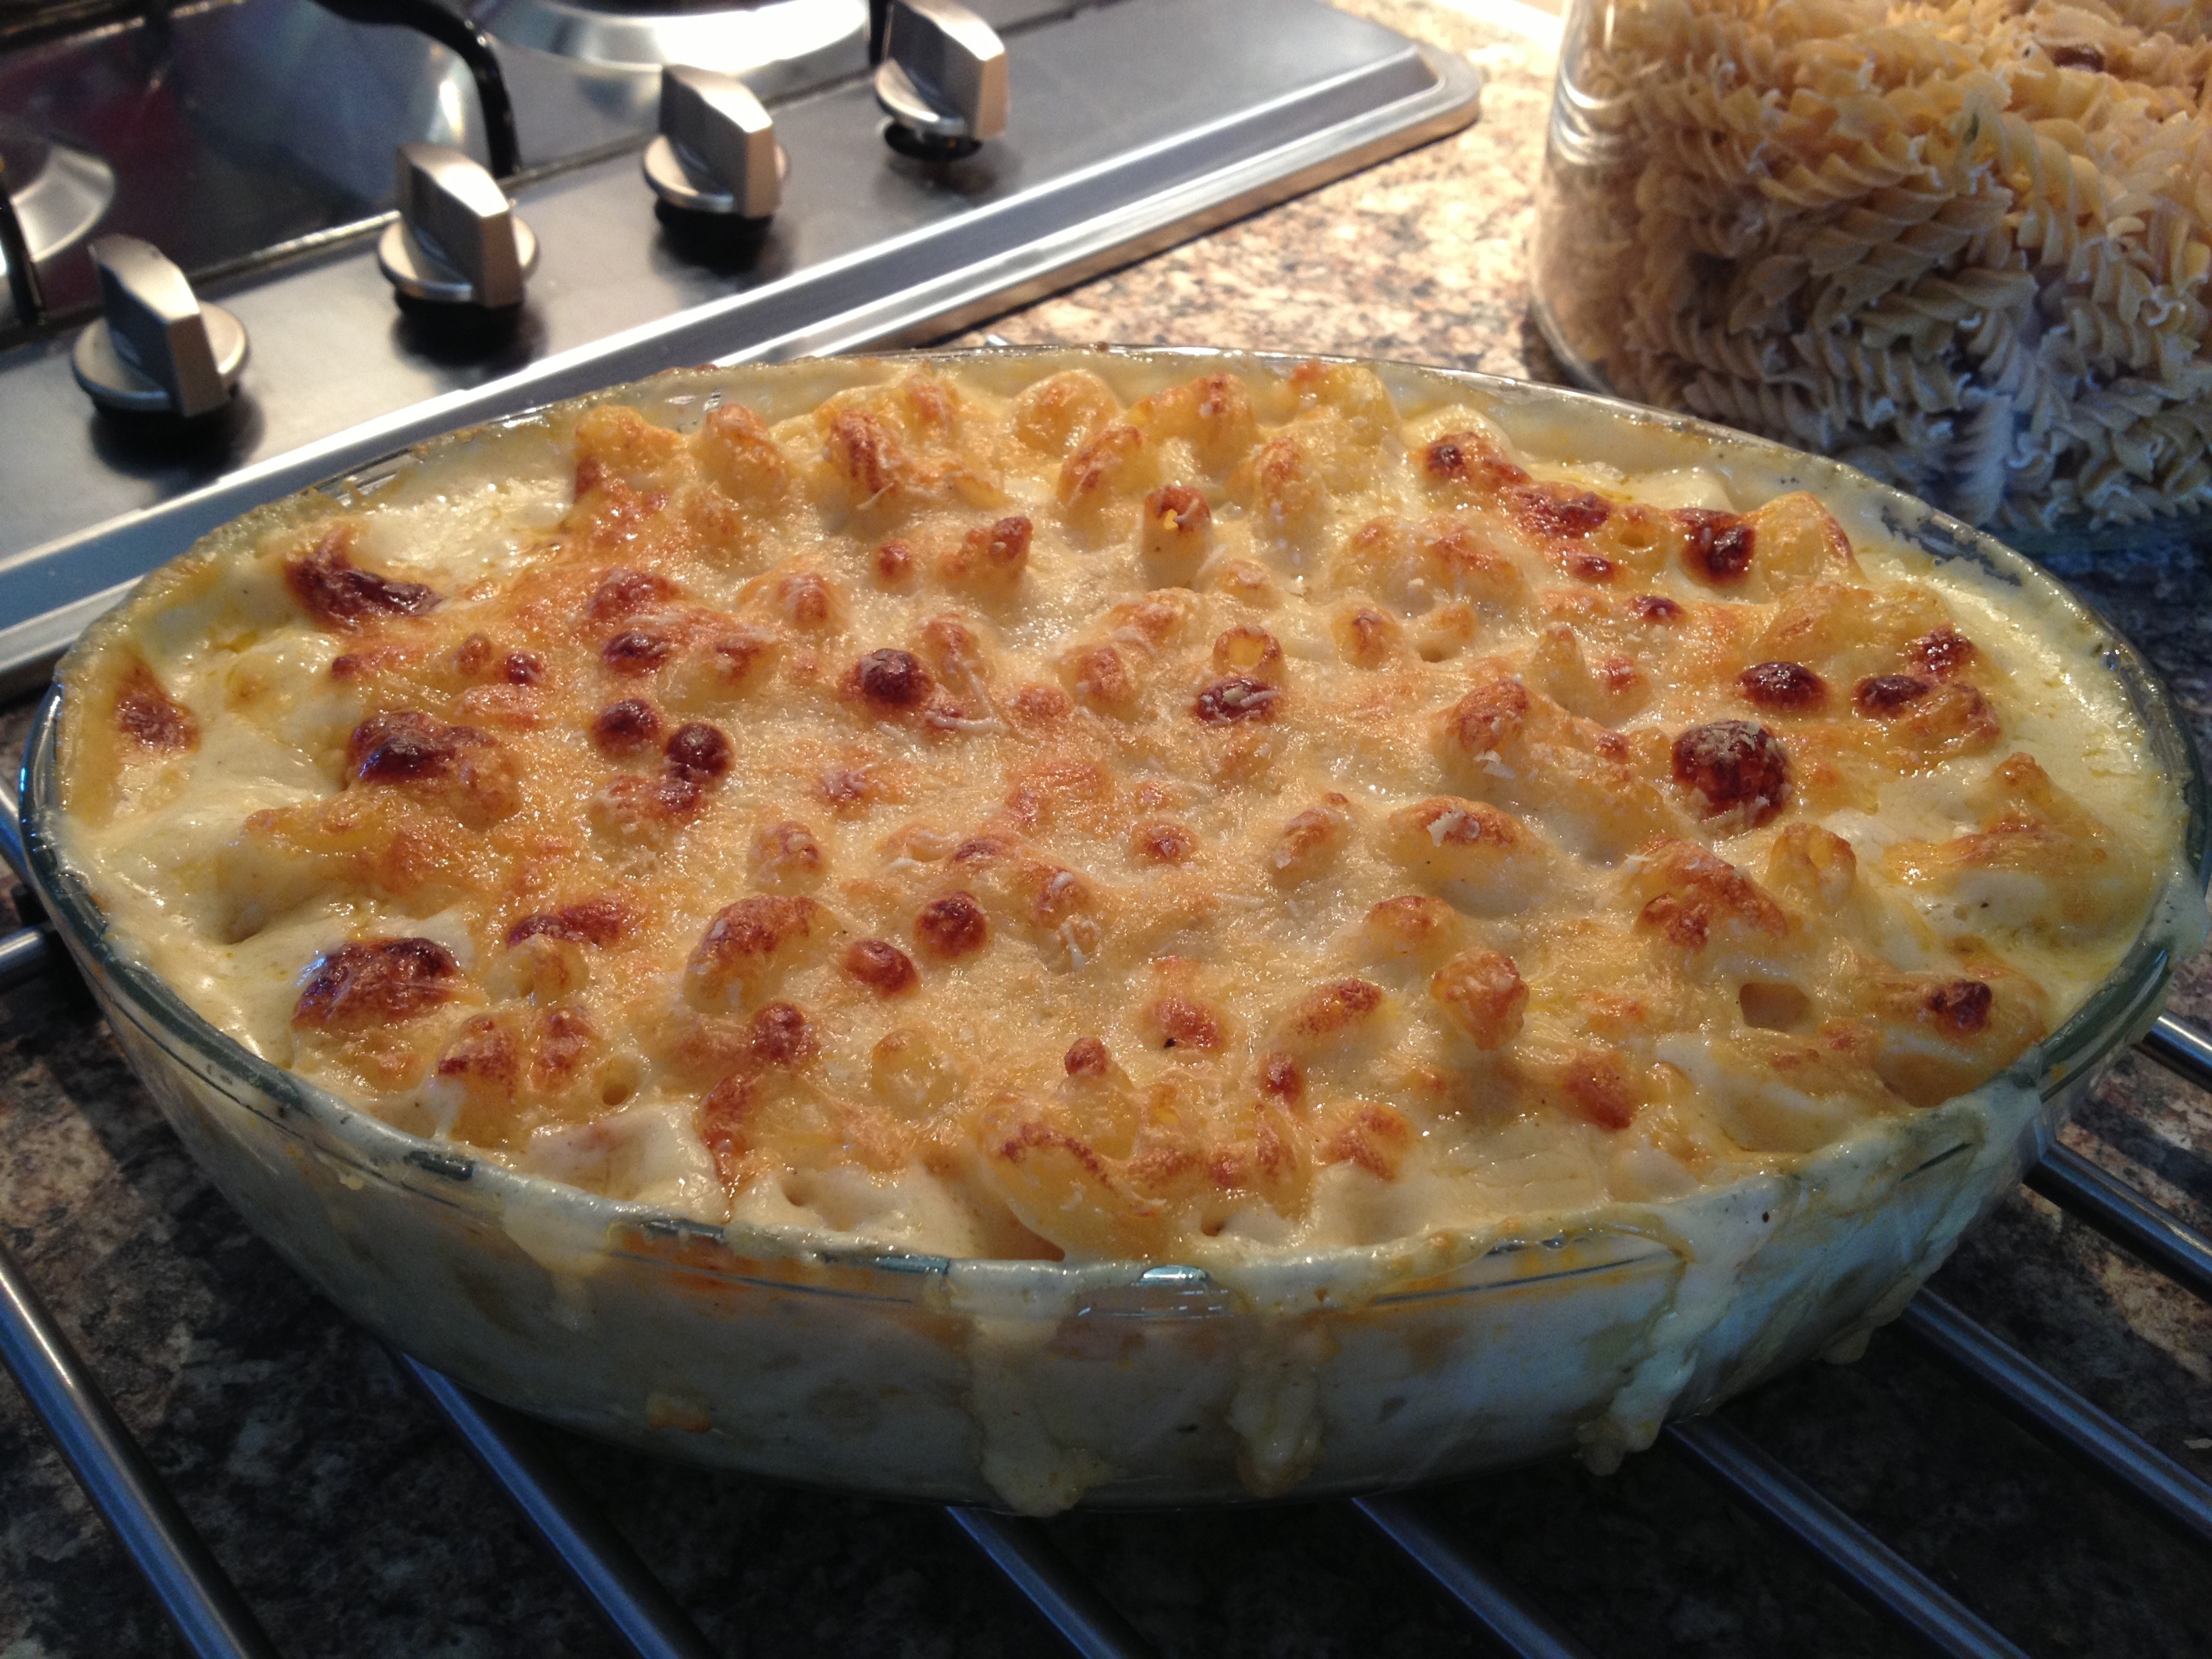
Add the cooked macaroni to the cheesy sauce then mix well and decant into an ovenproof dish.
Grate over the remaining cheese ( I had some Parmigiano regianno in the fridge so I used this instead).
Bake for about 30-40 mins at 175 degrees C or until golden brown on top.
Give it a bit of time on the side out of the oven before serving and enjoy!!!!!

I think the BBCs Great British Bake Off has started everyone baking. And I’m no exception. I even went baking mad for a month and applied for the show (all to no avail unfortunately).
I also ended up buying Paul Hollywoods how to bake book and have been slowly been working my way through the book, having a go at pretty much all of the stuff in it. I made croissants the other week and they were fantastic, extremely time consuming for a batch of 12 but it was worth it.
The next recipe was Pain Aux Raisins, just as time consuming ill admit but based on the success of the croissants I’m giving it a go. Here’s what I did:
*Before I begin with the recipe ill make it perfectly clear that from starting out to the end product, you are talking 2 days. It will become apparent why but make sure your prepped with a ten ton of patience before you start tackling this beast of a recipe.
Right, firstly you’ll need to make the base dough:
500g strong white bread flour
10g salt
80g caster sugar
10g instant yeast
2 medium eggs
90ml cool water
125ml tepid full fat milk
250g butter
Get a mixer with a dough hook attachment at the ready and place the flour, salt, sugar and yeast in the bowl making sure the salt and yeast are at opposite sides of the bowl. Then add the eggs water and milk and mix on a slow speed until well combined. Knock the mixer up to a medium speed and carry on ‘kneading’ the dough for around 6 more minutes.
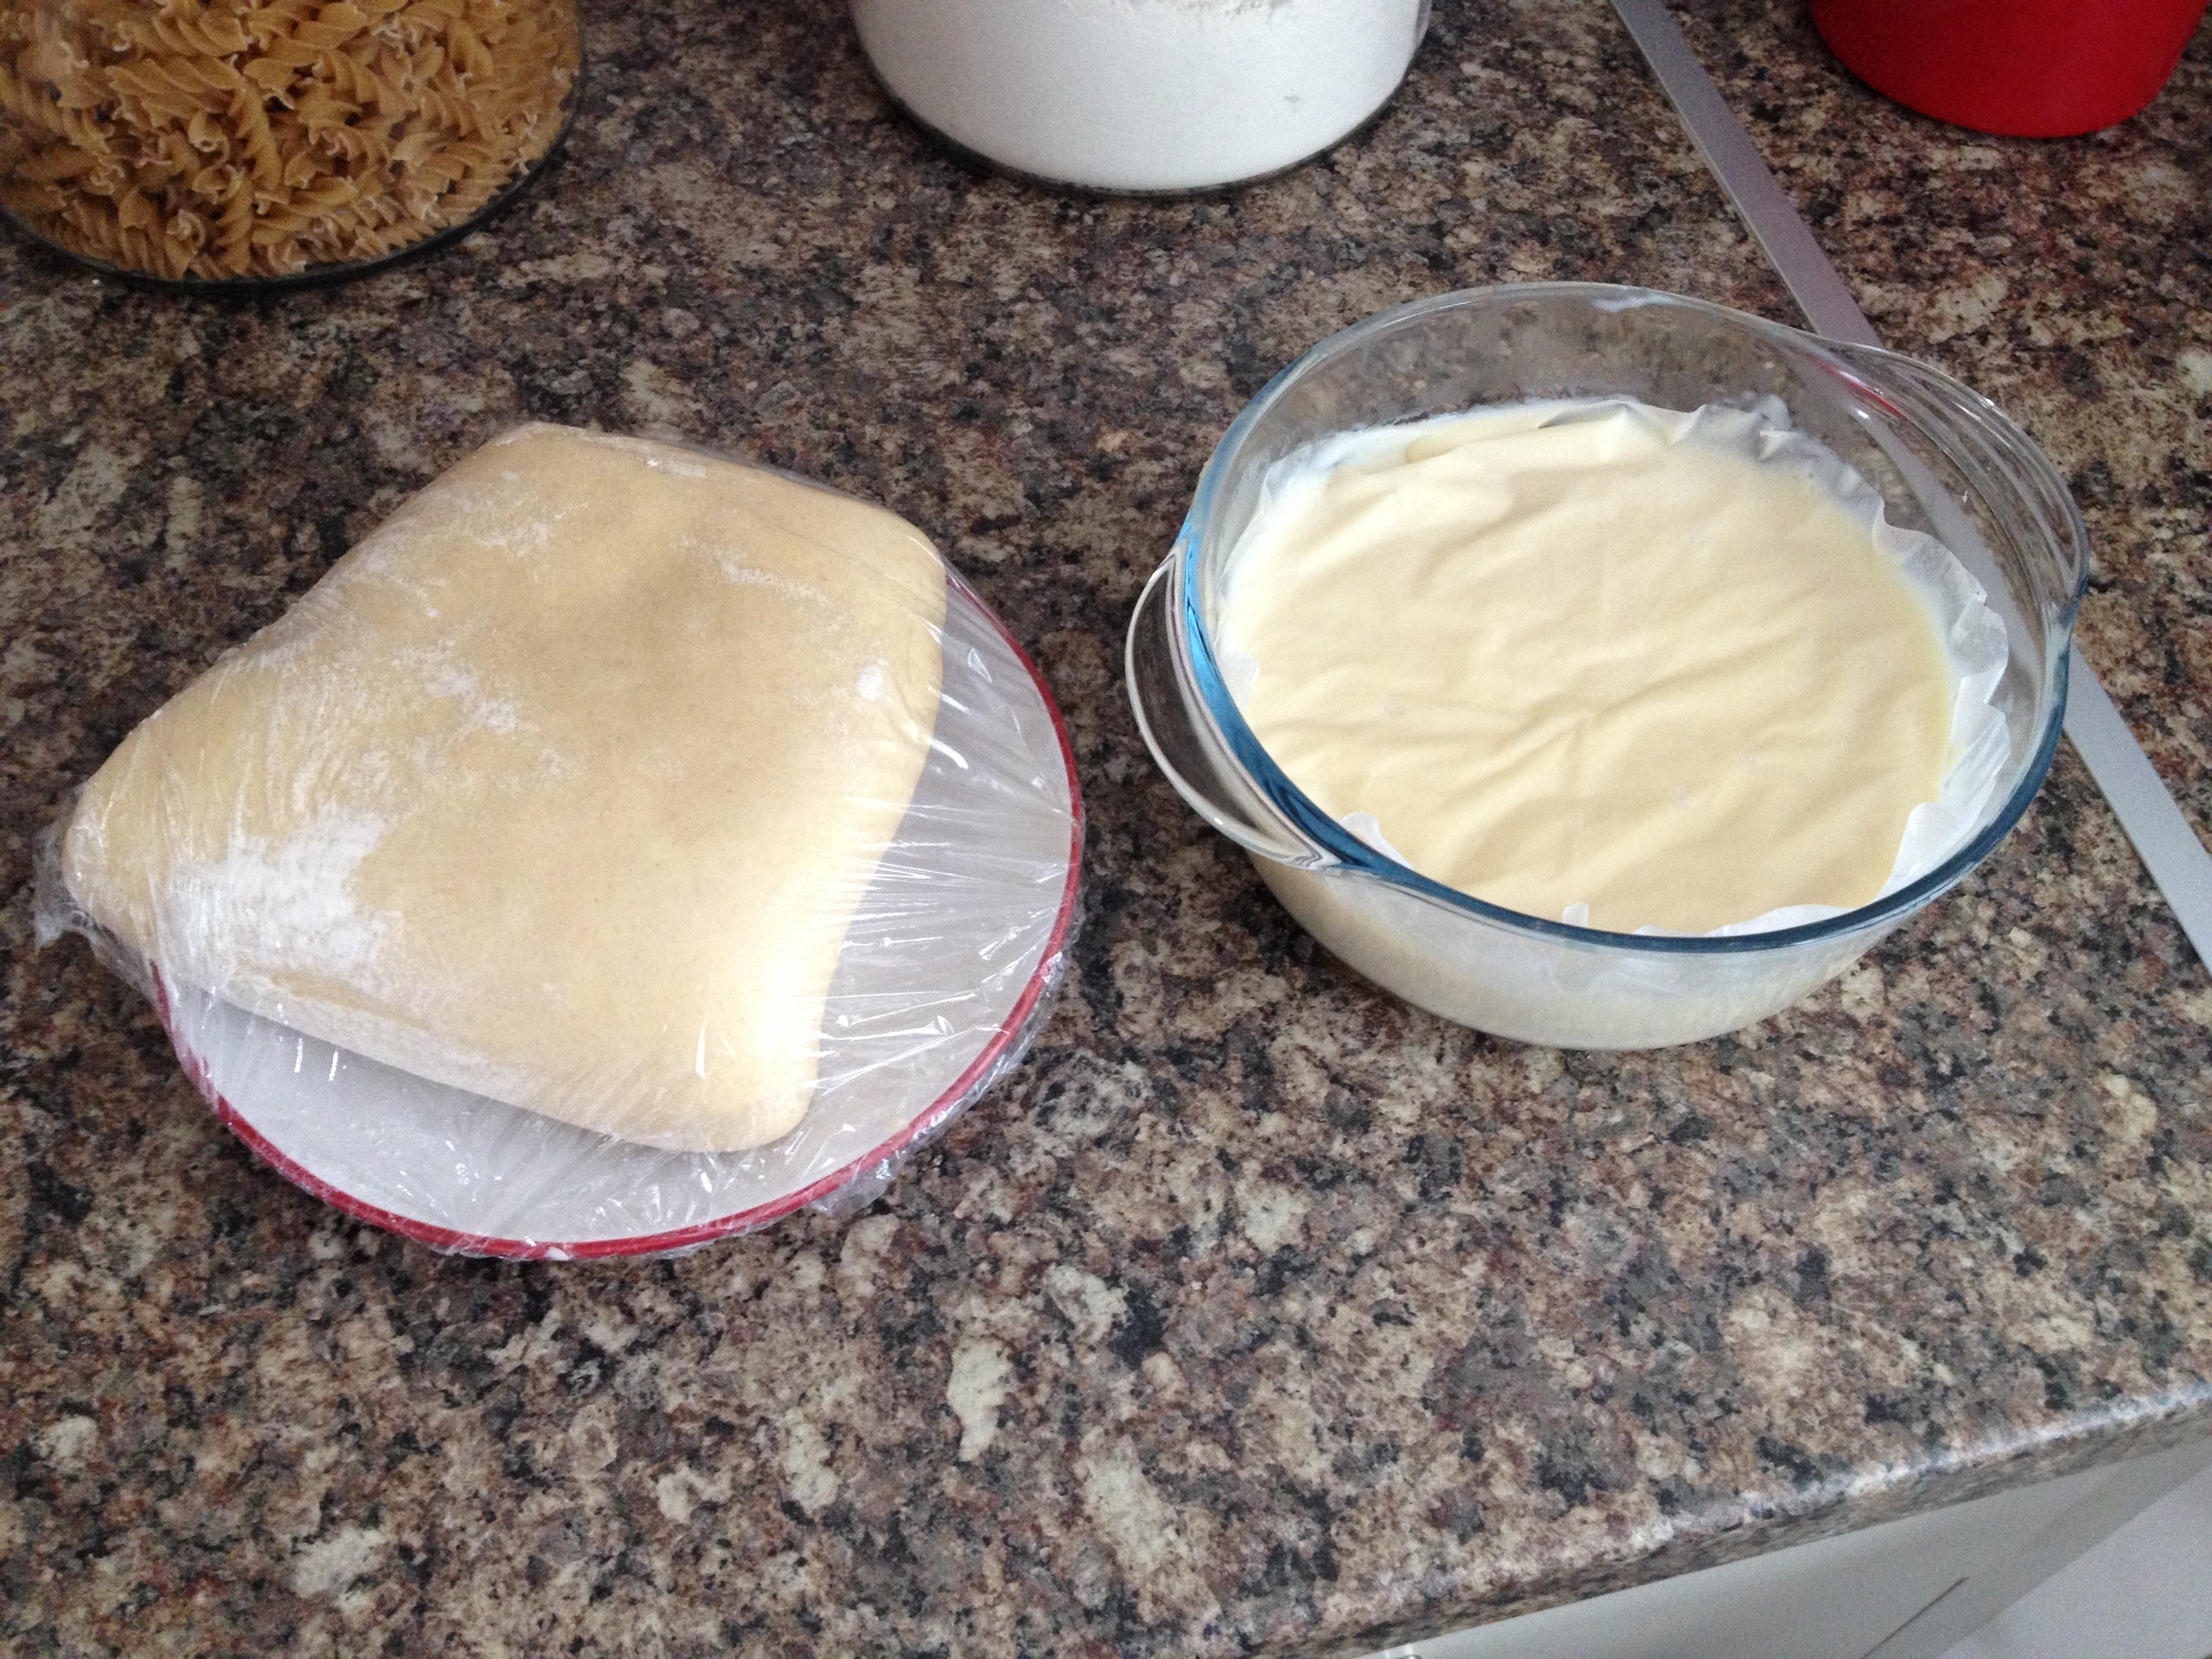
Tip the dough out onto a lightly floured surface and shape into a ball. Dust with flour and place in a plastic bag and chill In the fridge for an hour.
After chilled, roll out the dough into a rectangle, about 50x20cm and 1cm thick. Then flatten the butter between two sheets of grease proof paper with a rolling pin to about 33x19cm. Lay the butter so that it covers the bottom two thirds of the dough.
Fold the exposed dough over one third of the butter. Now gently cut the visible bit of butter and place it on top of the bit of dough you just folded down. Fold the bottom half of the dough back up on top of the butter to create like a sandwich layering with two layers of butter and 3 of dough. Pinch the edges to seal in the butter and put back in the plastic bag and chill in the fridge for another hour.
Once again, after rested place the dough on a lightly floured surface and roll out to 50x20cm as before making sure the short end is facing towards you. This time fold up one third of the dough and then fold the top third down on top. This is a single turn. All in all you’ll need to do at least 3 but you’ll need to chill the dough after each ‘turn’
Once all the ‘turns’ are done leave the dough to rest overnight in the fridge to rest and rise slightly. After this it’ll be ready to use.
This is the most laborious part of the recipe done. It’s quite similar to making puff pastry with the layers. In Paul’s book there were the addition of pictures which showed a step by step guide of how to do it, I know I’d have struggled without them (not going to lie).
So, back to the next step. The crème patisserie.
100g caster sugar
4 medium egg yolks
40g corn flour
500ml full fat milk
1.5 tablespoons of good vanilla extract (it says use 2 pods in the book, and you can, I just used a good vanilla extract because it was in the cupboard, plus it’s too expensive for pods these days, let alone 2!!!!)
40g butter
Right, whisk the sugar, egg yolks and cornflour together till well combined.
Whisk in the milk and vanilla extract and put into a saucepan and heat until thickened. Just remember that once it cools its going to be thicker than in the pan so take it off before you think you should.
Pass the mix through a sieve, make a cartouche then place on top to stop a skin forming and chill in the fridge to completely cool.
These are the main two elements for the Pain Aux Raisins, and are skills to make In themselves to be honest. The assembly of the ingredients has yet another skill: The Roll.
For the Pain Aux Raisins themselves you’ll need:
The base dough
The crème patisserie
225g raisins
1tsp ground cinnamon
2 medium eggs, beaten
150g apricot jam to glaze
200g icing sugar
2 tbsp of water
Finely grated zest of 1 lemon
You start with the rested dough. Cut it in half and roll out to a rectangle so that the long edge is facing you. Press down the bottom edge of the pastry to the worktop. This bit isn’t in the book but I’ve seen it somewhere and I’m telling you it makes the rolling of the dough soooooooo much easier.

Smear half of the crème patisserie over the dough leaving a 5cm gap along the near edge then add half the raisins on top along with a sprinkle of cinnamon on top of that.

And so, time for the roll.
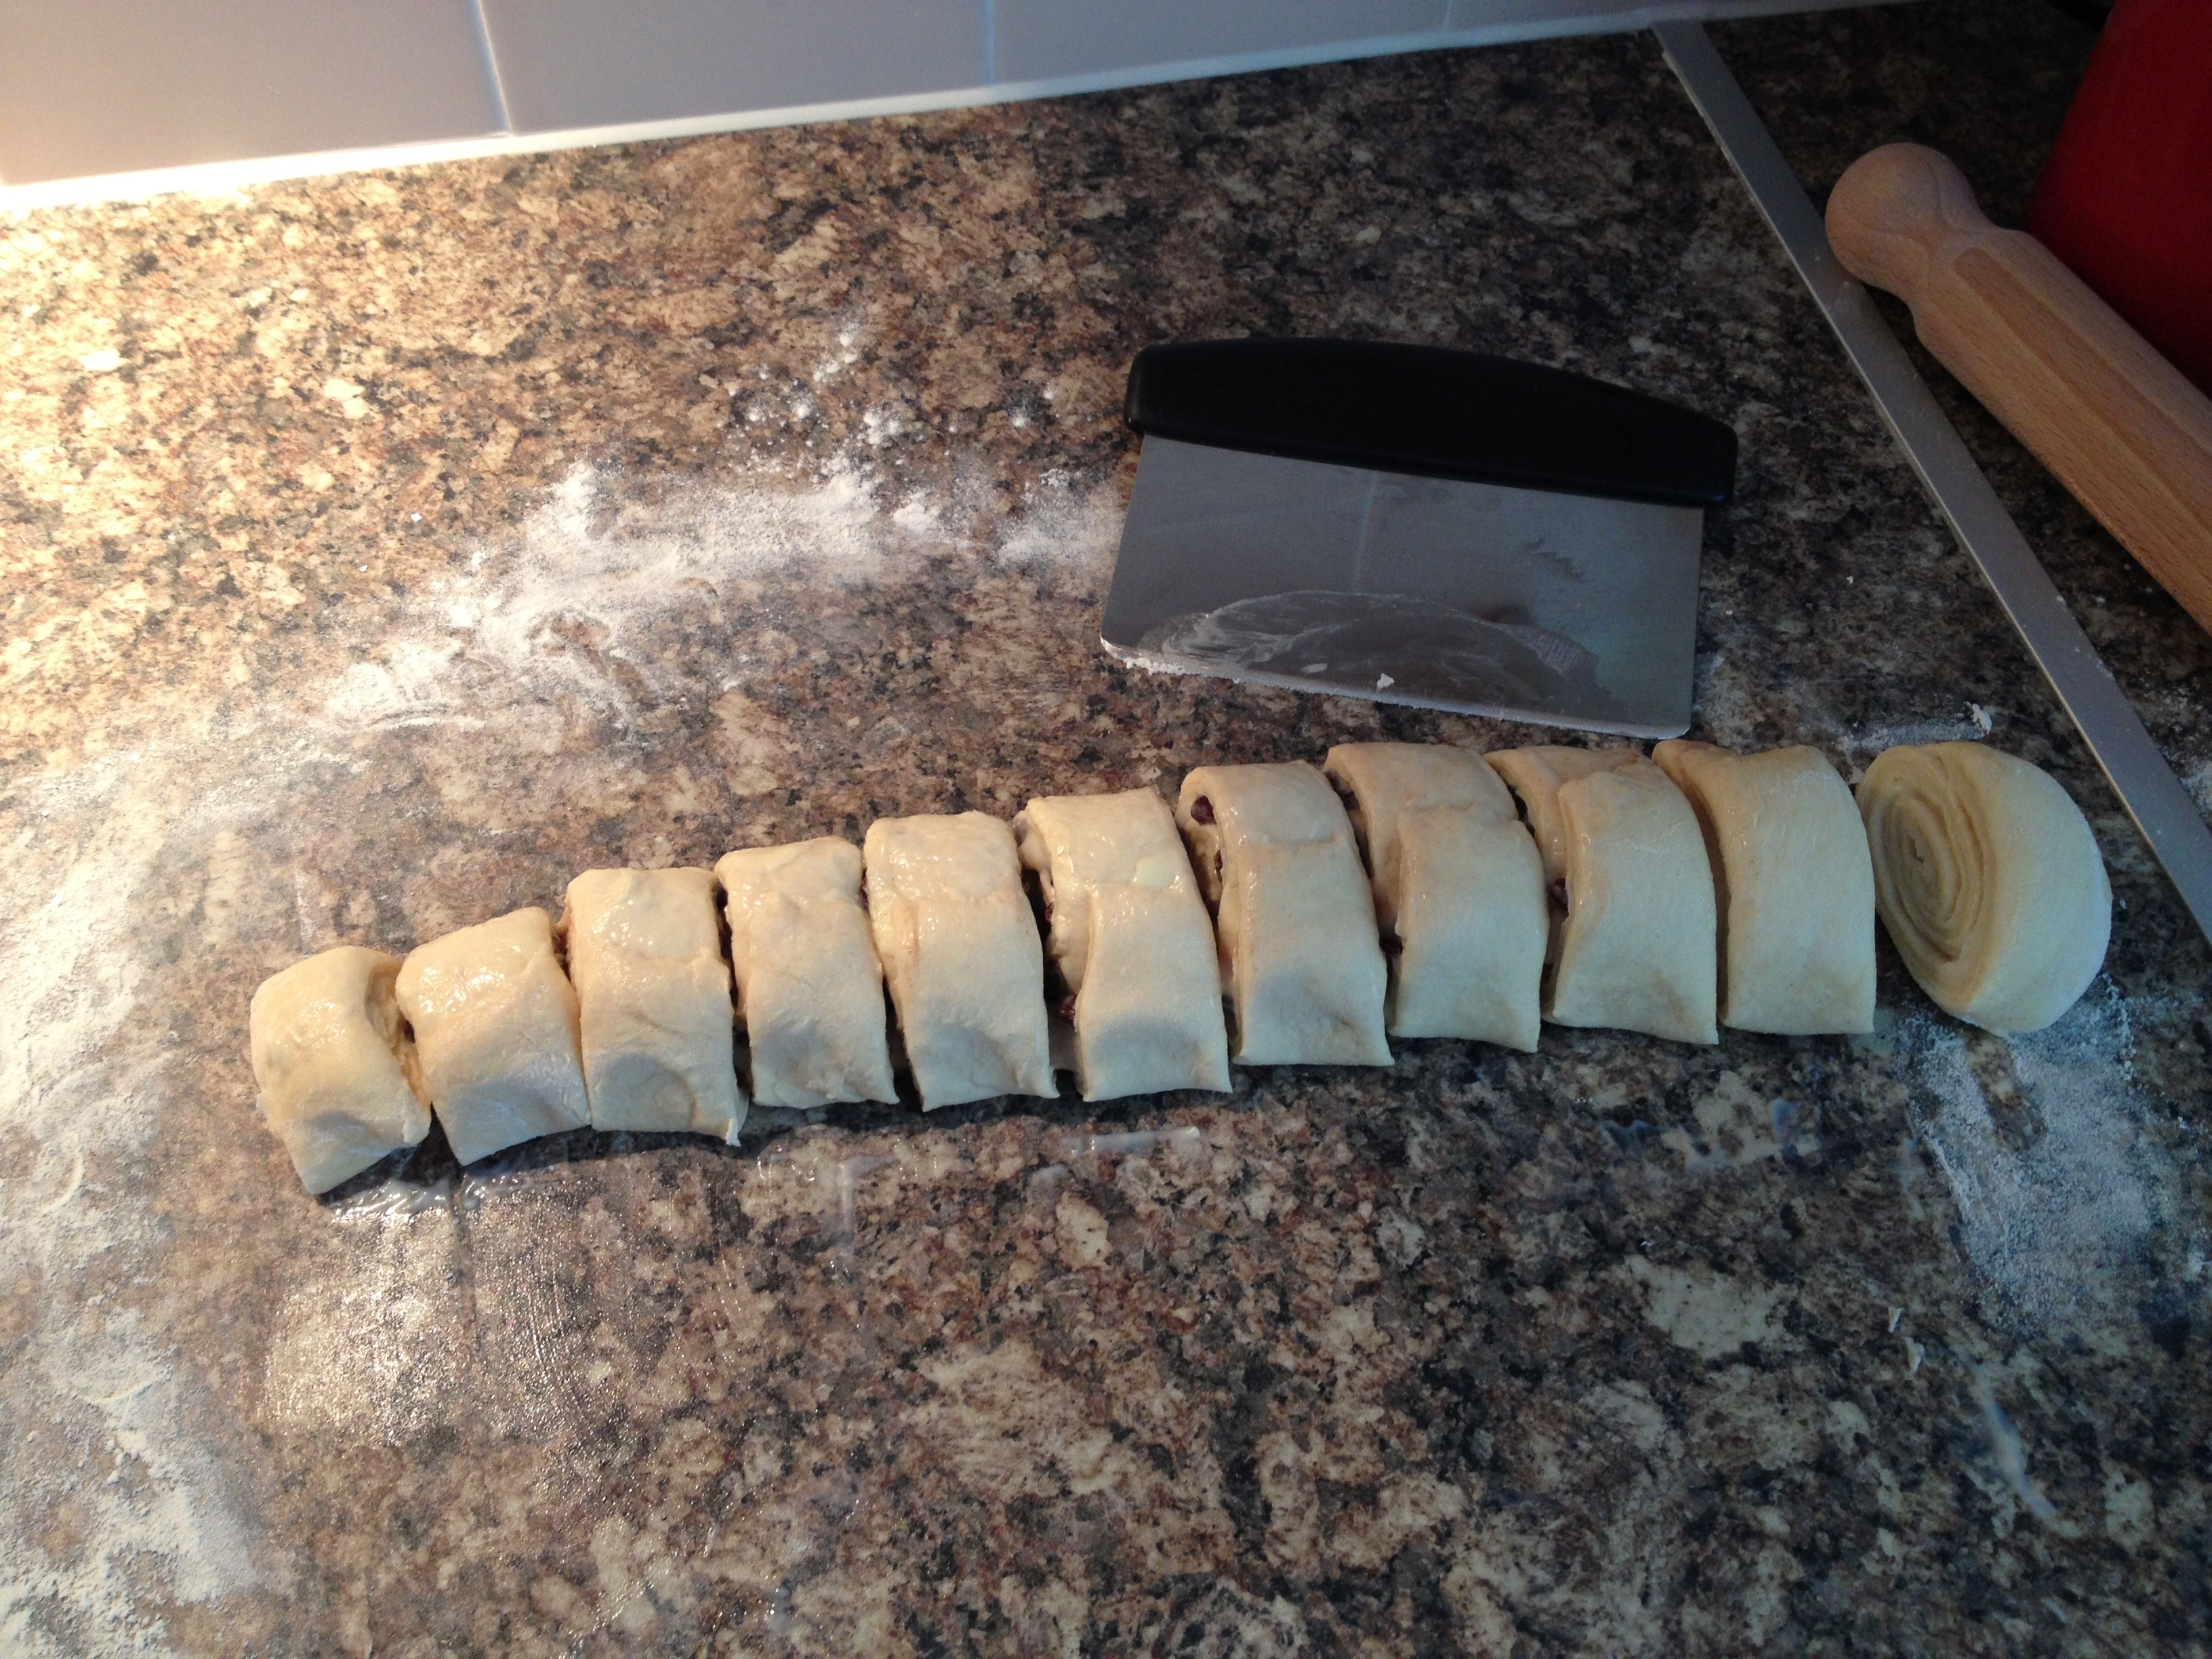
You’ll need to keep tension on the roll so that its as tight as possible (this is where pressing one side of the dough to the worktop helps so much). Each time you do a roll, give it a gentle tug towards you to tighten the roll and keep that tension against the pressed side of the roll. Once rolled all the way, roll it back and forth a few times to seal the join. Repeat with the remaining ingredients.

When you have both rolls completed, cut the rolls into 3cm slices and lay the cut side up and apart on the lined baking trays and leave to rise at room temperature for around 2 hours.
Heat the oven to 200 degrees C and brush the risen pastries with the egg and bake for 15-20 mins until golden brown.
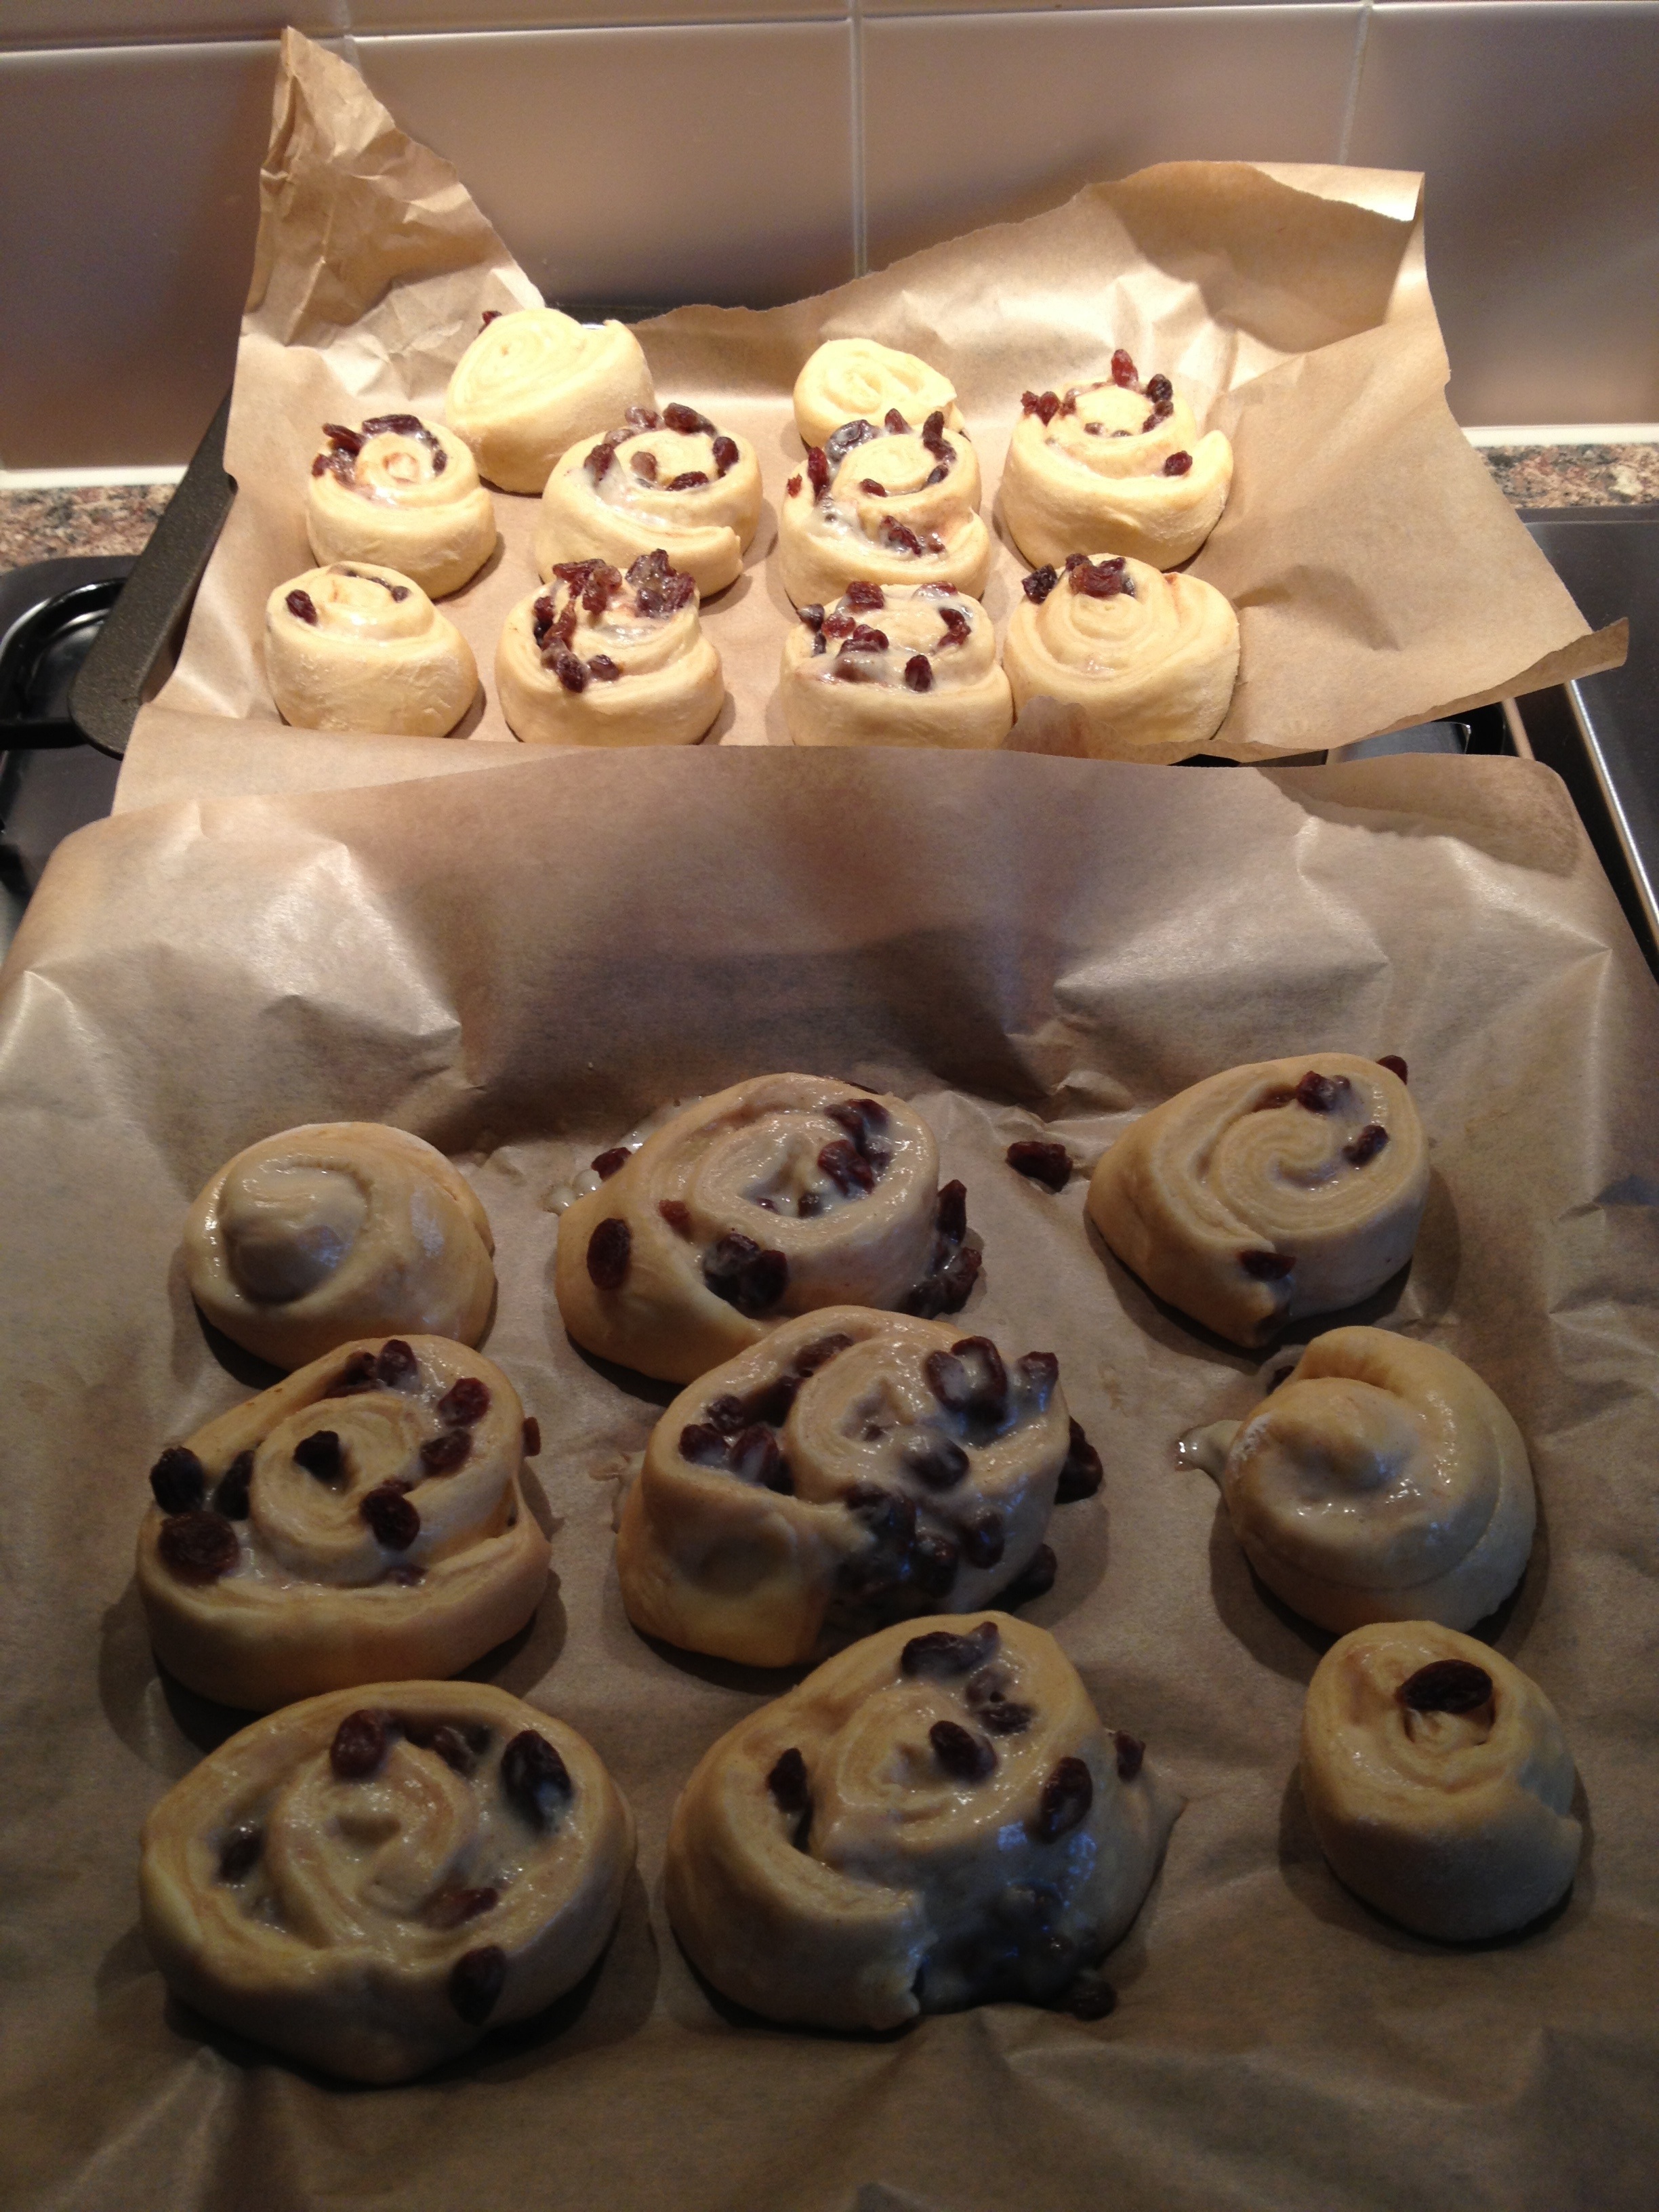
Meanwhile heat the apricot jam in a pan with a little water then sieve. As you take the pastries out of the oven, brush with the jam and move to a wire rack to cool.

Once cooled mix the icing sugar, water and lemon zest until smooth and drizzle over the cooled pastries.
I know the whole process is a massive effort but its totally worth it. Not too shabby for my first attempt either…….

